If you struggle with keeping tabs on your financial documents or feel absolute resentment just at the thought of manually extracting information from tables, fear not. Many more businesses, just like yours, have to deal with processing tabular layouts daily.
While this task is a recurring practice, there hasn’t been a solution to efficiently improve the process of extracting and processing tables and tabular layouts. Or so you thought.
Thankfully, there is a more efficient solution available. By utilizing OCR and AI technology, businesses can extract information from tabular layouts in record time, whether it’s from paper documents or digital files. In this blog, you will learn about table extraction and the challenges of undergoing this process manually. We’ll walk you through how to overcome these issues in just a few steps, using an Intelligent Document Processing (IDP) platform from Klippa.
Let us begin!
Key Takeaways
- Manual table extraction is slow and error-prone – Processing tabular data by hand wastes time and risks data inaccuracies.
- IDP automates table extraction efficiently – With OCR and AI, you can extract tables from PDFs and digital documents in seconds.
- Klippa DocHorizon streamlines the process – Automate every step: from document upload to data conversion and export.
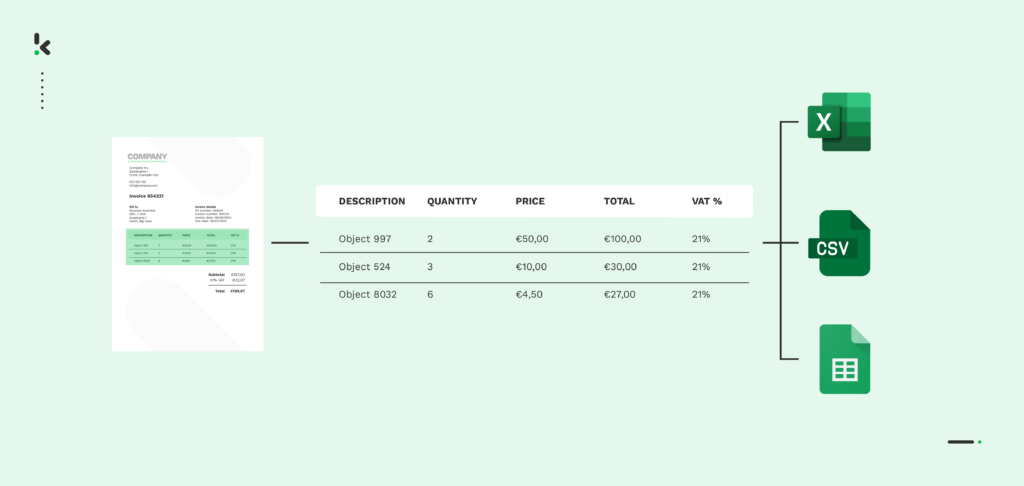
- Klippa supports multiple formats and integrations – Export table data to Excel, CSV, JSON, or connect directly with apps like Xero, QuickBooks, or SAP.
What is Table Extraction?
Table extraction is the detection and extraction of table information from a document. It involves scanning through the document, detecting, and then recognizing the table’s logical structure and content.
Very often, table extraction is done by manually typing its contents into various applications, such as Excel, accounting software, or an organization’s database. While this process doesn’t sound like too much trouble, it can cause great bottlenecks for companies.
Challenges of Manual Table Extraction
Tables are not necessarily an easy format to understand, as they can take many forms and shapes. It might not always be an Excel-looking table with numbers and values, as a table can also contain definitions and full paragraphs, without the presence of bounding boxes. Take a look at the example below.
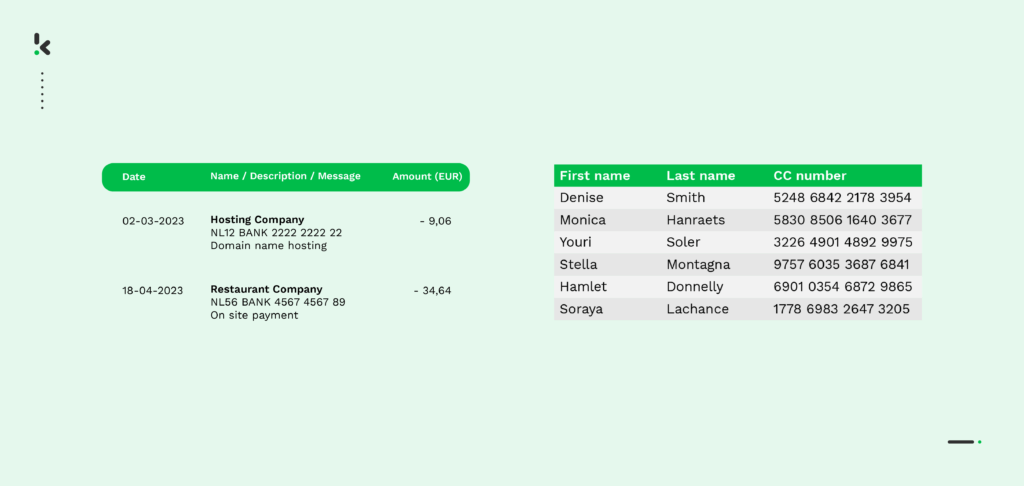
Tabular layouts can be found in a multitude of documents, for instance, invoices, credit card and bank statements, as well as salary slips. Usually, they are overcrowded with important business information, which can prove difficult to extract at times.
However, the table might be structured, and manually extracting information from tables proves to be a time-consuming and repetitive process. If not carried out meticulously, it can lead to many errors and misinterpretations, damaging the accuracy of your data. Not to mention, it also means additional time and resources spent on correcting these mistakes.
Extracting Table Information
Extracting information from tables, especially from those with the bounding-box format, is essentially key-value pair extraction. Oftentimes, tables contain a key and a value, for instance, “Total amount – €100”. This makes table extraction a fairly straightforward process.
However, having one of your employees carefully capture all information from required tables can take hours on end, adding to unnecessary workload and overhead costs. And even then, it doesn’t guarantee high precision.
IDP software, on the other hand, does not need to go through all these preparatory tasks. The OCR technology embedded in it immediately recognizes the layout of the table, no matter the placement on the document, and extracts it swiftly and accurately.
Converting Table Information
Even if you manage to manually extract all necessary information from tables, the real challenge is converting it to a suitable format or exporting it to a relevant application, such as Excel, Google Sheets, or any ERP and accounting software. As of now, many organizations struggle to copy and paste information from one Excel sheet to another or use unsecured applications to extract data from PDFs to Excel.
To simplify manual table extraction and shorten the processing times, users employ automation. Regardless of your organization’s industry, table extraction is a task that is more than likely to occur in data capturing and document processing. The document is read and converted to JSON format by default, leaving you with the option to further convert it to XLSX, CSV, or other machine-readable formats.
Scaling Extraction Processes
Let’s say your financial year was more than great, and all this important data you need to transfer to your business’s balance sheets or ledgers is still trapped in a tabular format within your financial documents. Your financial department is now sitting in front of tens or even hundreds of thousands of invoices or financial statements, trying to make sense of it all. In this case, manual processing is not going to cut it.
With the IDP solution, however, you can do it all within hours. The IDP software can read, classify, extract, and convert all your tabular data from a variety of documents in seconds, making it possible for you and your employees to face any number of documents in a much shorter time.
How to Extract Tables from PDFs, Images, and Excel
You can extract table data quickly by matching the right method to the table’s source format, whether that’s a PDF invoice, a scanned image, a spreadsheet, or a web/email table. OCR-powered tools like Klippa DocHorizon handle all formats in a single automated flow, exporting results to Excel/CSV in seconds.
Step 1: Identify Your Table Source
Before extraction, determine if your table is:
- PDF (digital invoices, statements, reports)
- Image/Scanned file (paper receipts, bank statements)
- Spreadsheet/Database (Excel, Google Sheets, SQL table exports)
- Web or Email table (HTML tables in portals or reports sent by email)
This matters because extraction accuracy and tools vary between formats.
Step 2: Choose Your Extraction Method
Step 3: Capture the Table Data
- PDF/Table tools: Drag to select table boundaries and extract as CSV/XLSX
- OCR software: Upload scanned images, and the software detects cells and exports text
- Spreadsheet functions: Apply FILTER or VLOOKUP to isolate specific rows/columns
- Database queries: Use SELECT INTO or EXPORT commands to retrieve relevant rows
Step 4: Export & Convert to Business-Ready Formats
- Common formats: CSV, XLSX, JSON, XML
- ERP/accounting integrations: Xero, QuickBooks, SAP, Zoho
- For PDFs/images, choose machine‑readable formats that preserve headers and structure
Step 5: Clean and Validate Data
- Check totals, dates, and IDs for accuracy
- Remove duplicates or empty rows before importing into accounting or BI tools
Automated solutions can do all these steps at once. For example, Klippa DocHorizon with OCR detects table layouts, captures data, exports to chosen formats, and can push results directly into your ERP or spreadsheet with zero manual work.
Step-by-Step: Extract Tables from a PDF Invoice With Klippa
In this section, you’ll learn how to seamlessly extract tables from documents and convert them to Excel. This way, you fully automate the process so manual handling becomes a thing of the past.
Klippa DocHorizon is an advanced Intelligent Document Processing (IDP) platform designed to automate document workflows across a wide range of use cases. It supports over 100 document types and formats, making it a versatile solution for any business.
We’ll guide you through a simple, step-by-step example: extracting data from a PDF invoice stored in Google Drive and converting it into an Excel spreadsheet. With our intuitive flow builder, you can create your own table extraction workflow in just 5 easy steps.
Step 1: Sign up on the platform
Start by creating a free account on the DocHorizon platform. Simply enter your email and password, then add some basic details like your full name, company name, use case, and estimated document volume. Once registered, you’ll receive €25 in free credit to explore all features and functionalities.
After logging in, set up your organization and create a project. To enable the necessary services, navigate to Project Settings -> Services. For this use case – extracting data from PDFs into Excel – make sure to activate the Document Capturing – Financial model and the Flow Builder. With this setup, you’re ready to get started right away.

Step 2: Create a preset
You might be wondering why we recommend using the Financial Model. It’s specifically designed to streamline financial workflows by automating data extraction, validation, classification, and analysis. It works seamlessly with various financial documents, including receipts, purchase orders, bank statements, invoices, and more.
Next, let’s create a new preset; this activates the components needed for your use case. For invoice processing, enable the Financial and Line Item components to extract key fields like transaction numbers, purchased items, and amounts.
Tip! You can tailor the preset to your needs by enabling additional components such as Date Details, Reference Details, Amount Details, Document Language, and Payment Details.
Almost there! Just hit Save to confirm your settings and move on to the next step.

Step 3: Select your input source
Now that you’ve enabled the Flow Builder and set up your preset, it’s time to build your flow. A flow defines the step-by-step process so the platform extracts data from PDFs and exports it to Excel.
Start by clicking New Flow -> + From Scratch, and give your flow a name. For this example, create a folder named Input in your Google Drive and upload your PDF invoices there.
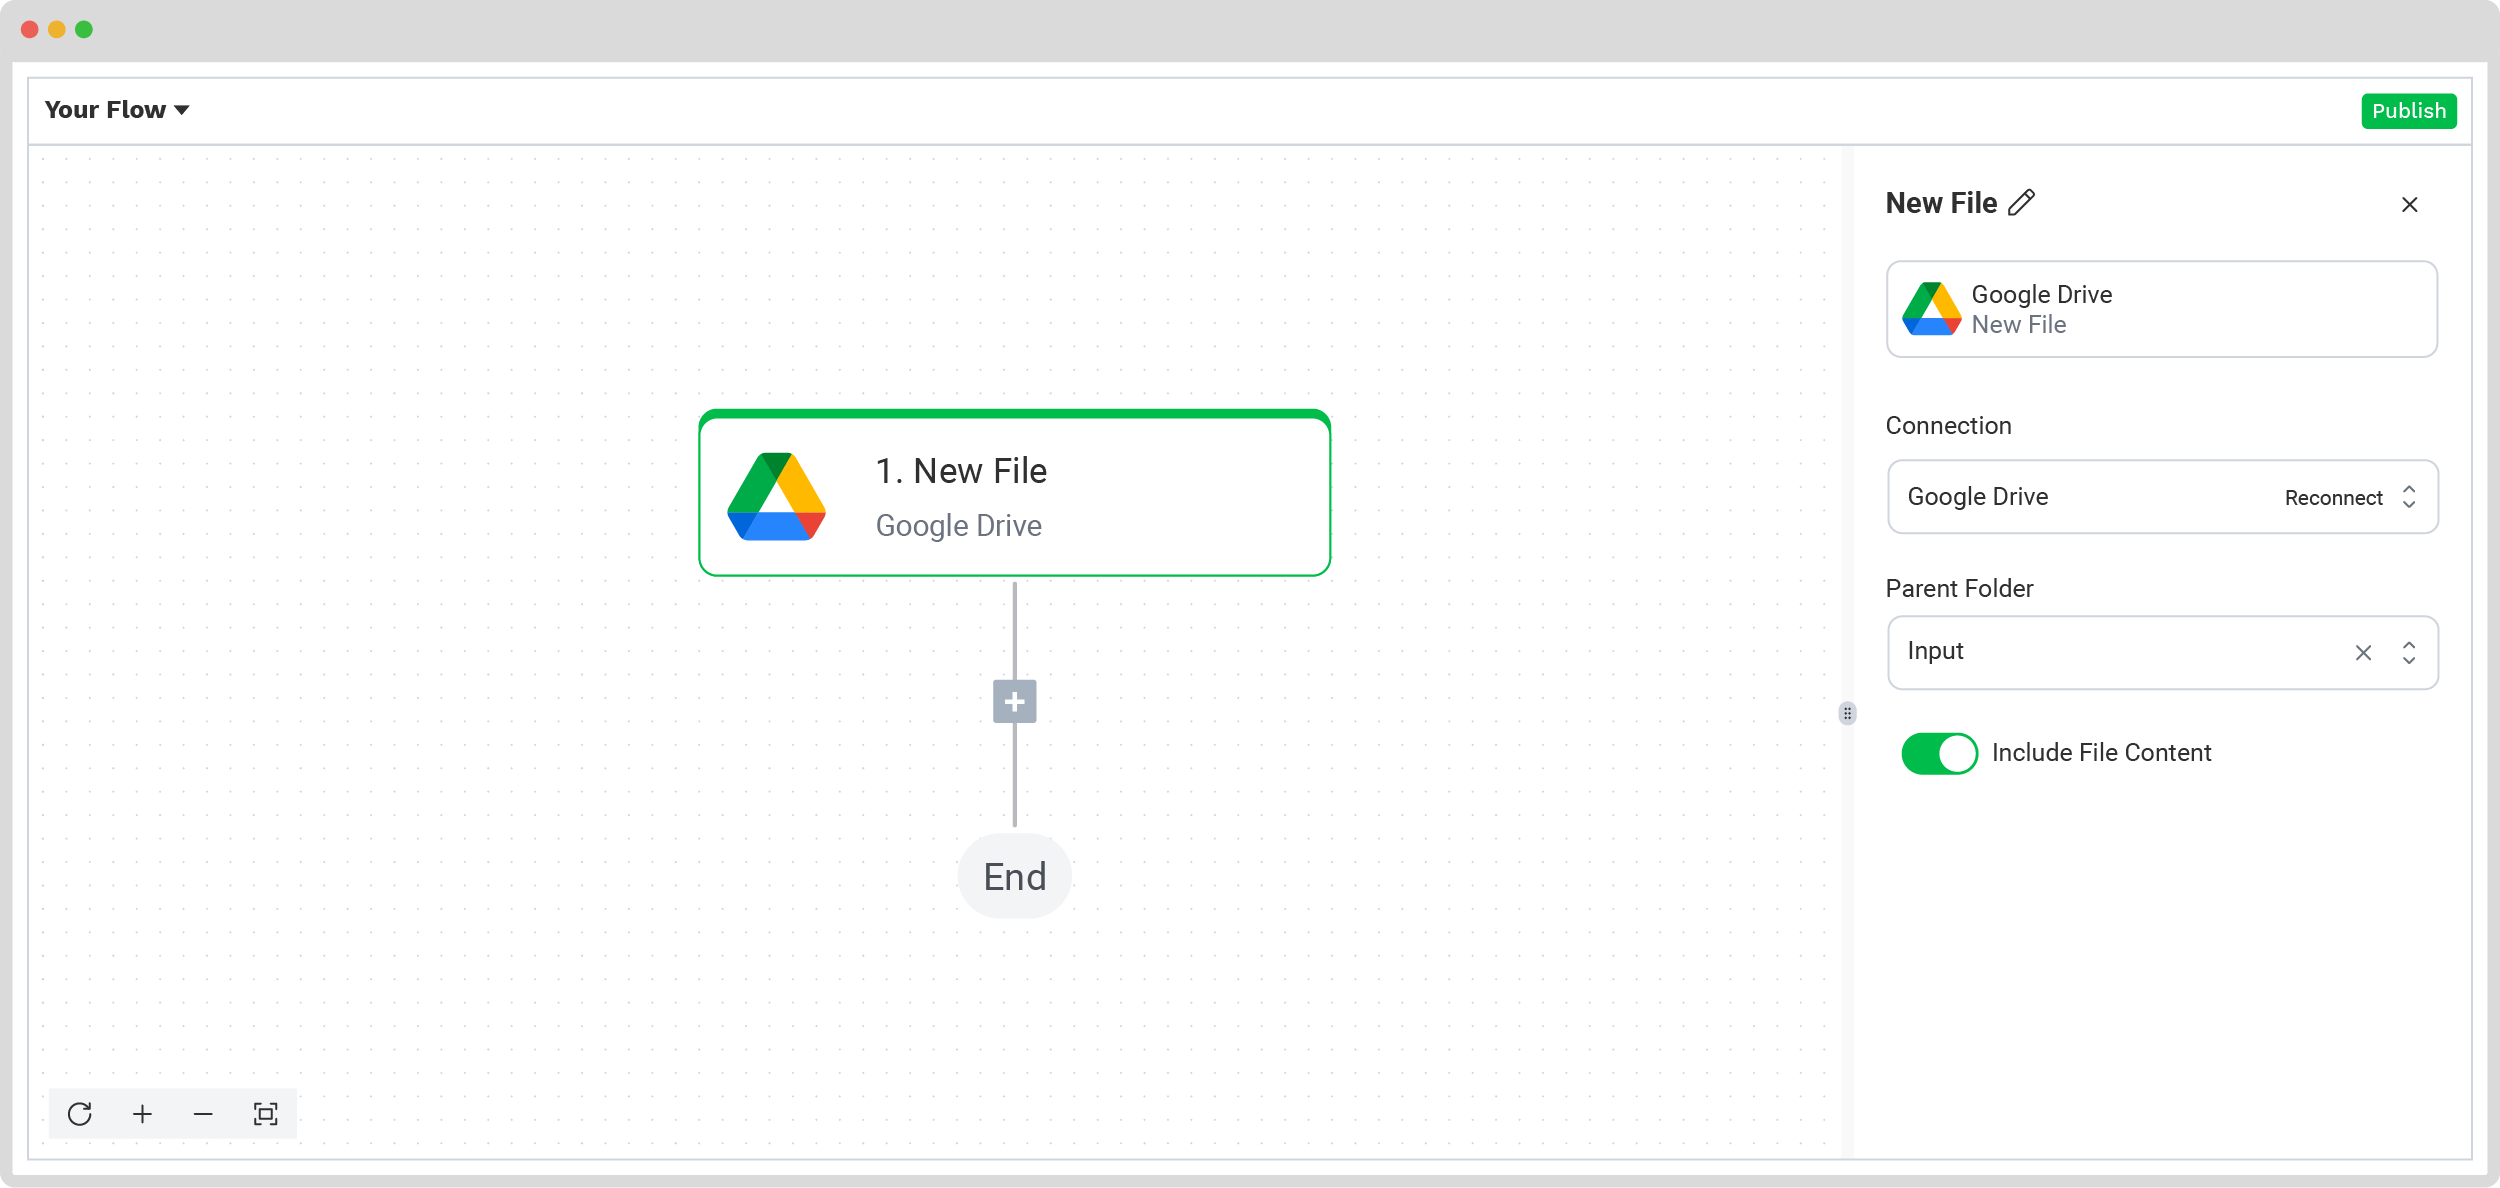
Next, select your input source. Choose Google Drive and set the trigger to New File – this means the flow will start automatically whenever a new file appears in your designated folder. Then, configure the following:
- For Connection: Give it a name (e.g. “google-drive”) and authenticate your Google account
- For Parent Folder: Set this to “Input”
- Include File Content: Make sure to check this box so the file content is processed
Tip: You’re not limited to Google Drive. DocHorizon supports over 100 input sources, including Dropbox, Outlook, Box, Salesforce, Zapier, OneDrive, and even your company database. You can also upload files directly from your device.
To verify everything is working correctly, click Load Sample Data. Just make sure you’ve placed at least one PDF document in your “Input” folder before testing.
Step 4: Capture and extract data
Now it’s time to extract the data using the preset you created earlier. This will process all the relevant data fields from the invoices in your input folder.
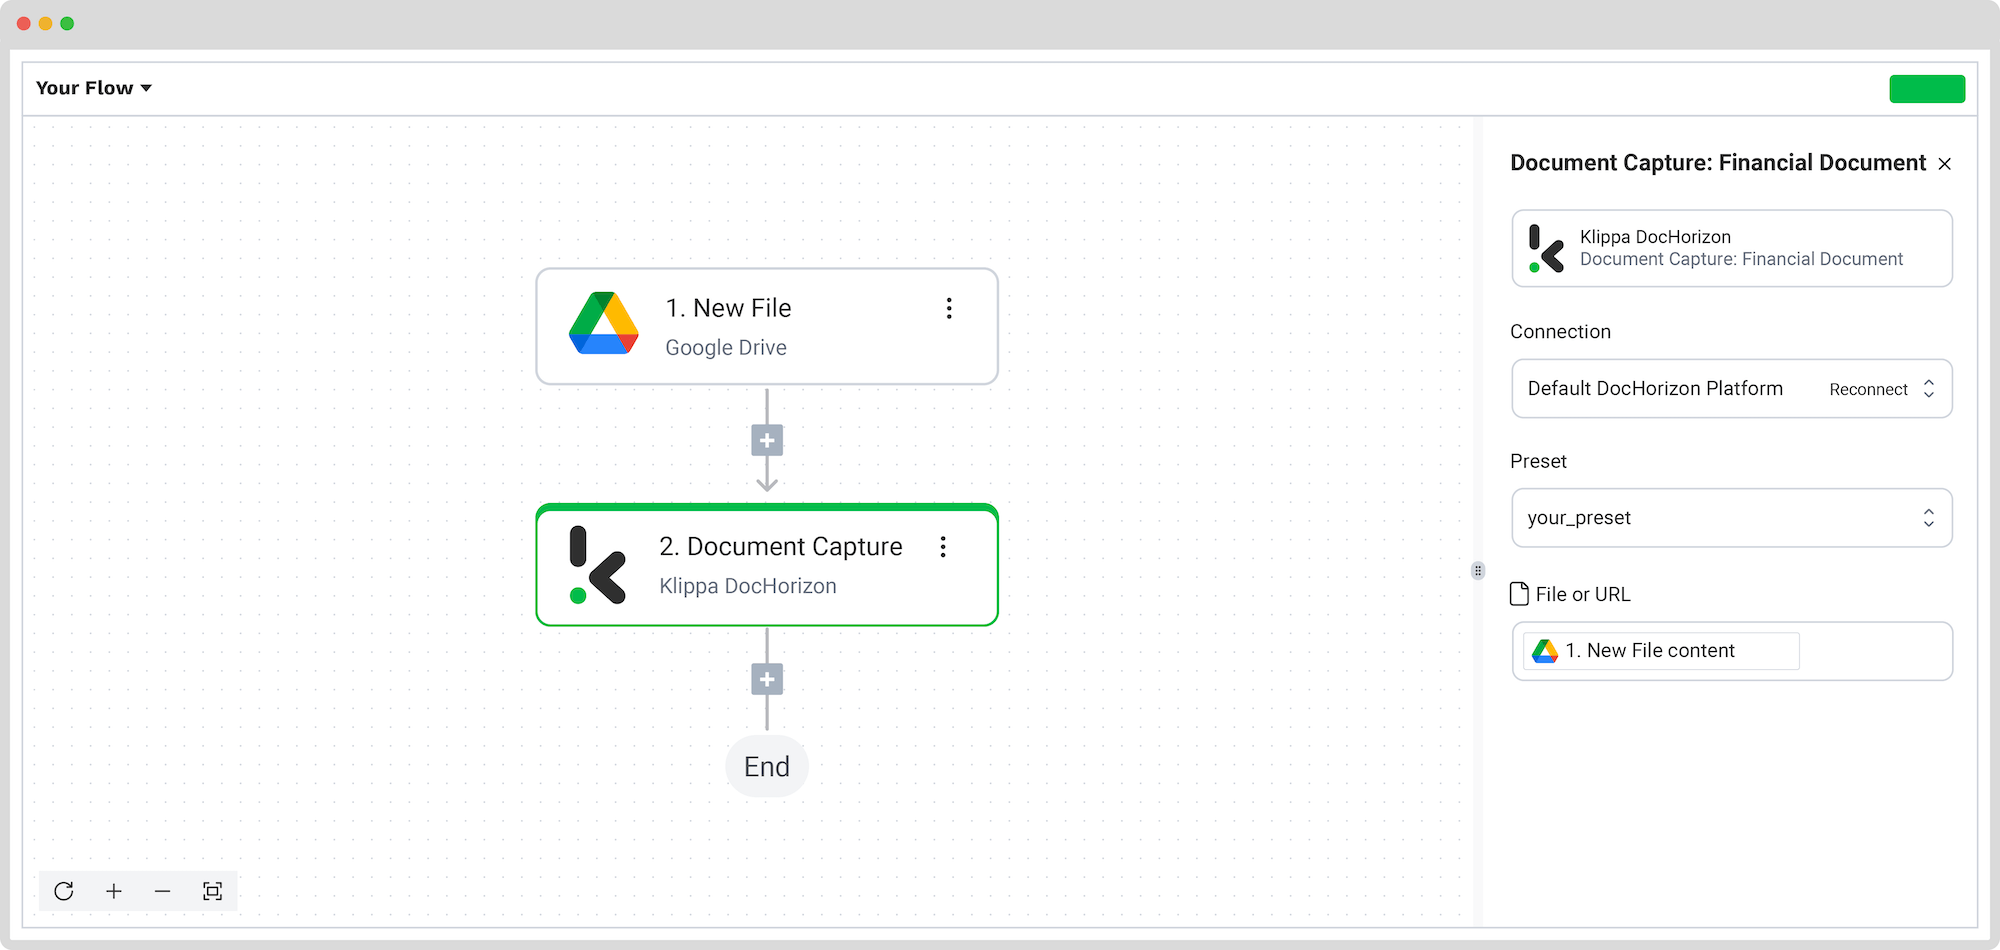
In the Flow Builder, click the + button and select Document Capture: Financial Document. Next, configure the following settings:
- For Connection: Default DocHorizon Platform
- For Preset: Select your preset
- For File or URL: Choose New File → Content
Once set up, click Test Step to make sure everything runs smoothly. If the test is successful, you’re ready for the final step: saving your extracted results!
Step 5: Save the file
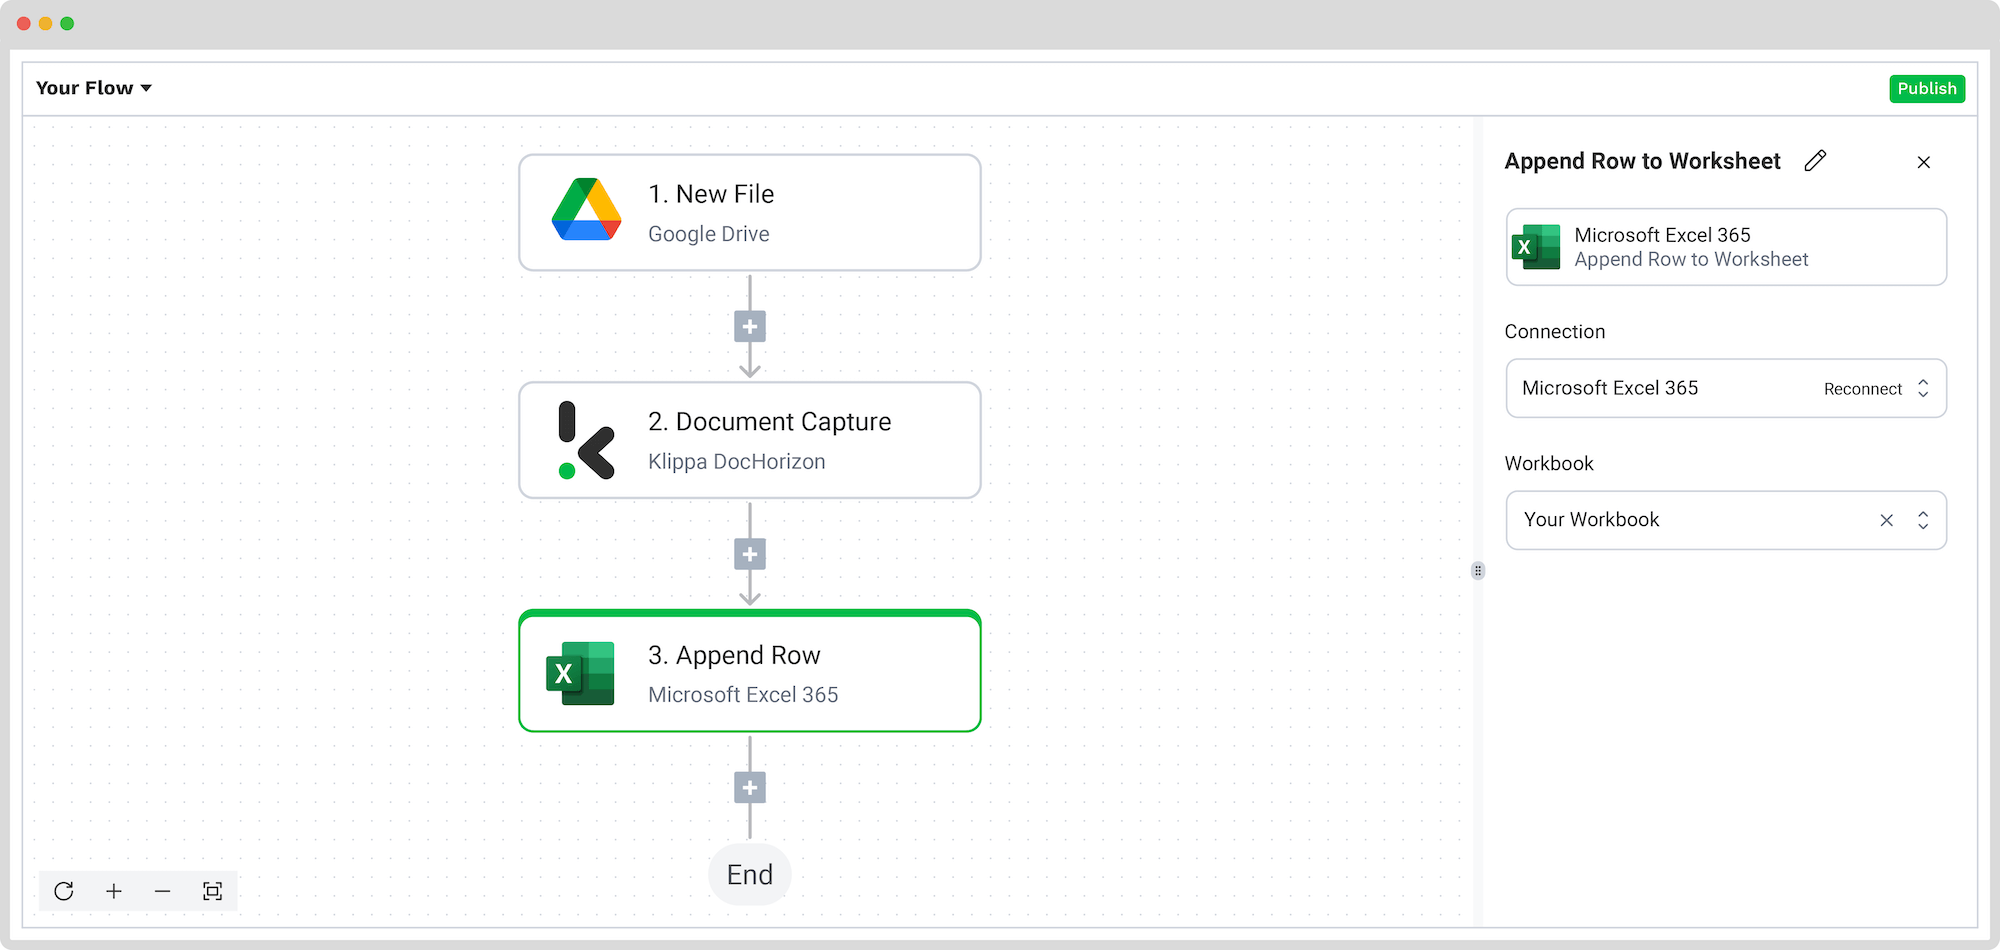
Now it’s time to set up the output destination for your extracted data. In this example, we’ll compile invoice data into an Excel sheet—but keep in mind, you can also connect with tools like QuickBooks, Xero, or Zoho if that better suits your workflow.
To configure Excel as your output, follow these steps:
- In the platform, search for Excel and select Append Row to Worksheet.
- On the right-hand side, fill in the following fields:
- For Connection: Connect your Microsoft account (Excel 365)
- For Workbook: Choose the Excel workbook you want to use
- For Worksheet: Select the name of the sheet within that workbook
Tip! If your sheet already contains headers in the first row, toggle the Does the first row contain headers? option. This tells the platform to begin inserting data from the second row onward.
Once toggled, you’ll see a section displaying the header names from your worksheet. For our example, we’ll use: Invoice Number, Total Amount, and Date. Now, map the extracted data to your sheet:
- Go to the Data Selector menu
- Open Document Capture: Financial Document -> components -> financial
- Select invoice_number, and repeat the same steps for total_amount and date
When everything is mapped correctly, click Test Step to confirm it works.
Congratulations! Your table data extraction now flows directly into your Excel sheet. Once published, the flow will automatically process new invoices added to your input folder, saving you time and boosting accuracy across the board.
And remember: if you’re processing a high volume of documents, you don’t have to set up the flow yourself! Feel free to reach out to us because we’d love to help you out!
Use Cases of Table Extraction
Table extraction holds much more importance than it may seem. Important information, such as names, total amounts, dates, and document numbers, is most commonly found in a table section of a document.
Salary Slip Processing
Whether you need to extract an overview of your employees’ hours or total amounts paid before the year-end closing, table extraction for salary slips is the most efficient way to get this data extracted in an instant.
Accounts Payable Processing
In the accounts payable process, table extraction is instrumental in efficiently handling a high volume of documents. Automatically extracting information from tables minimizes manual effort and errors in receipt capturing and invoice processing. By streamlining accounts payable, your AP team doesn’t need to manually process expense-related documents for hours on end.
Bookkeeping
To make sure that your business is abiding by regulatory practices and that you don’t lose any financial resources, your books must be balanced. Table extraction of balance sheets and budget reports gives a clear overview of the cash flow and keeps information in a clear and structured way.
Inventory Management
Logistics documents can take a large amount of time to cross-check. Since most of these documents come in a paper or digital format, PDF table extraction helps any supply chain department capture information from invoices, purchase orders, or bills of lading. This ensures that inventory levels are accurate and payments or deliveries are up to date.
To be able to accurately carry out table extraction and get qualitative results, a well-performing IDP solution is a must. Klippa IDP platform can offer your business all the modes necessary to get your important business information extracted in an instant.
Ready to Automate Table Extraction with Klippa?

Klippa DocHorizon is an Intelligent Document Processing platform that enables you to completely automate the workflow of extracting information from tabular layouts. By integrating various Klippa DocHorizon modules and your preferred applications, you can create an effortless and unique workflow:
- Data extraction – Get data extracted automatically from all documents containing tables
- Document conversion – Convert documents into a number of business-ready data formats, such as JSON, XLSX, CSV, TXT, XML, and many more
- Document classification – Classifies documents accordingly, so you can organize your documents in a logical manner
- Document verification – Automatically verify documents in numerous ways and detect document fraud
Curious to see how you can get started? Don’t hesitate to contact our experts or book a demo down below!
FAQ
Use PDF extraction tools or converters to select the table and export it to CSV or Excel. Common approaches include OCR for scanned PDFs or structured parsing for digital PDFs. Open the PDF in a tool, select the table region, export to a machine‑readable file, and clean up the data.
Klippa’s OCR and AI models detect tables automatically without manual selection, convert them directly into Excel, CSV, JSON, or XML, and integrate them into workflows instantly.
Apply OCR to detect cell boundaries and text. Upload the image or scanned PDF to OCR software, export the recognized table to your desired format, and validate accuracy.
Klippa’s OCR is optimized for mixed-format tables, recognizing rows and columns even in complex layouts. You can upload images from scanners or cloud drives, and have them processed automatically with no manual segmentation.
Use built-in Excel features like Power Query to transform or export table data. Functions like FILTER, VLOOKUP, and HLOOKUP can pull specific columns or rows into a new sheet.
If Excel is your target format, Klippa can bypass manual Power Query steps by detecting source tables (from PDFs, images, or other documents) and appending the data directly to your chosen Excel sheet.
Copy the table into Excel or Google Sheets directly. For large documents or embedded tables in reports, use conversion tools that export Word content to CSV/Excel.
Upload Word DOC/DOCX files to Klippa, and tables are detected, extracted, and converted automatically, even if they are embedded images inside the document.
You can open your PDF file in a converter tool or OCR software. After selecting the table region, export data directly to Excel and adjust formatting and headers.
Klippa converts PDF tables into Excel automatically, preserving header names, cell structure, and number formats. The process can be triggered from cloud folders like Google Drive or Dropbox.
Use SQL queries, such as SELECT * INTO OUTFILE 'filename.csv' to export table data. Many ERP systems allow table exports directly to CSV/Excel.
Klippa accepts database exports in PDF, CSV, or image format, processes them, and converts them into analytics-ready formats like JSON or CSV with integrations into BI tools.
Klippa’s Flow Builder handles the entire automation: detects new files from over 100 sources, applies OCR to capture tables, converts the data, and pushes results into your ERP or accounting software, no coding needed.
Most tools support CSV, XLSX, or JSON. Some also offer XML, TXT, or SQL exports for database ingestion.
Klippa supports CSV, XLSX, JSON, XML, and TXT, plus direct posting to Xero, SAP, QuickBooks, Zoho, and more, ensuring integration without format conversion steps.
Some workflows (e.g., Python Pandas scripts) require coding. Many OCR and converter tools offer graphical interfaces for non-technical users.
Klippa’s no-code interface makes extraction accessible to anyone, while still offering API access for developers who prefer programmatic control.