Are you also spending too much of your time checking or sorting your Gmail inbox and manually extracting important information from email attachments? If the answer is yes, then this blog is definitely for you.
Can you guess how many emails will be sent daily in 2025 around the world? A projected figure of around 376.4 billion! Ouch! Manually processing these emails will take… about forever!
Time-consuming, full of errors, and an obstacle to your business’s growth, manual processing is definitely something that belongs in the past. And that’s where Gmail parsing comes in.
In this blog, we’ll walk you through a detailed step-by-step process to automate Gmail parsing using an intelligent email parsing solution that leverages AI.
Let’s get started!
Key Takeaways
- Gmail parsing automates the extraction of relevant data from emails and their attachments, being a versatile technology that can be adapted to different industries.
- Manual email processing is time-consuming and error-prone, especially with the global email volume projected to hit 376.4 billion per day in 2025.
- With Klippa’s intelligent automation solution, you can set up intelligent Gmail parsing using AI-powered OCR and machine learning.
- The process is simple and fast: in five guided steps, you connect your Gmail, define the data fields to extract, process email content or attachments, and route the output to your preferred destination.
What is Gmail Parsing?
Gmail parsing is the process of automating the extraction of specific data from emails received in the Gmail inbox. Instead of manually opening each email and copying the information you need, a Gmail parser scans the emails’ content and extracts the relevant data lines for you.
For a business that handles high volumes of transactional emails, a Gmail parser can make a real difference. By automating this process, you can save time, reduce human error, and send the extracted data directly to their CRM, ERP, or accounting systems.
How to Parse Gmails with Klippa DocHorizon
To efficiently parse Gmail emails and their attachments, you can use Klippa DocHorizon, an AI-powered document automation platform. With the sophisticated platform, you can set up the entire Gmail parsing flow with a few simple steps.
For today, we chose to explain how you can automate the flow of renaming files (in our case, they are invoices) sent to your Gmail address, so you can enjoy better organization and always have them at your disposal.
Let’s see how you can do this using the DocHorizon Platform.
Step 1: Sign up
If you don’t have an account yet, you need to sign up on the DocHorizon platform. Just provide your details to create an account and begin.
Once registered, you’ll receive €25 in free credits. Great, right? This way, you can explore the platform’s features and see for yourself if Klippa DocHorizon is the right solution. And this without any type of commitment!
After logging in, create an organization and set up a project to access the services.
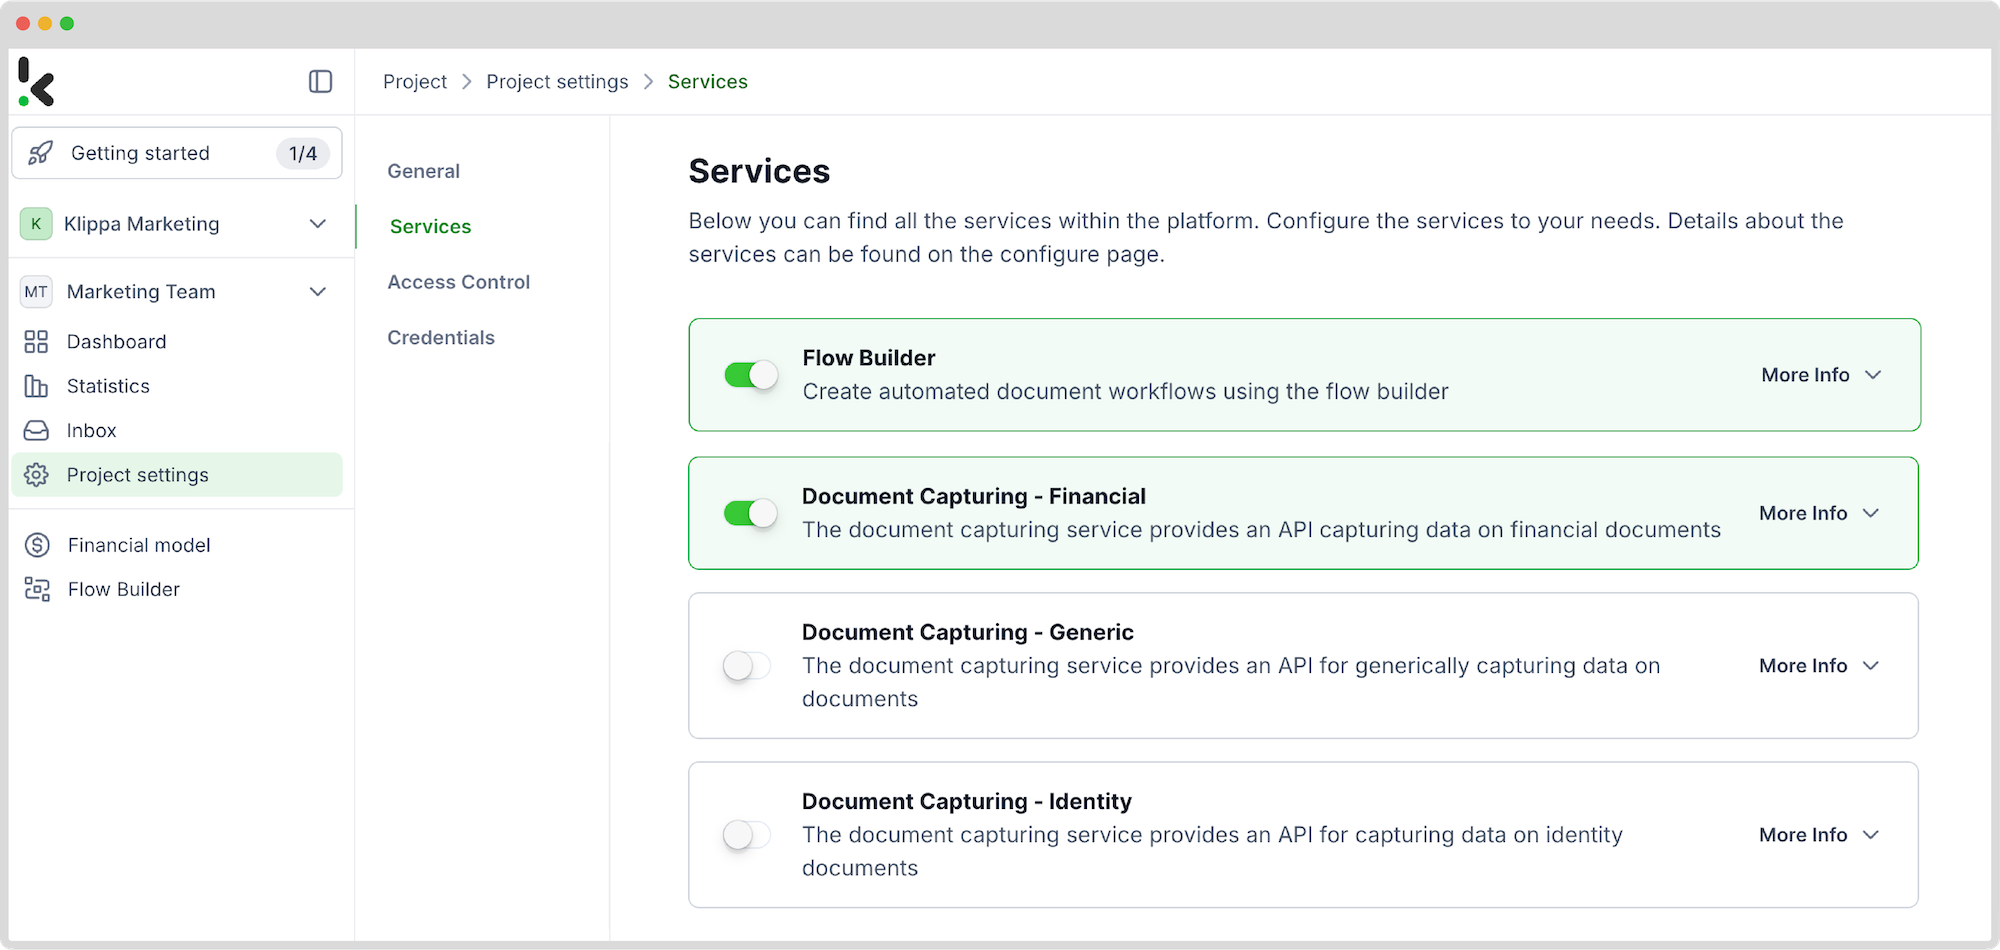
Now you can select Document Capturing – Prompt Builder and Flow Builder, just as seen in the image below. And you are ready to go!
Step 2: Create a preset to get the data you need
Before jumping into the actual document workflow and starting to automate the Gmail parsing workflow, you need to create and configure a preset. This is an important feature because it allows you to extract the fields you need from the files.
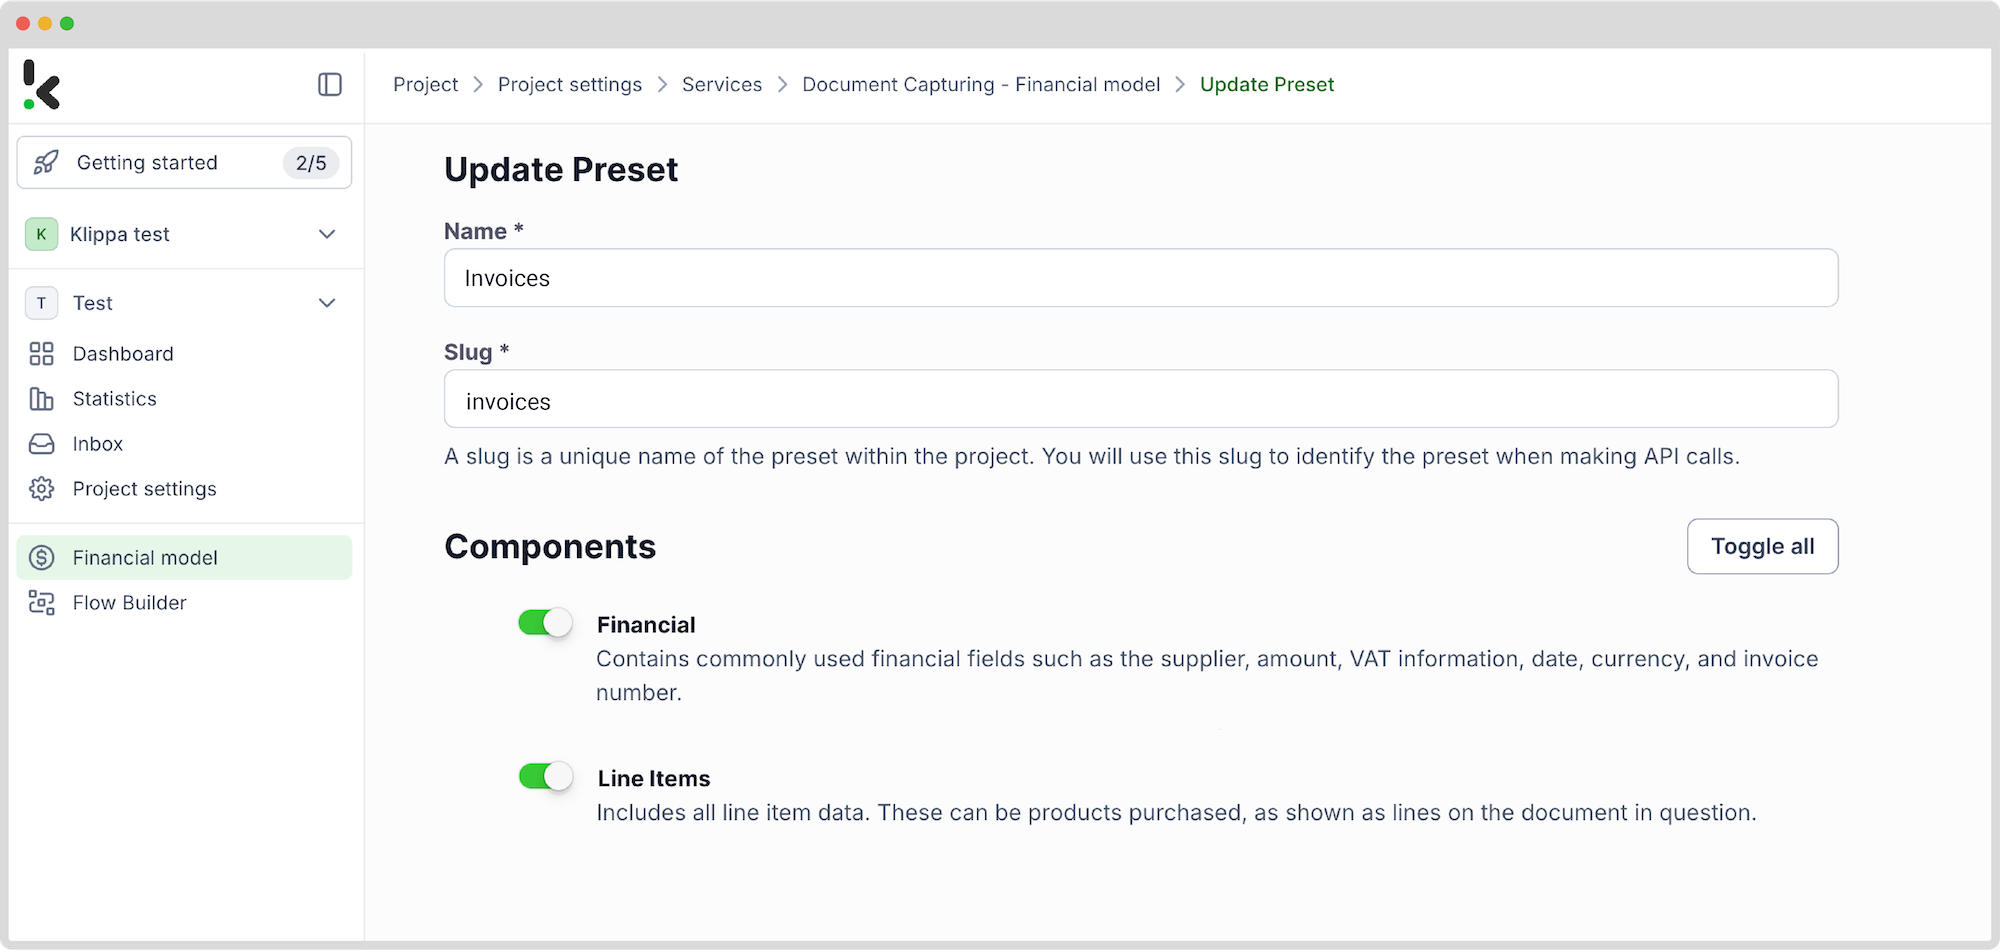
To do this, go to the left column. Select Financial Model and then New Preset. Let’s call this preset “Invoices”. After filling in the relevant details, click on Create, choose the components that you’d like to be extracted, and click on Save. And that was it!
Step 3: Select the input source
This can be done in 2 ways. The first method is to use the email Klippa created for you and route the relevant emails you receive to your Gmail address to this Klippa Inbox.
Or, if you have a specific email address that you only share with your vendors and they send the invoices to you at this address, then you can make your Gmail address the trigger of this flow. We chose to use the second method.
After selecting the Gmail address as the trigger by clicking on 1. Select Trigger -> Gmail -> New Email, and connect it to the platform. Next, choose which email subject the emails that will automatically run through this flow should have. For us, it’s Invoice.
Don’t forget to load sample data and test this step, along with the following ones! If successful, you can go to the next step.

Step 4: Select which items should be looped in
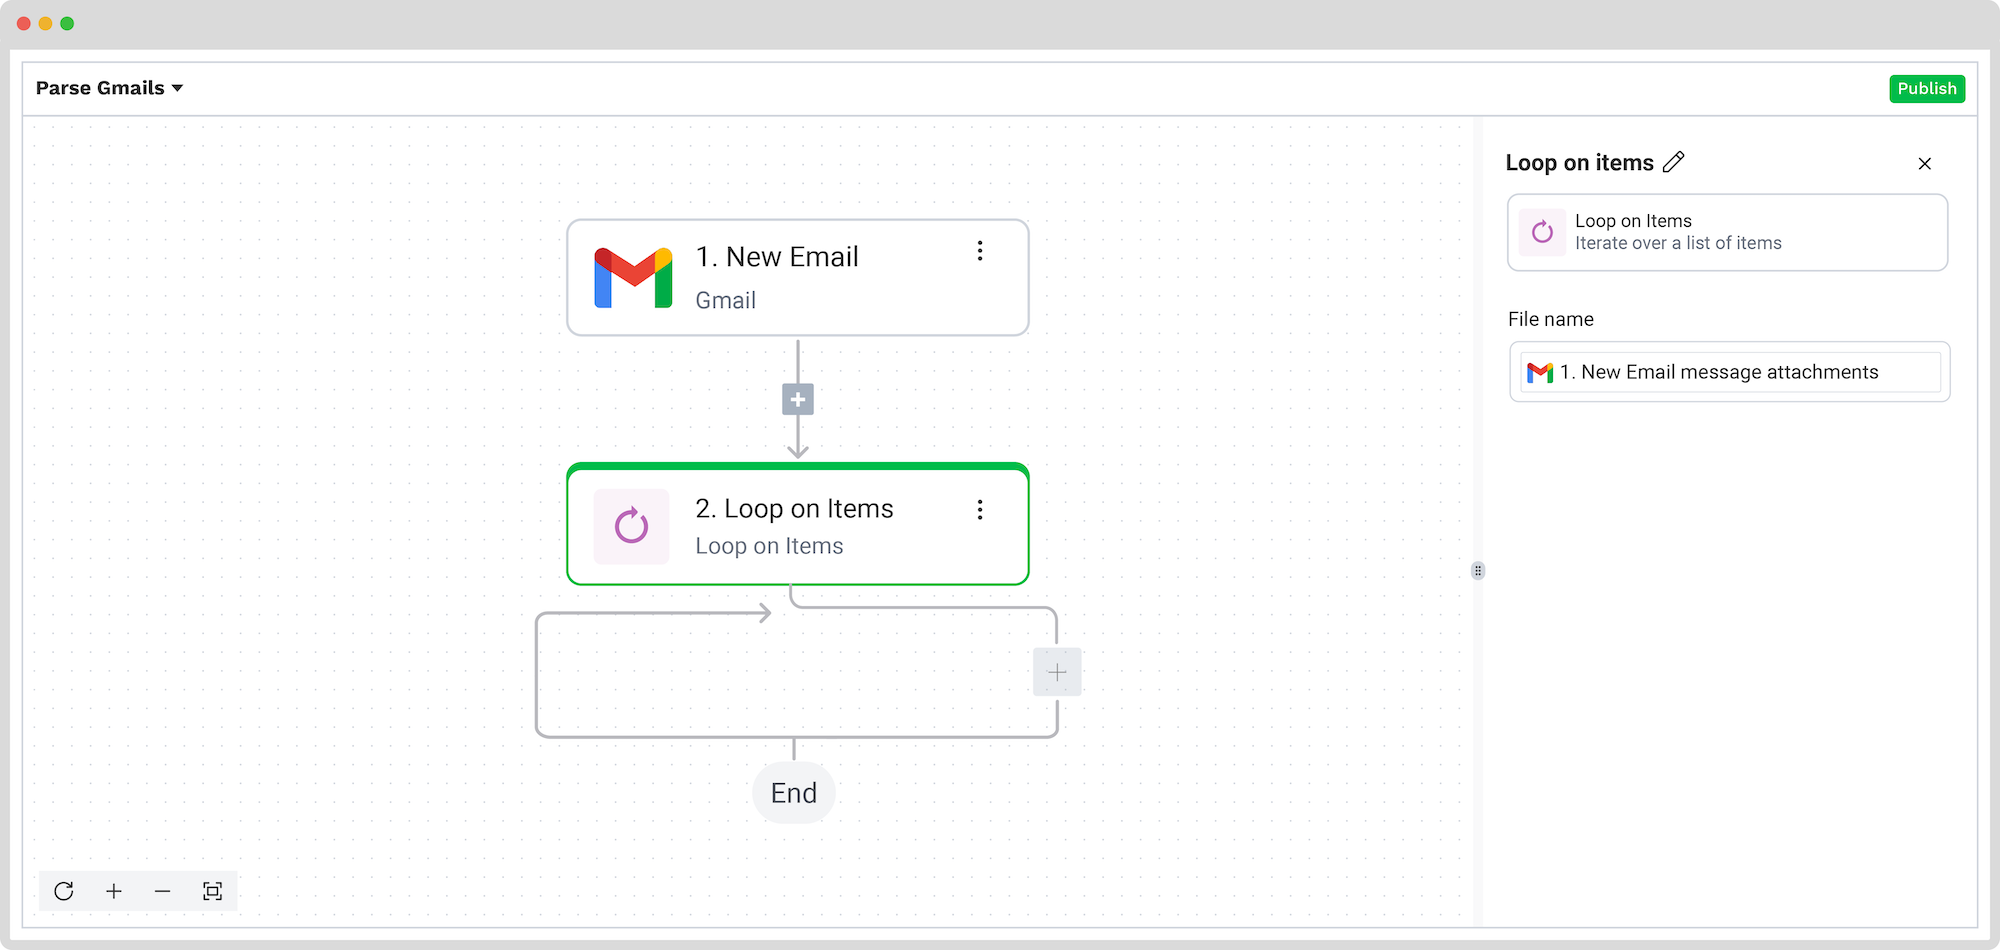
For the platform to know which items it should access, search for the Loop in items function. Ours is renamed to “Loop on all attachments,” meaning that all incoming emails’ attachments will be looped in the flow. This was done by going to the Items section and clicking on the box. From the data selector menu, select New Email -> message -> attachments.
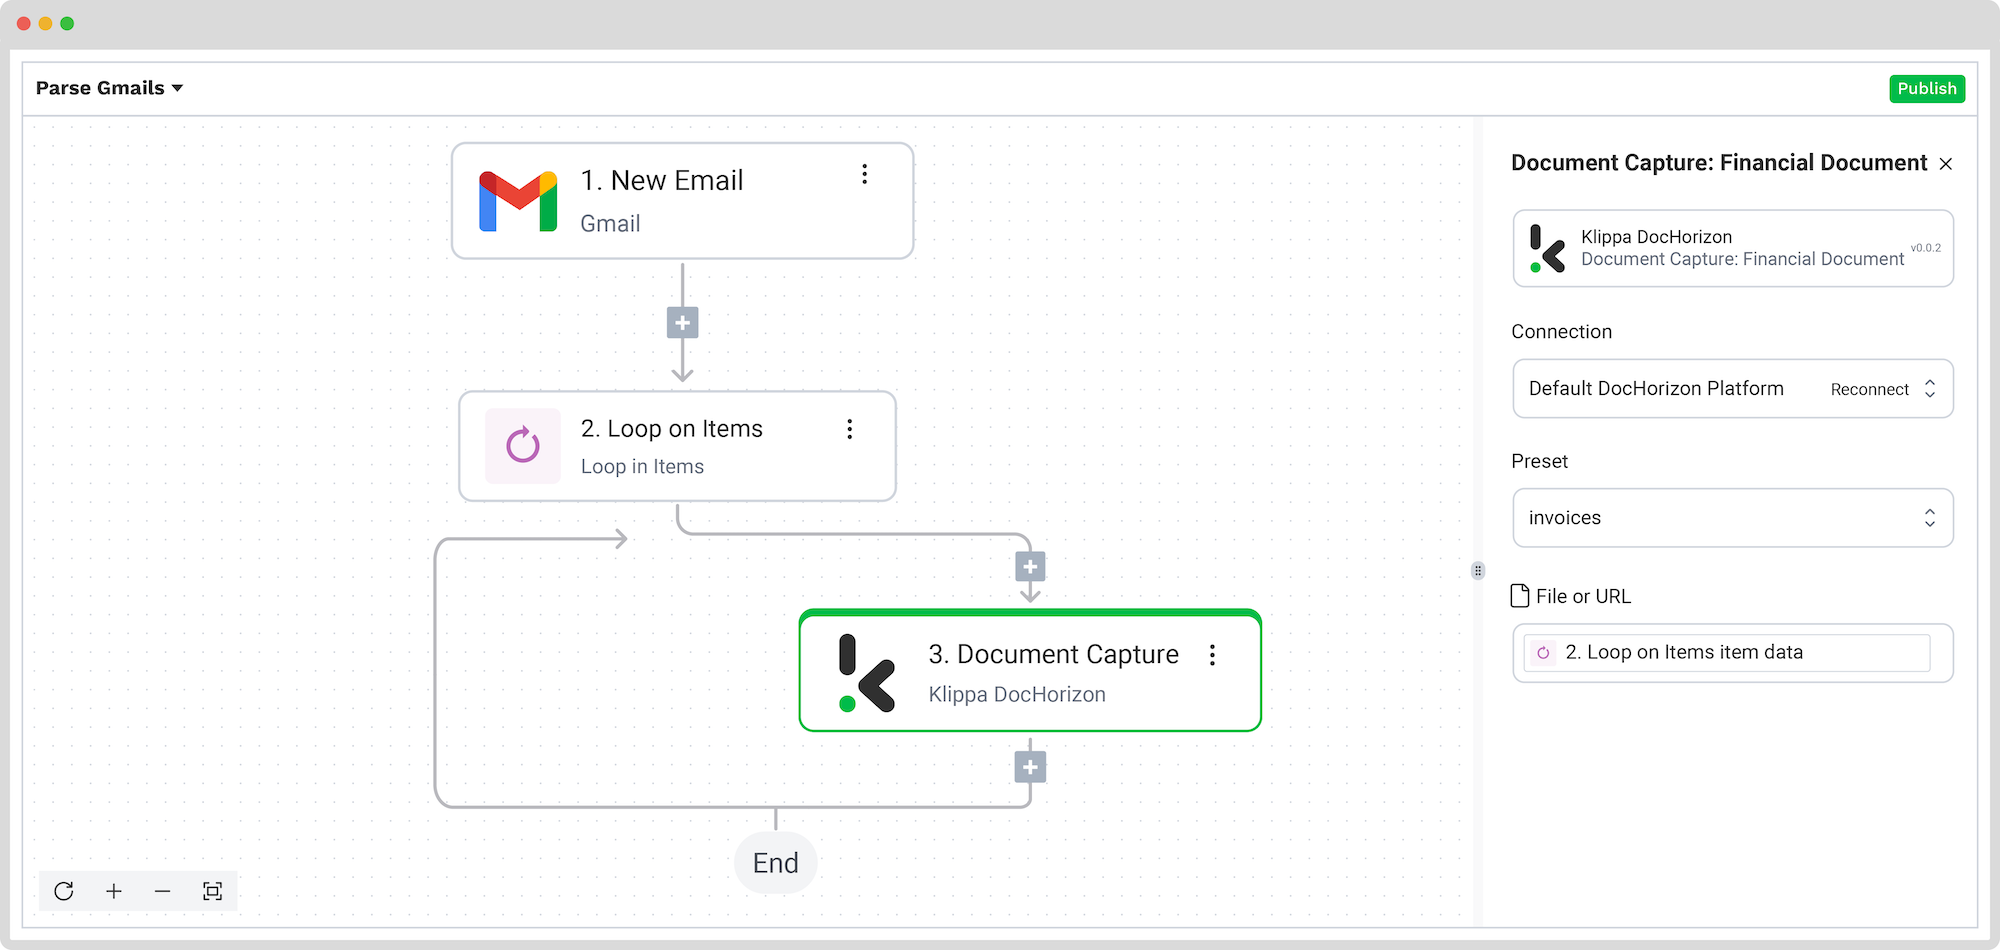
Step 5: Select the document capture model
The next step is to select the document capture module, which extracts all the information in the email. Since we have created a specific preset for this use case, simply select the Document capture: Financial Model module from the list.
Connect it again, but this time with the Default DocHorizon Platform. Next, select the preset we’ve created in step 2, namely “Invoices”. Next, for File or URL, click on the box and pick from the menu 2. Loop on all attachments -> item -> data (the identification URL for the file’s data).
Step 6: List the files from your Drive
Before starting this step, it would be best if you opened another tab in your browser with your Google Drive. Now, you need to create a new folder in your Google Drive. We have called ours “Invoices Gmail Flow”.
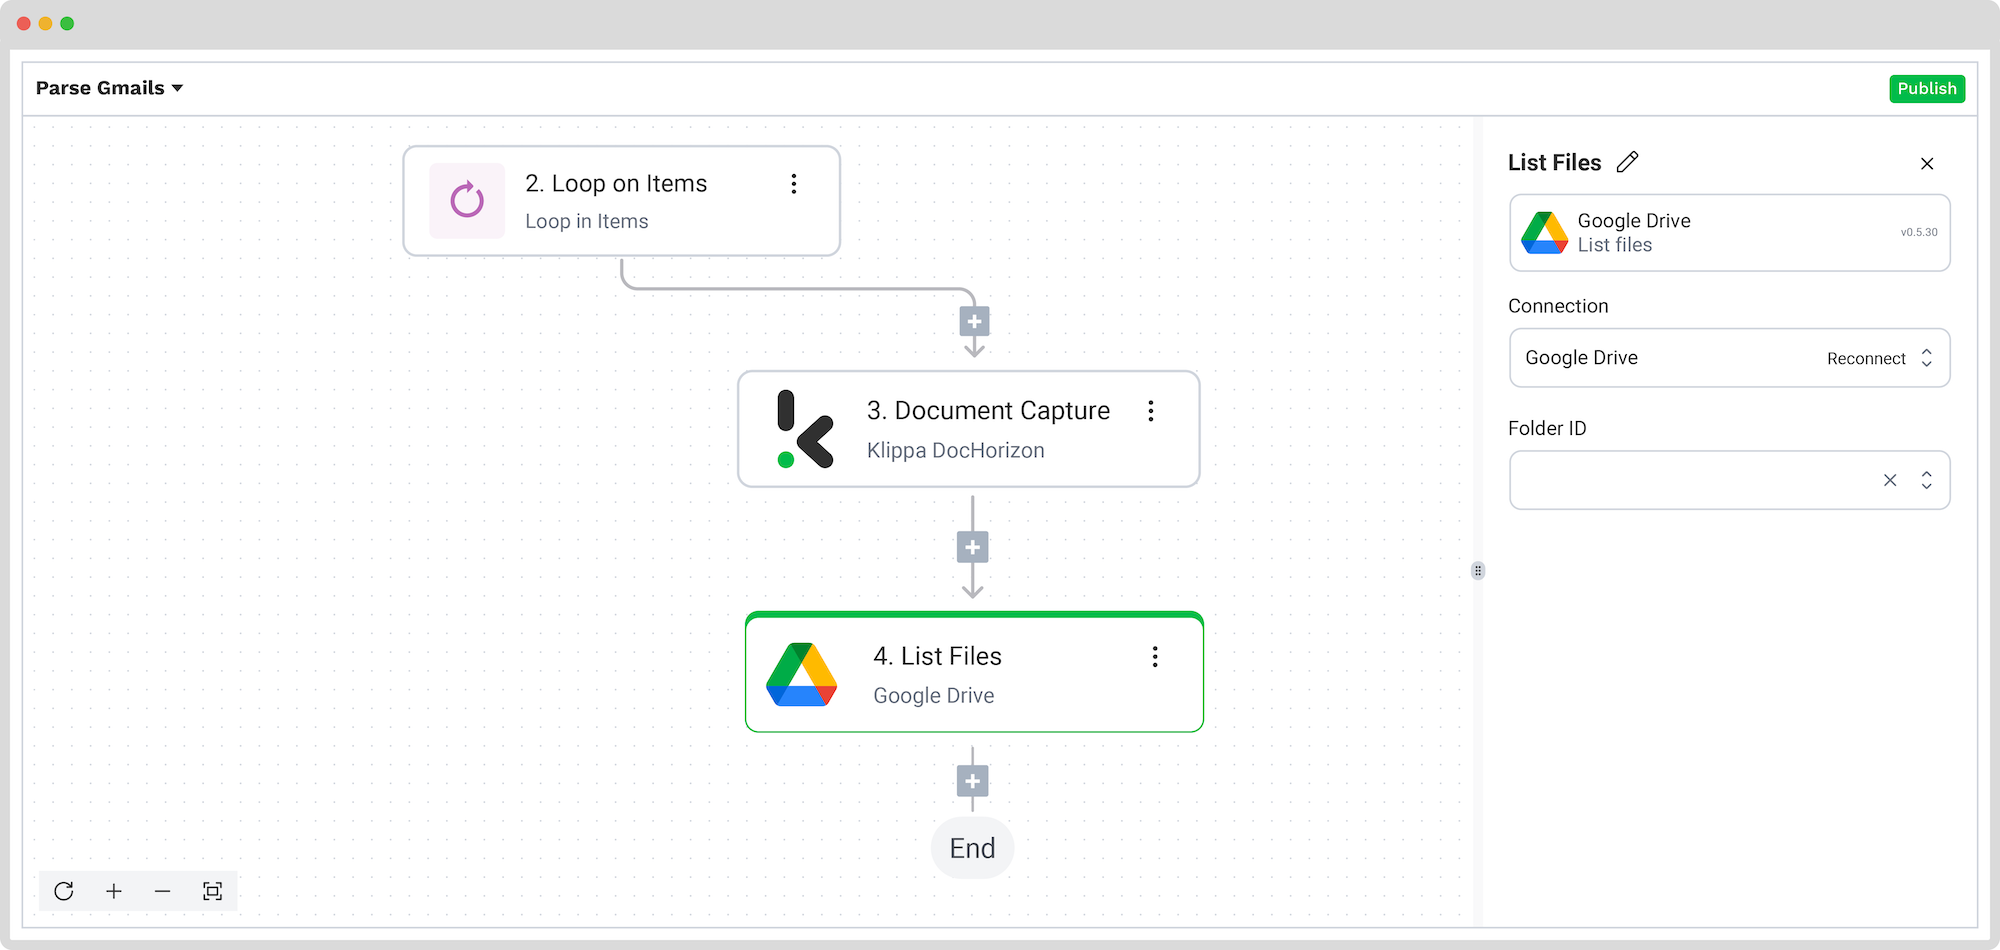
Back to the DocHorizon Flow Builder tab. Click the + button, search for Google Drive, and select List Files. We’re doing this so the platform knows which files you already have in your drive (this will help us with a later step). Connect the platform with your Drive.
Back to your Google Drive. The URL of this new folder should have this format: https://drive.google.com/drive/folders/1FVGF6hMA2m57WUDfiw87t35p_IHpsITC. Now, copy the folder’s identification name 1FVGF6hMA2m57WUDfiw87t35p_IHpsITC and go back to the DocHorizon Flow Builder tab. There, paste it in the Folder ID section.
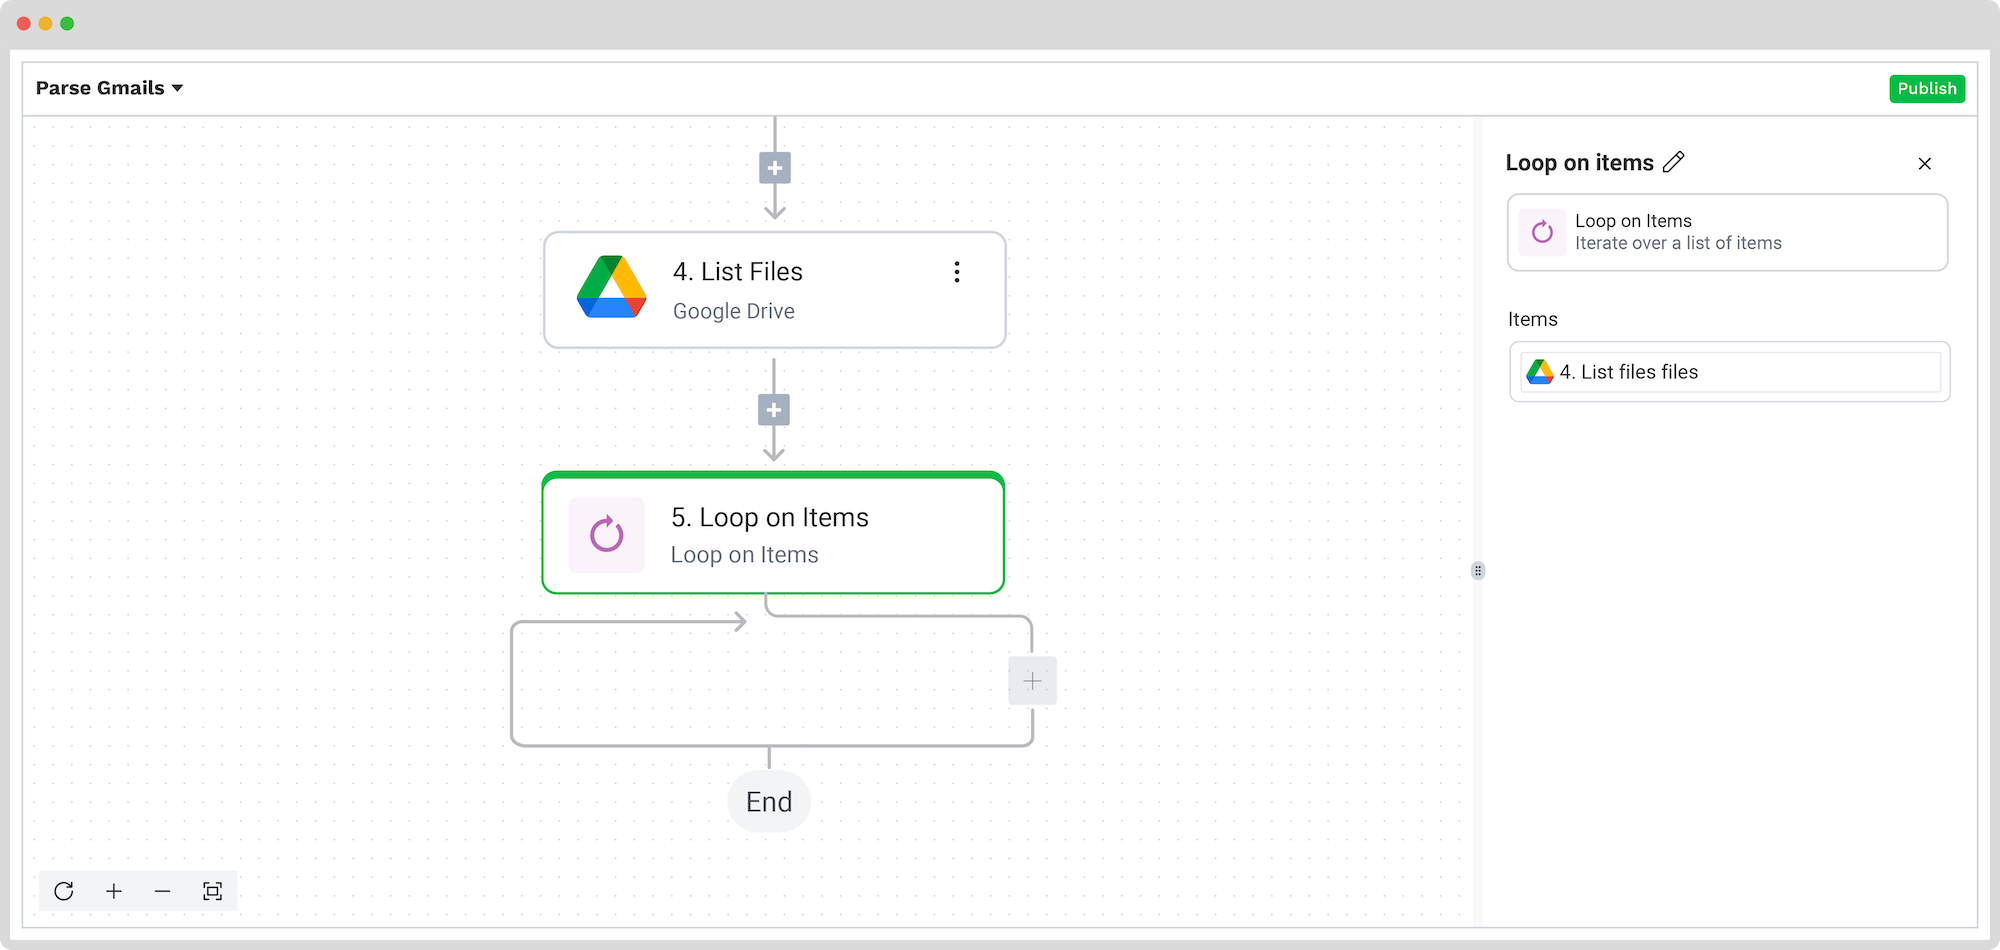
Step 7: Select which files should be looped in
For the platform to know which files from your folder should be accessed, you’re going to use the Loop on items function again. Search for it and add it to the flow. On the right side, for the Items section, you need to select from the menu 4. List files and then choose files.
Step 8: Create a conditional routing
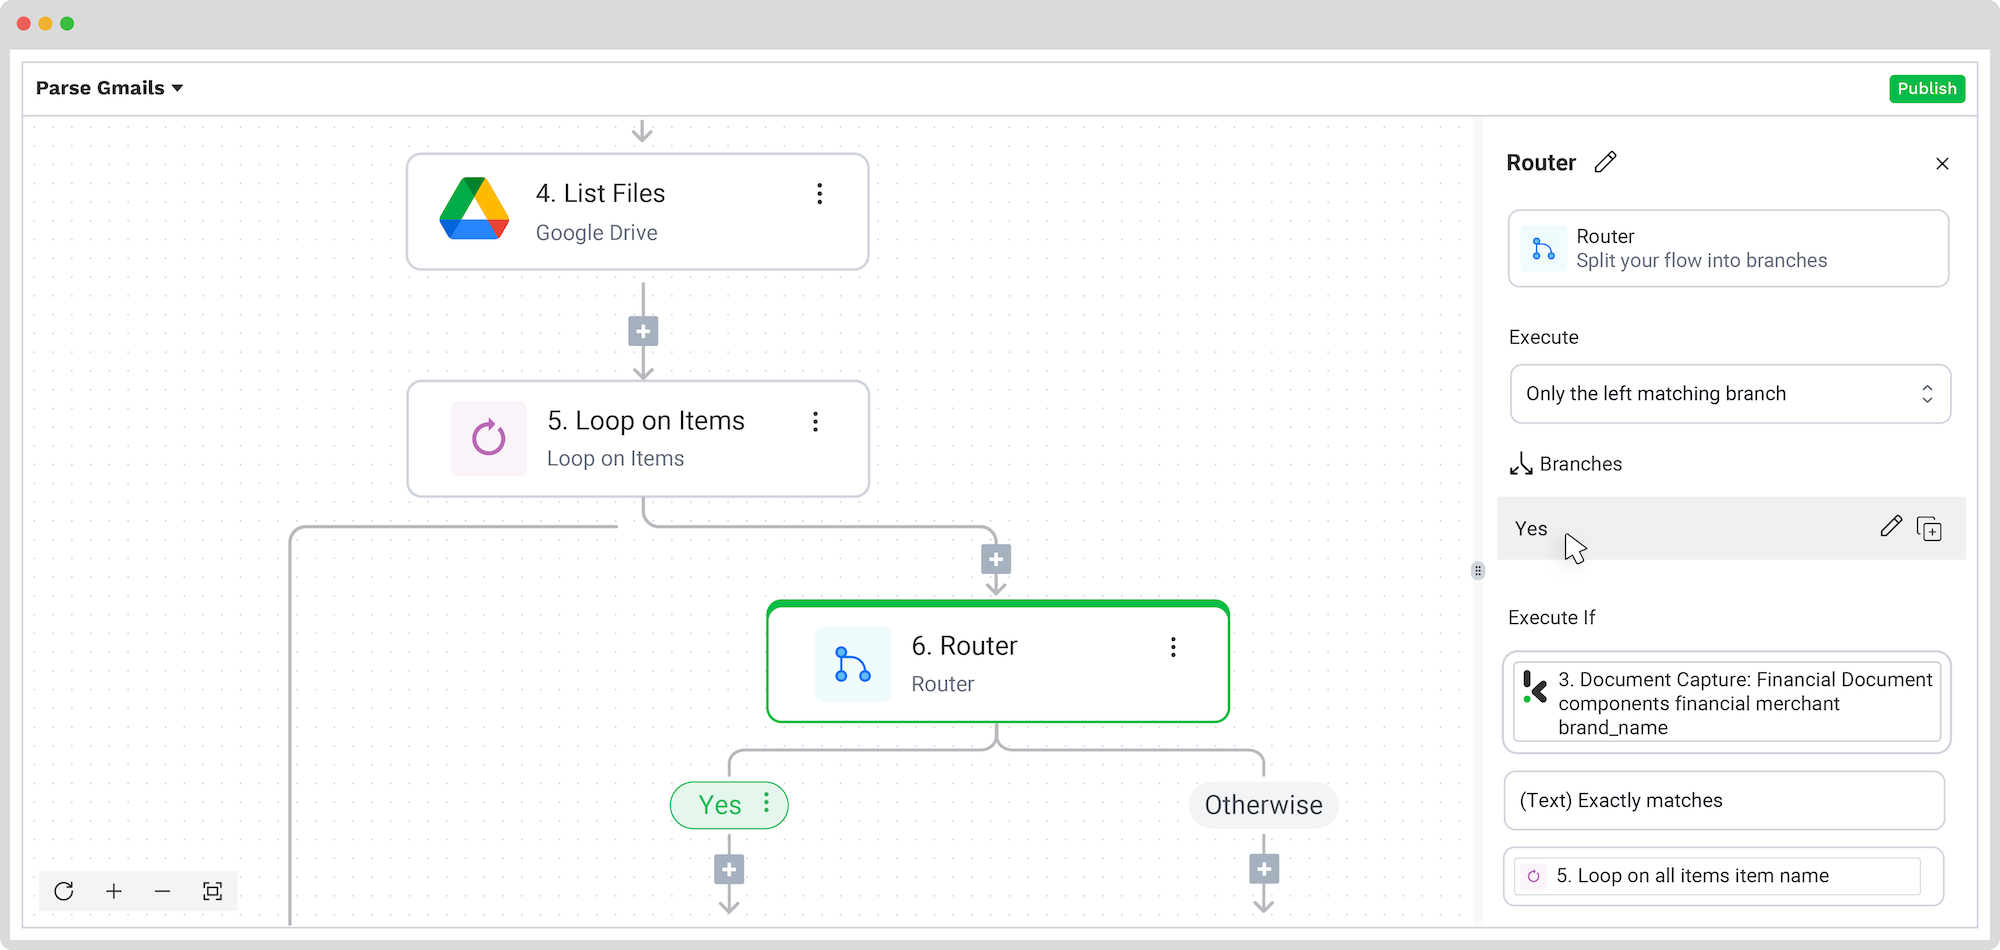
The next step of the flow will be to use the Router option, so we can define what the platform should do when certain conditions we set are met or not. For our example, the condition will be whether the merchant folder exists or not. The possible solutions will be YES or Otherwise. We’ll need to create only the YES one.
To do this, we are going to select Execute: Only the first (left) matching branch and set the rules by clicking on Branch 1:
- For the first value: Document Capture: Financial Document -> components -> financial -> merchant -> brand_name
- For Text: (Text) Exactly Matches
- For the second value: 5. Loop on Items -> item -> name.
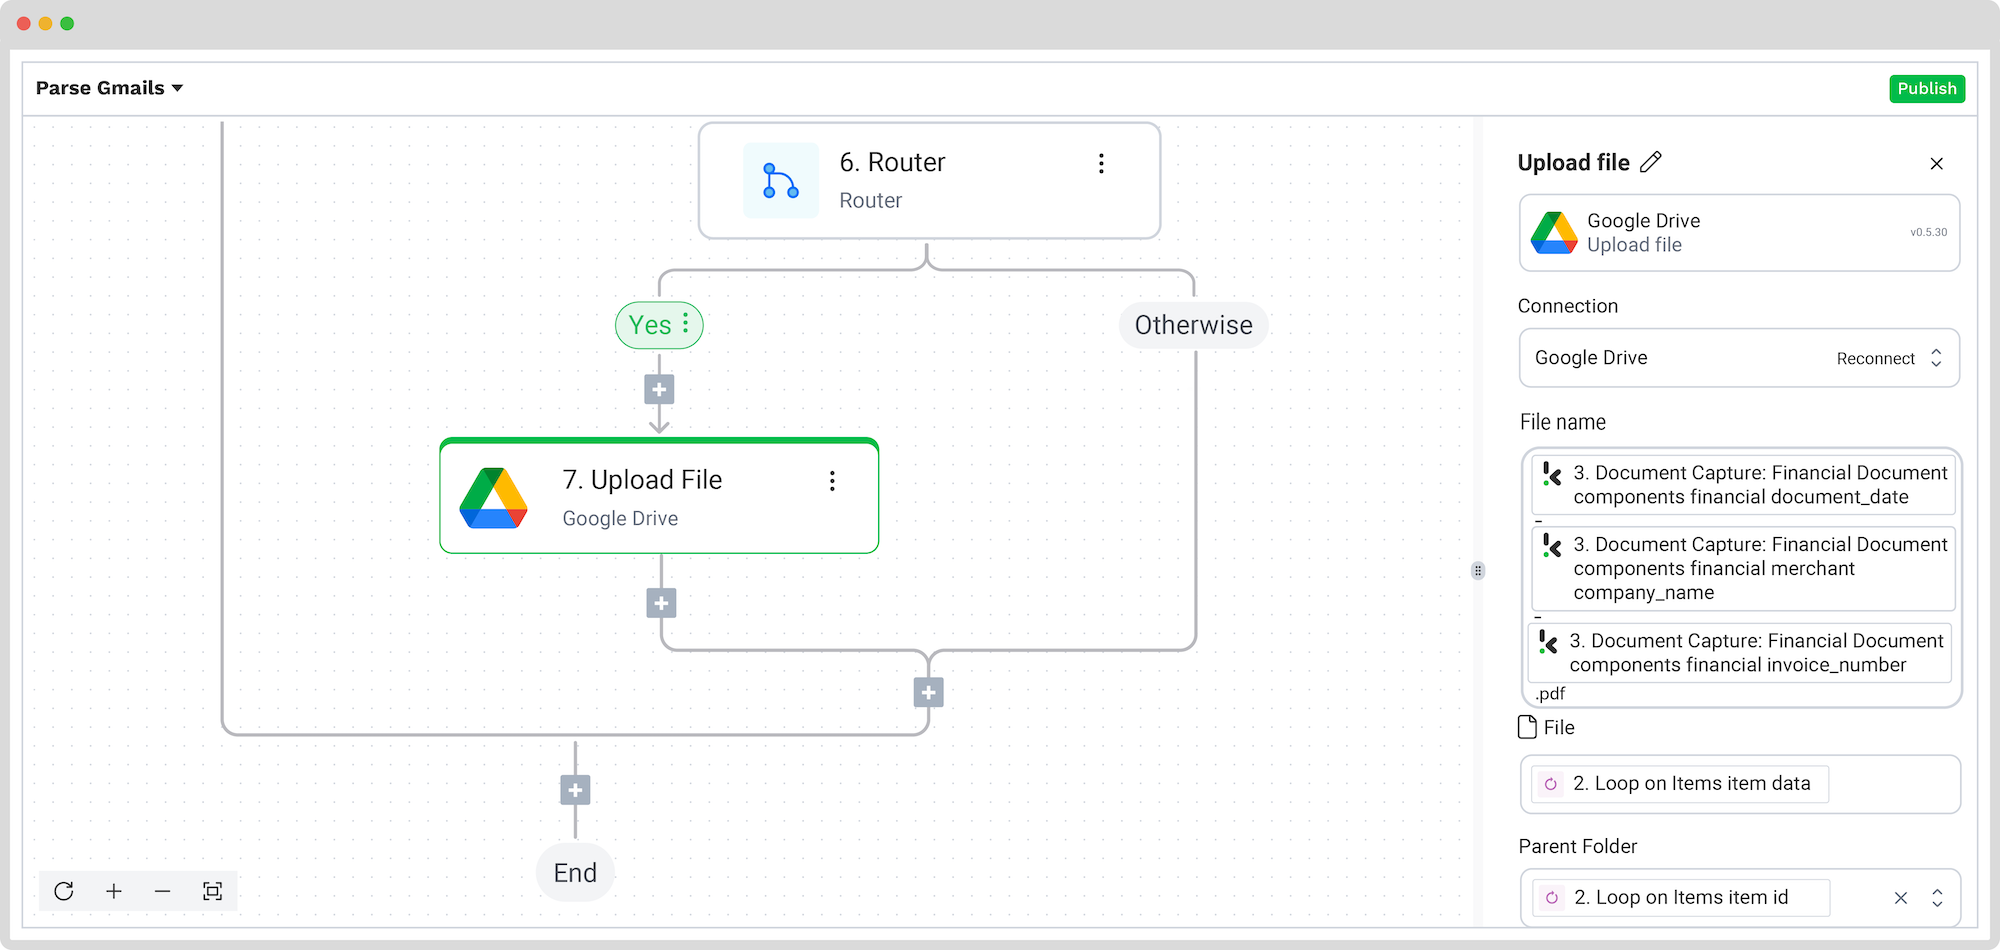
Step 9: Upload a file to the existing merchant folder
Now, we need to define what will happen if the condition before is met: what will happen if the merchant folder already exists in the Google Drive folder. If the folder exists, it’s only natural that we’d like the new file to be uploaded to the designated folder.
In the Flow Builder, please click the + button, search for Google Drive, and select Upload File. Also, connect this step to the Drive.
For the File name, you can pick any components that make sense. We wanted to use the document’s date, the name of the merchant’s company, and the invoice number as the new file’s name. We did this by clicking on Document Capture: Financial Document -> components -> financial -> document_date + merchant company_name + invoice_number.
By default, all data extracted in the flow is automatically converted into JSON format, but you can convert it to another format, such as PDF, XLS, or CSV. Do this by placing the necessary extension in the File or URL section, as below.
For File, select 2. Loop on all attachments -> item -> data. For Parent Folder, put the folder you’ve created in the beginning in your Google Drive by selecting 5. Loop on Items -> item -> id.
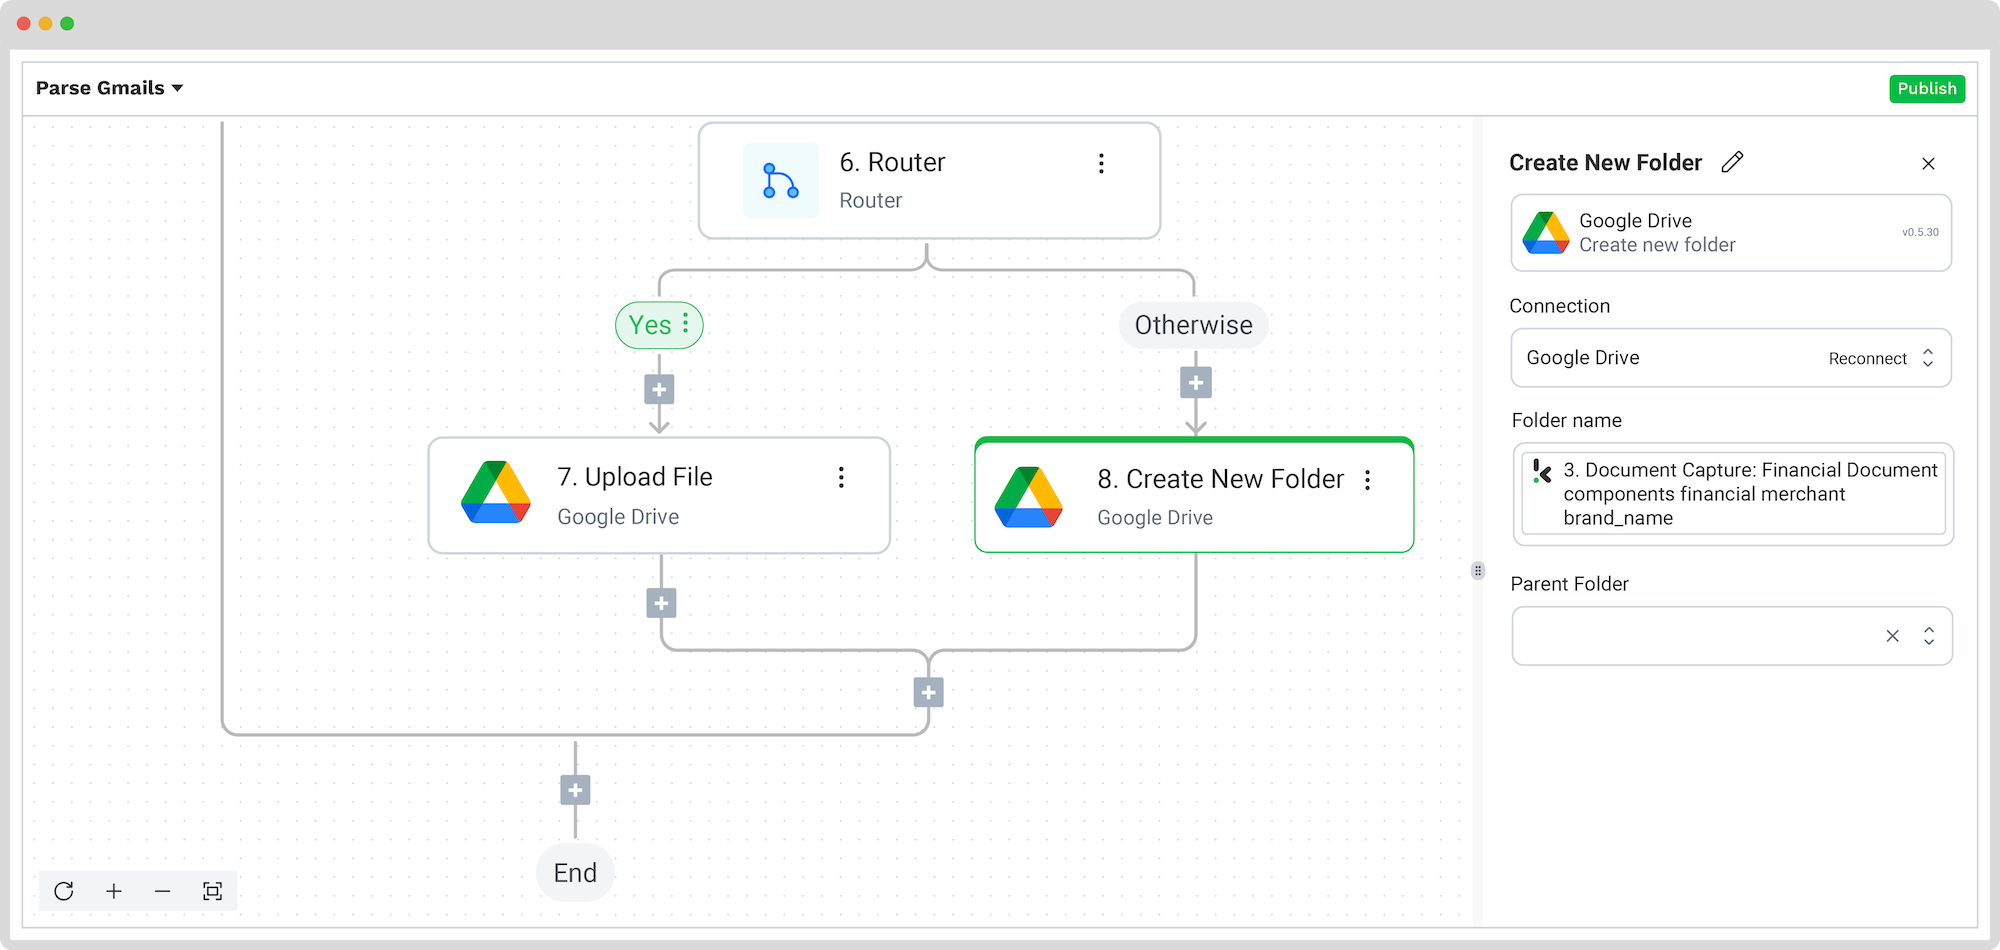
Step 10: Create a new folder if the merchant folder doesn’t exist
Let’s see what is supposed to happen when the conditions aren’t met, meaning that the merchant folder doesn’t exist in the Drive folder. We’re working now on the right branch, named Otherwise.
If the merchant folder doesn’t exist, we’d like one to be created and the file to be uploaded there. To do this, click the + button, search for Google Drive, and select Create New Folder.
Please connect the Drive to the platform and decide which component will give the folder’s name. You’re going to do the same as in step 9, when you selected the first value: go to Document Capture: Financial Document -> components -> financial -> merchant -> brand_name.
The parent folder needs to be the one from the Drive, Invoices Gmail Flow, in our case.
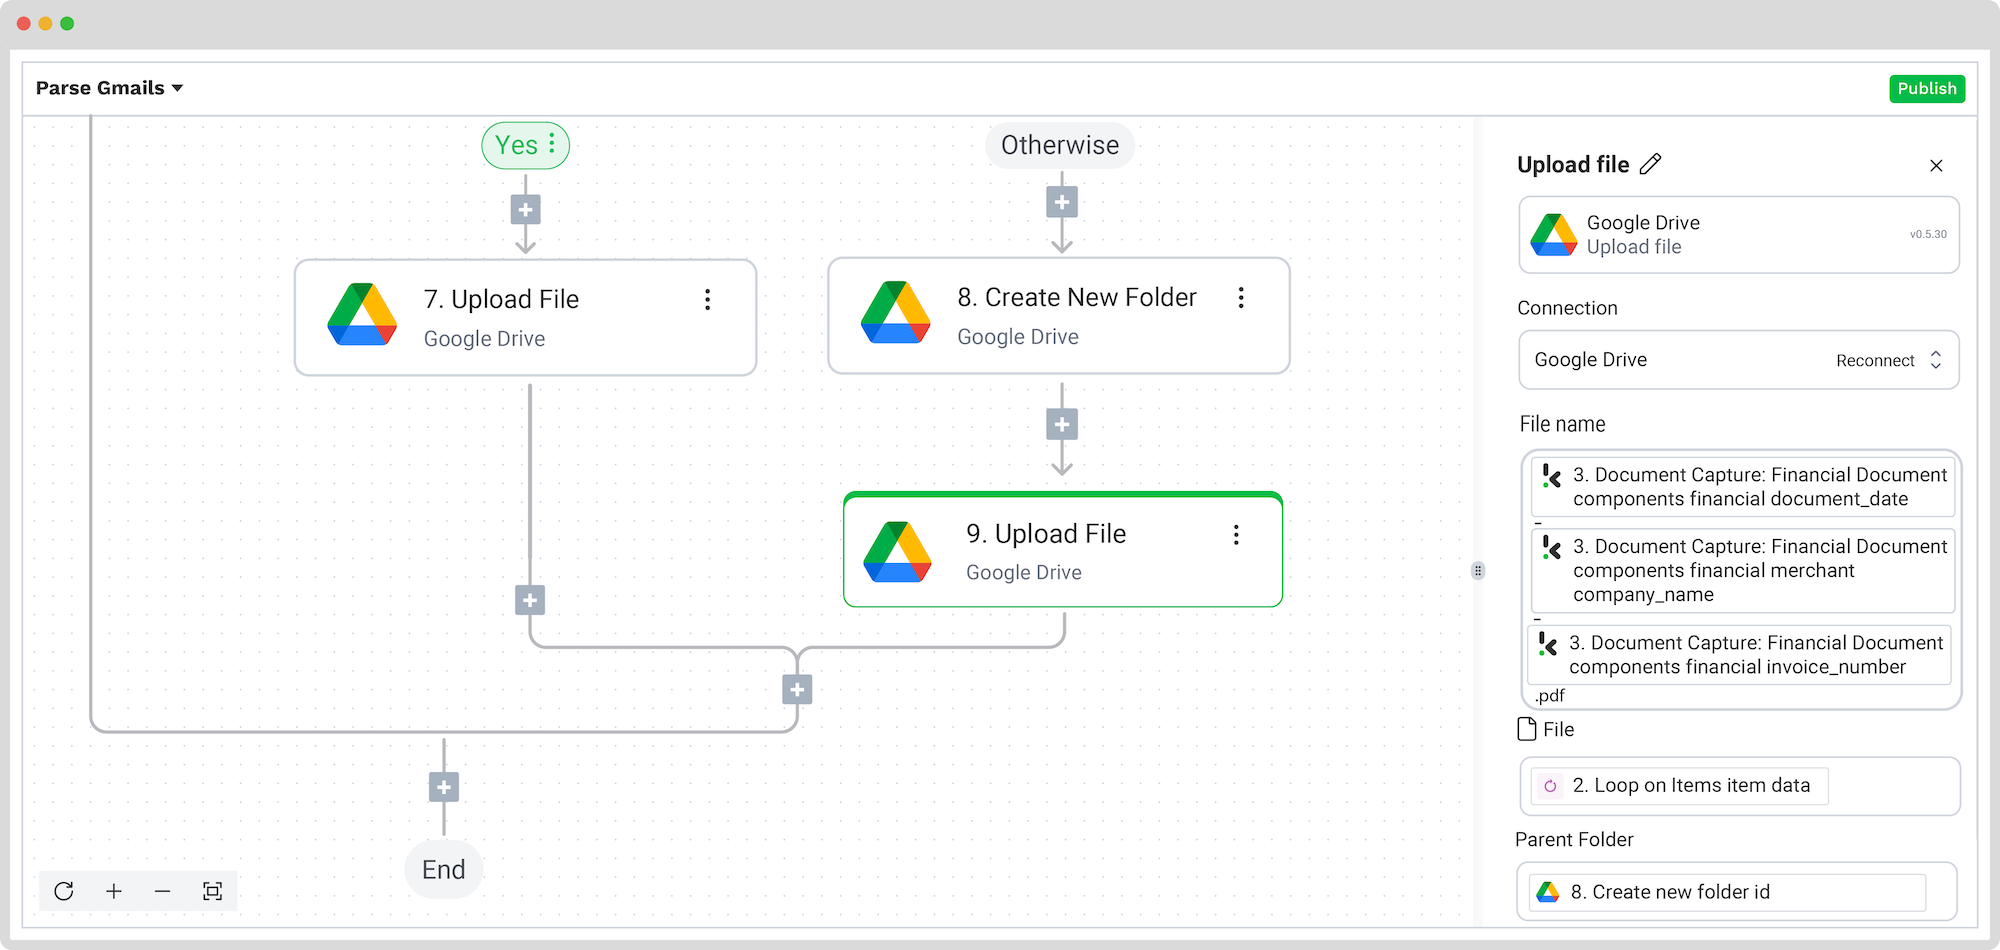
Step 11: Upload a file to the created merchant folder
The last step is similar to step 7. Please click the + button, search for Google Drive, and select Upload File. After connecting this step to the Drive, choose which components will give the file’s name, such as the document’s date, the name of the merchant’s company, and the invoice number.
For File, we are going to use the same 2. Loop on all attachments -> item -> data process. The only thing that differs is the parent folder, which is now going to be the folder created in the previous step. This means that you select Create New Merchant folder -> id from the Data Selector menu.
That’s it – your Gmail parsing flow is complete!
You’ve just created an automated workflow that captures Gmail attachments, extracts key invoice data, checks for the right merchant folder in Google Drive, creates one if needed, and uploads the files with a structured name. No more manual file sorting, renaming, or folder hunting – everything now happens automatically.
Before you sit back and enjoy the automation, test the full flow with sample emails and attachments. This way, you can be confident that everything works just as intended.
And remember: if you’re processing a high volume of documents, you don’t have to set up the flow yourself! Feel free to reach out to us because we’d love to help you out!
Gmail Parsing Use Cases
Automating the process of Gmail parsing can be implemented in a variety of use cases, so your business is able to benefit from the rewards of automation, regardless of your industry.
Here are just a handful of examples:
- Streamline customer acquisition by extracting customer information from Gmail bodies and help you nurture lead generation.
- Automate e-commerce workflows with email to Google Sheets conversion. Extract & forward data from POs, invoices, or delivery documents to stay on top of your order management.
- Simplify your HRM tasks by automatically parsing incoming resumes for instant candidate pre-selection. Invest your time in applicants who match your initial criteria.
- Facilitate appointment administration by reading and scanning incoming emails and capturing information, such as names, email addresses, and dates, helping your business with administrative planning and organization.
Regardless of your industry, parsing Gmail emails is something that you encounter on a daily basis. And, with Klippa DocHorizon, you can automate this task and bring it to its highest potential. Let’s see some of the benefits of automating Gmail parsing with Klippa.
Automate Gmail Parsing with Klippa
With Klippa DocHorizon, you will get to experience a streamlined Gmail parsing workflow. With our IDP platform, you get to enjoy:
- Increased information accuracy: With the use of AI-powered Optical Character Recognition (OCR) technology integrated into our solution, you get up to 99% accuracy in data extraction and Gmail parsing, reducing the human error rate.
- Shortened processing times: Save precious time by automating Gmail parsing, eliminating manual efforts and long processing times.
- Automated workflow: Using our IDP platform for Gmail parsing helps you to efficiently gather crucial information from incoming emails, seamlessly handling multiple email addresses at once.
- Safe and secure document processing: Process sensitive Gmail information, be it names, financial information, or personal data, in a safe and secure manner, as our IDP platform is GDPR and ISO-compliant and does not store any information in its servers.
- Ensure transparency in document processing, as Klippa DocHorizon is designed to detect any signs of document fraud or tampering.
- Document and language variety: Automate Gmail parsing, regardless of the document type in the attachment or the language used in the email body. Klippa DocHorizon processes a large variety of documents, such as invoices, bank statements, or contracts, in all Latin-alphabet-based languages.
Leave the manual Gmail parsing process behind and step into a more efficient rhythm with Klippa Dochorizon. Contact our experts or book a free demo below and bring the rewards of automation to your organization!
FAQ
While Gmail doesn’t offer email parsing features, you can easily connect it with solutions like Klippa DocHorizon to do it. By using OCR and machine learning, DocHorizon turns unstructured email content – like invoices or forms – into structured data you can use in your workflows.
Yes, it is! Tools like Klippa DocHorizon allow you to extract data from emails and export it directly into Google Sheets. You can define exactly what data to capture and where it should go, making it perfect for processing orders, form submissions, or customer requests in real time.
Reputable email parsing tools prioritize security and comply with regulations, just like Klippa DocHorizon does. Our platform is fully GDPR-compliant and ISO-certified, meaning your data is processed securely and never stored on external servers. If data privacy is a priority for your organization, DocHorizon is a safe bet.
To reduce errors, it’s necessary to clearly define the fields you want to extract and set up validation rules. Most parsing tools, including Klippa’s, provide error reports so you can quickly spot and fix issues. A useful feature you can enable is the Human-In-The-Loop review step to double-check uncertain extractions before they’re sent to your system.