Automating forms processing can cut document handling time by over 80% and reduce compliance errors to near zero.
This guide shows you exactly how to build a fully automated, GDPR/HIPAA-compliant form workflow in under 30 minutes using Doxis AI.dp, no coding required.
Manual form processing drains resources, risks data entry mistakes, and slows your business down. By replacing repetitive tasks with intelligent document processing, you can capture, classify, verify, and export data automatically from any form, in any format, and from any source.
In this blog, we’ll walk you through:
- Ways to adapt automation for compliance audits, multilingual OCR, and industry-specific needs
- Exactly how automated forms processing works
- A step-by-step setup in Doxis AI.dp
Key Takeaways
- 80% Faster Turnaround Times: Process thousands of forms in minutes instead of hours.
- ~99% Accuracy: Human-in-the-loop verification ensures data precision, even for complex layouts.
- Supports 100+ Formats: PDFs, scanned images, Word docs, structured/unstructured layouts.
- Multi‑Source Import: Integrates with Google Drive, Dropbox, Outlook, CRMs, ERPs, and over 100 other platforms.
- Compliant from Day One: Fully GDPR, HIPAA, and ISO‑certified workflows.
- No‑Code Setup: Configure automation flows without developer support.
- Free Trial Included: Start with €25 credits to explore full automation capabilities risk‑free.
What is Automated Forms Processing?
Automated forms processing refers to the use of technologies like Optical Character Recognition (OCR), AI-image processing, and machine learning to extract and process data from forms, whether physical or digital.
As an alternative to manual processing, forms processing automation boosts efficiency, accuracy, and cost-effectiveness, making it a valuable tool across various sectors like banking, healthcare, government, education, and retail.
7 Key Steps to Automate Forms Processing
Before we show you how to do this with Doxis AI.dp, it’s important to understand the universal process for forms automation. These steps reflect widely accepted industry practice and will help you recognise where automation can deliver the greatest impact in your organization.
Step 1: Define Objectives & Map Your Process
Identify the purpose of your form (e.g., onboarding, feedback, compliance) and outline current manual steps. This helps reveal exactly where automation will save time or reduce errors.
Step 2: Create Digital Forms
Use form‑building tools with drag‑and‑drop fields, conditional logic, and validation rules to ensure incoming data is clean and consistent from the start.
Step 3: Set Up Triggers & Actions (Workflow Automation)
- Triggers: New form submission, file upload, or scheduled event.
- Actions: Send confirmations, update a database, post to Teams or Slack, add rows to Excel, or start an approval process.
- Tools: Workflow engines like Microsoft Power Automate, Adobe Experience Manager Forms, or FormAssembly are common starting points.
Step 4: Data Extraction for Paper Forms
Use OCR as part of an Intelligent Document Processing (IDP) workflow to scan and convert handwritten or printed text into structured digital fields.
Step 5: Apply Business Rules & Validation
Check incoming data against specific rules, for example, verifying email formats, ensuring required fields are complete, or cross‑referencing form data with existing records.
Step 6: Route & Store Data
Automatically send validated responses to the right system (CRM, ERP, database) or route them for manual approval if required.
Step 7: Monitor & Report
Track completion rates, processing times, and error rates. Use these insights to continuously refine your automation workflows for speed and accuracy.
How to Automate Forms with Doxis AI.dp (Step-by-Step)
We will demonstrate how you can easily automate the processing of any form using Doxis AI.dp – a powerful Intelligent Document Processing platform that automates document workflows and offers flexibility for various use cases by supporting more than 100 document types and formats.
Let’s walk you through a step-by-step process of extracting data from a form using our platform. Remember: All you have to do is configure your workflow once, and from then on, AI.dp will completely automate the process for you.
Example Scenario
In this example flow, we will process the PDF T1 General Tax Form as our example document. We will fetch the file from Google Drive, extract the data and export it to a Google Sheets file.
And the best part? You can try it for free!
Step 1: Sign up on the platform
Start by signing up for free on the AI.dp Platform. After that, you’ll receive a free credit of €25 to explore all the platform’s features and capabilities.
After logging in, create an organization and set up a project to access our services. Here, we will activate platform components that will allow us to extract data from any form to Google Sheets.
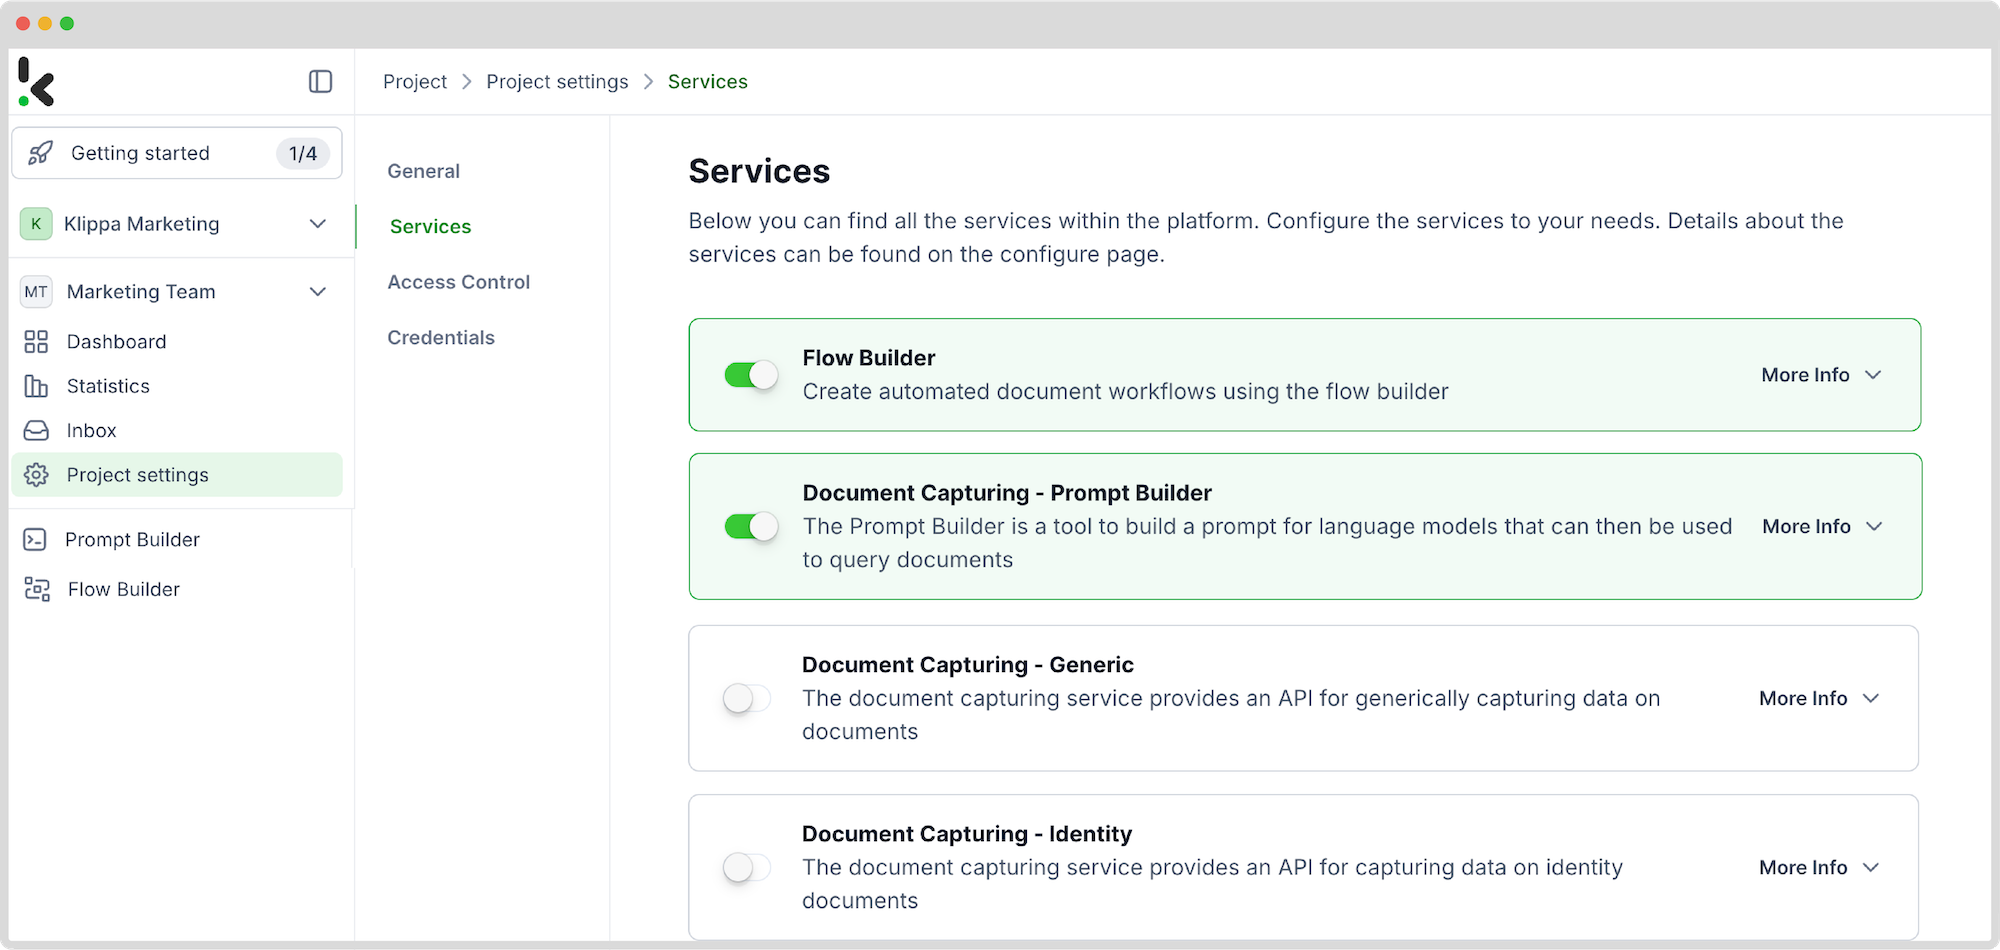
Go to Project Settings → Services and enable:
- Flow Builder
- Prompt Builder
This setup ensures you have everything you need right from the start! In the next steps, we will explain each service in detail.
Step 2: Configure Prompt Builder
The Prompt Builder service allows you to build custom prompts for capturing data on any document. All you have to do is upload an example document and match the types of fields you want to process (e.g., document number, name, address, etc.).
In your service area, click on Prompt Builder and follow these steps:
- Click +New Prompt
- Name it (e.g., “T1 Form”)
- Click Create
- Upload an example document
Now you can choose to either match document fields with one of our existing document type templates or highlight and name the fields from scratch.
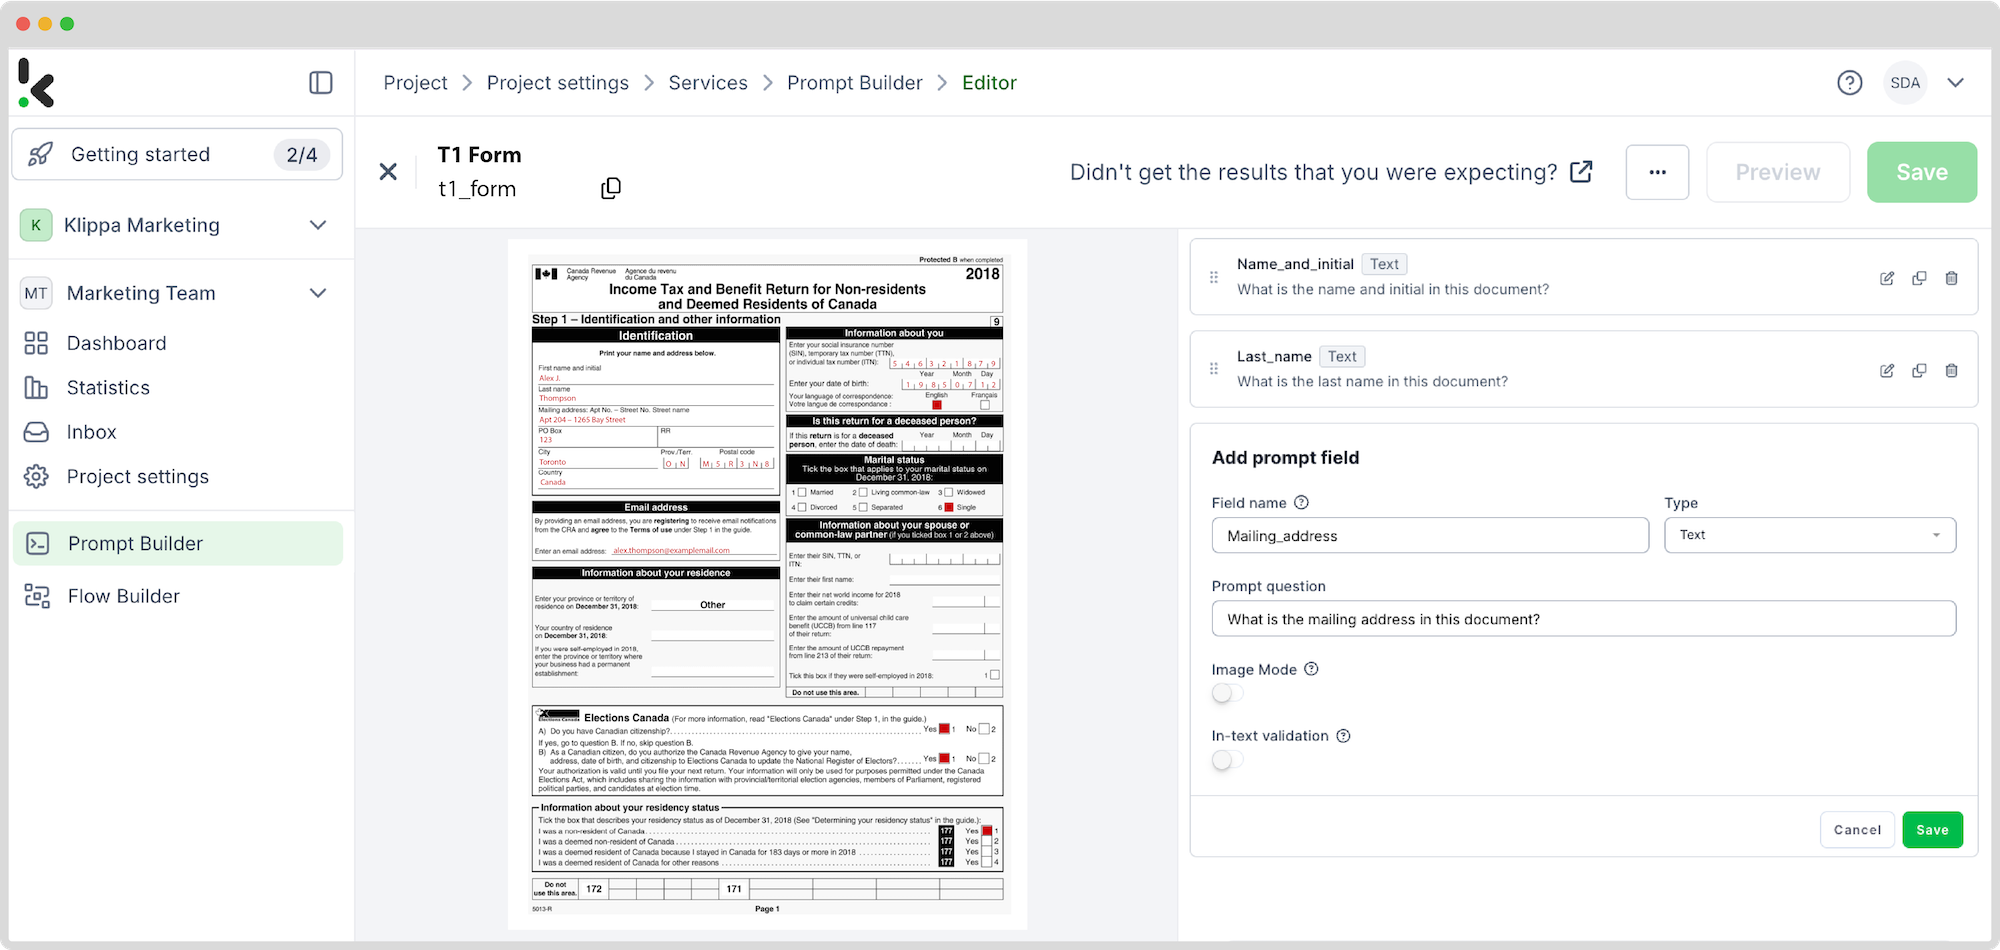
For our T1 form example, we will create a prompt from scratch. Click on “+Start from scratch” and configure the following:
- Add prompt instructions (e.g., “Recognize fields in this document”)
- Click on the +Add field
- Field name: Choose which fields you want to process when using this prompt (e.g, “Mailing_Address”)
- Type: Choose the data field type (e.g., Text, Number, Date, etc)
- Prompt question: e.g., “What is the mailing address in this document?”
- Click Save
Following the same steps, add more fields that the platform should recognize with this prompt. For our example, we will add “Name_and_initial” and “Last_name”.
“Preview” the results. If the prompt recognizes the fields correctly, save it.
Step 3: Choose your input source
Now it’s time to design your flow. A flow is a sequence of steps that define how your forms are going to be extracted to a chosen output.
In your service area, click on Flow Builder and follow these steps:
- Click on New Flow -> +From Scratch
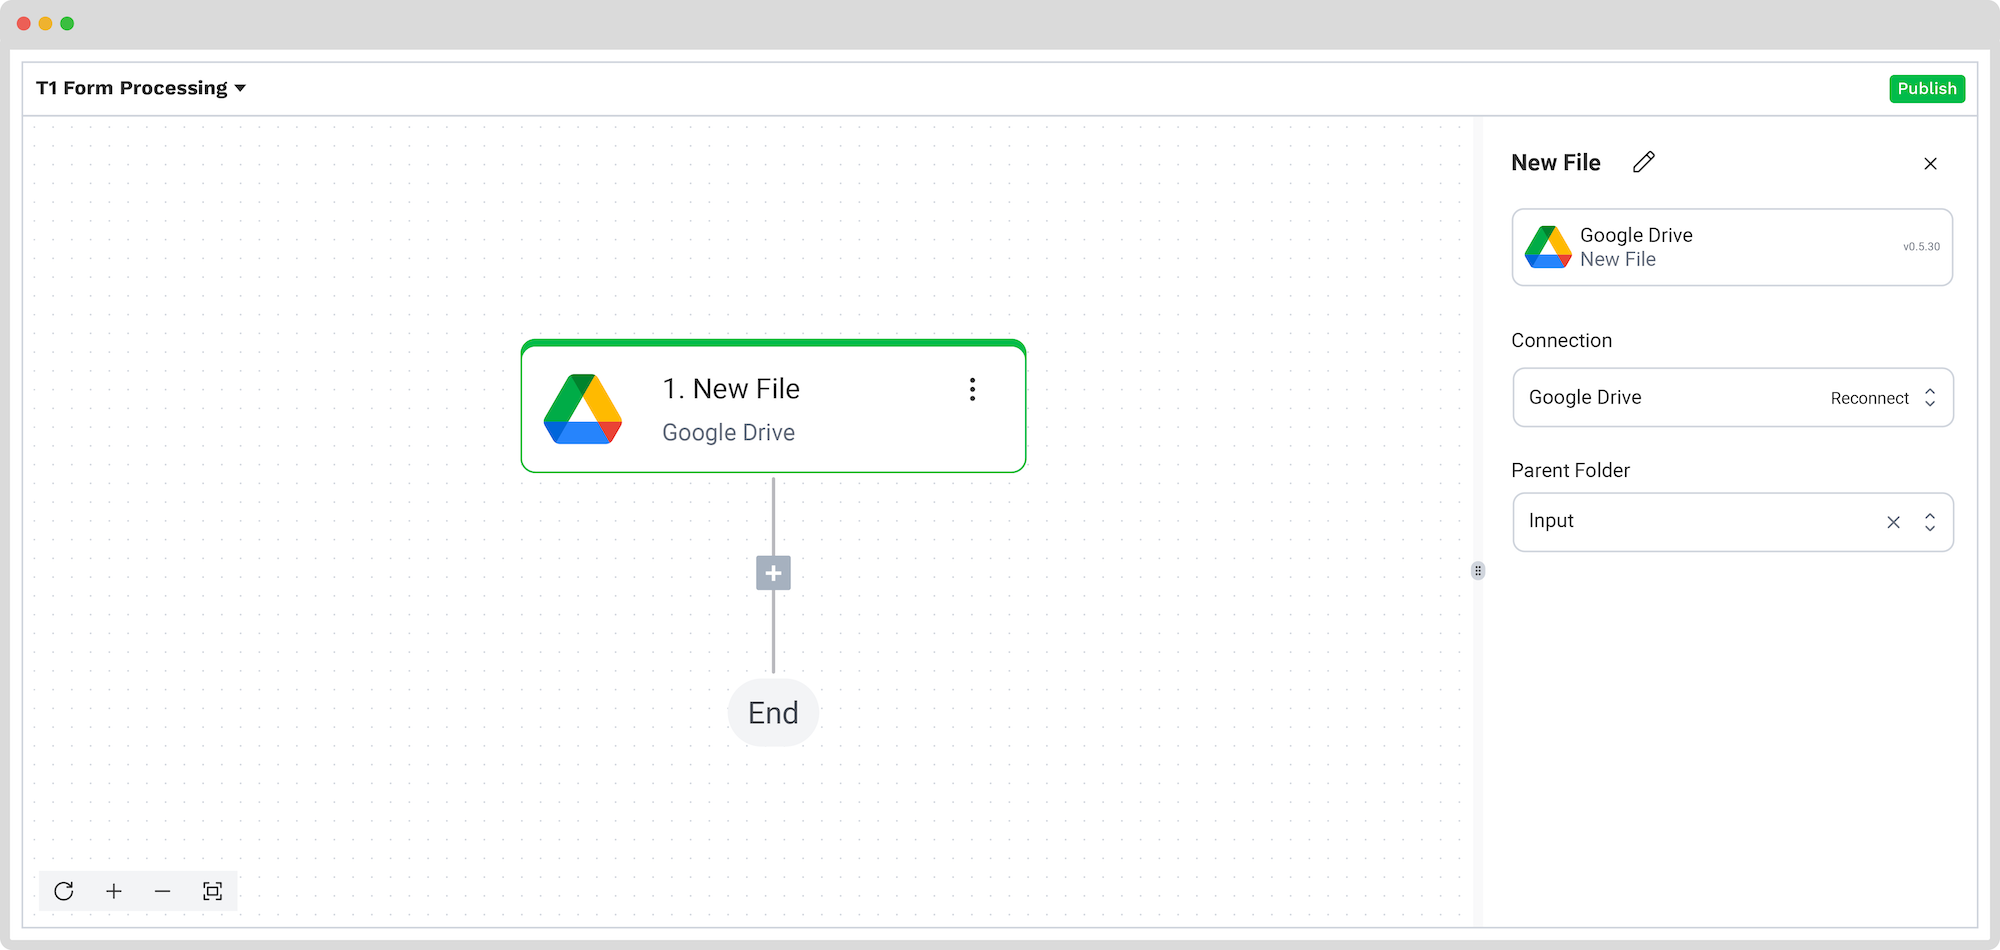
The first step in building your flow is selecting your input source. For our example, we will choose a Google Drive folder:
- Click on Select Trigger -> Google Drive (New File)
- Connection: Google Drive (log in to your account)
- Parent folder: The name of the folder where your forms are located
Upload a file into the Google Drive folder and test this step.
Here’s a tip: For the input source, you can upload files directly from your device or connect to over 100 external sources, including Dropbox, Outlook, Salesforce, Zapier, OneDrive, your company’s database, or cloud storage solutions like Amazon S3 and iCloud.
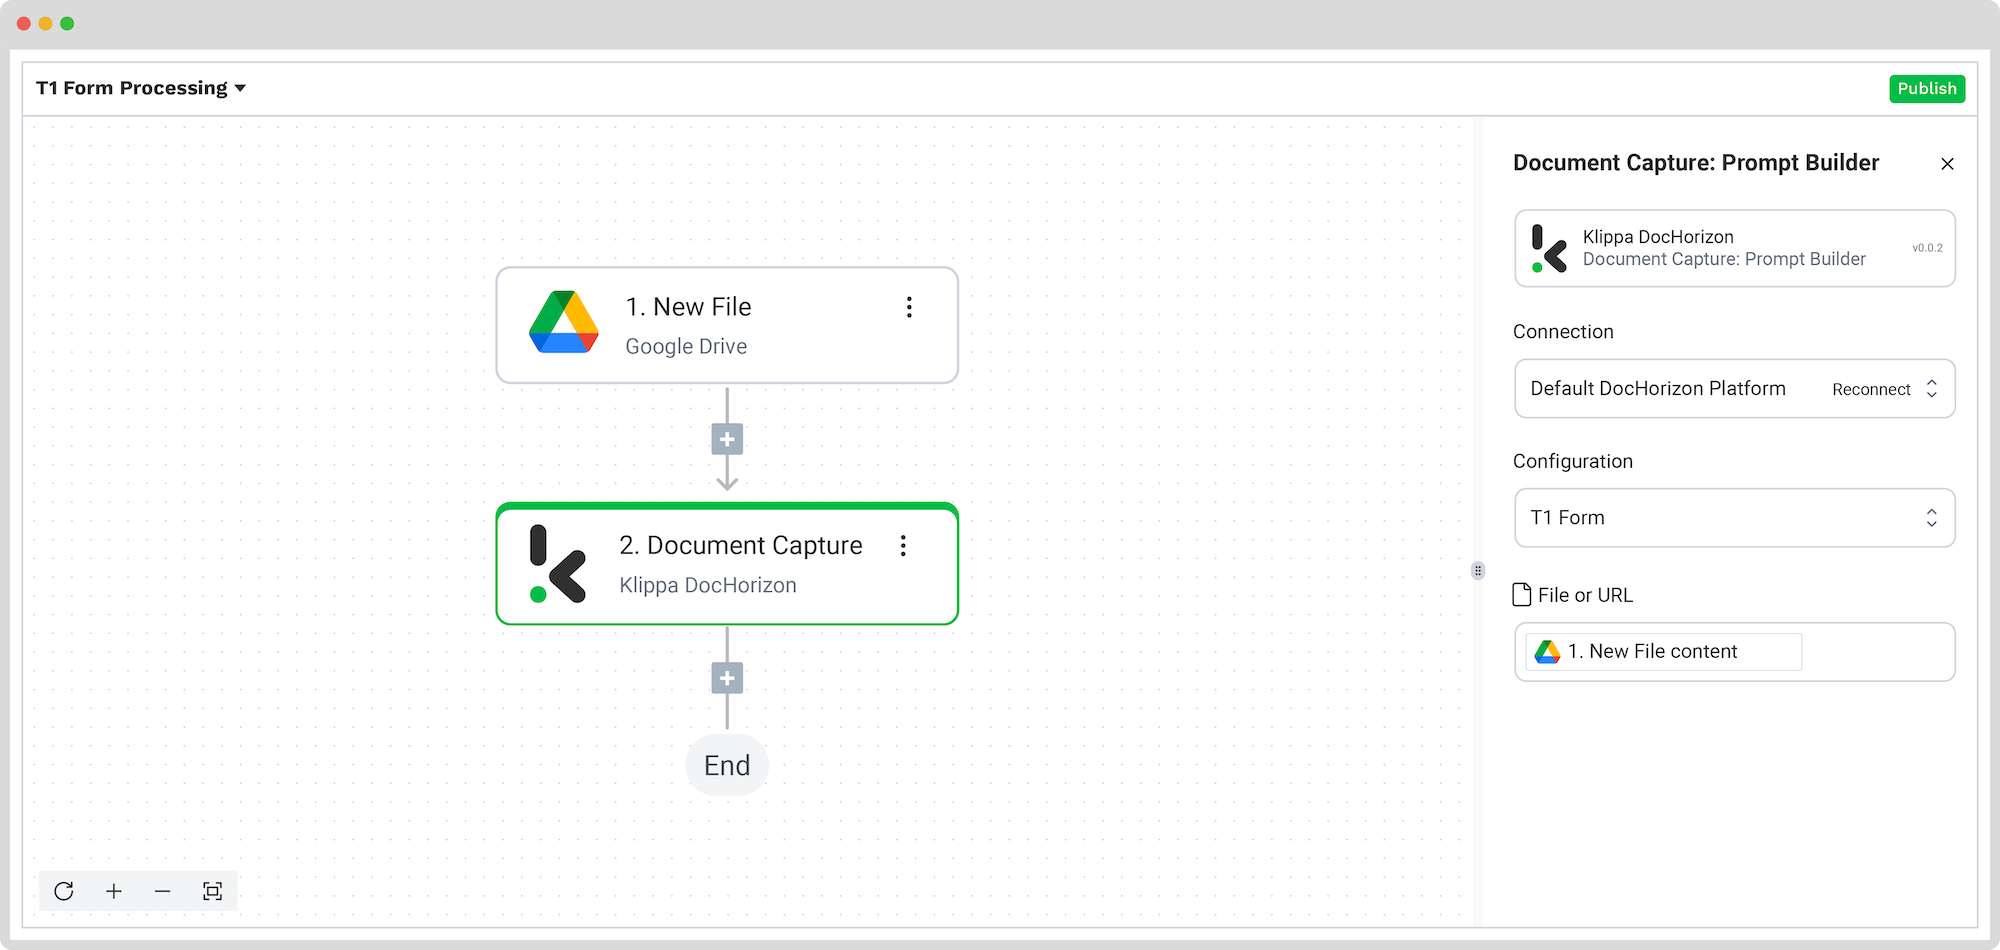
Step 4: Capture and extract data
Now, it’s time to extract the necessary data by using the previously created prompt to process all the selected data fields from the T1 form in our input folder.
In the Flow Builder, add Document Capture: Prompt Builder step and configure the following:
- Connection: Default AI.dp Platform
- Preset: The name of your prompt, in our example, “T1 Form”
- File or URL: New File -> content
Test this step. You’re ready to move on to the next step: saving your results!
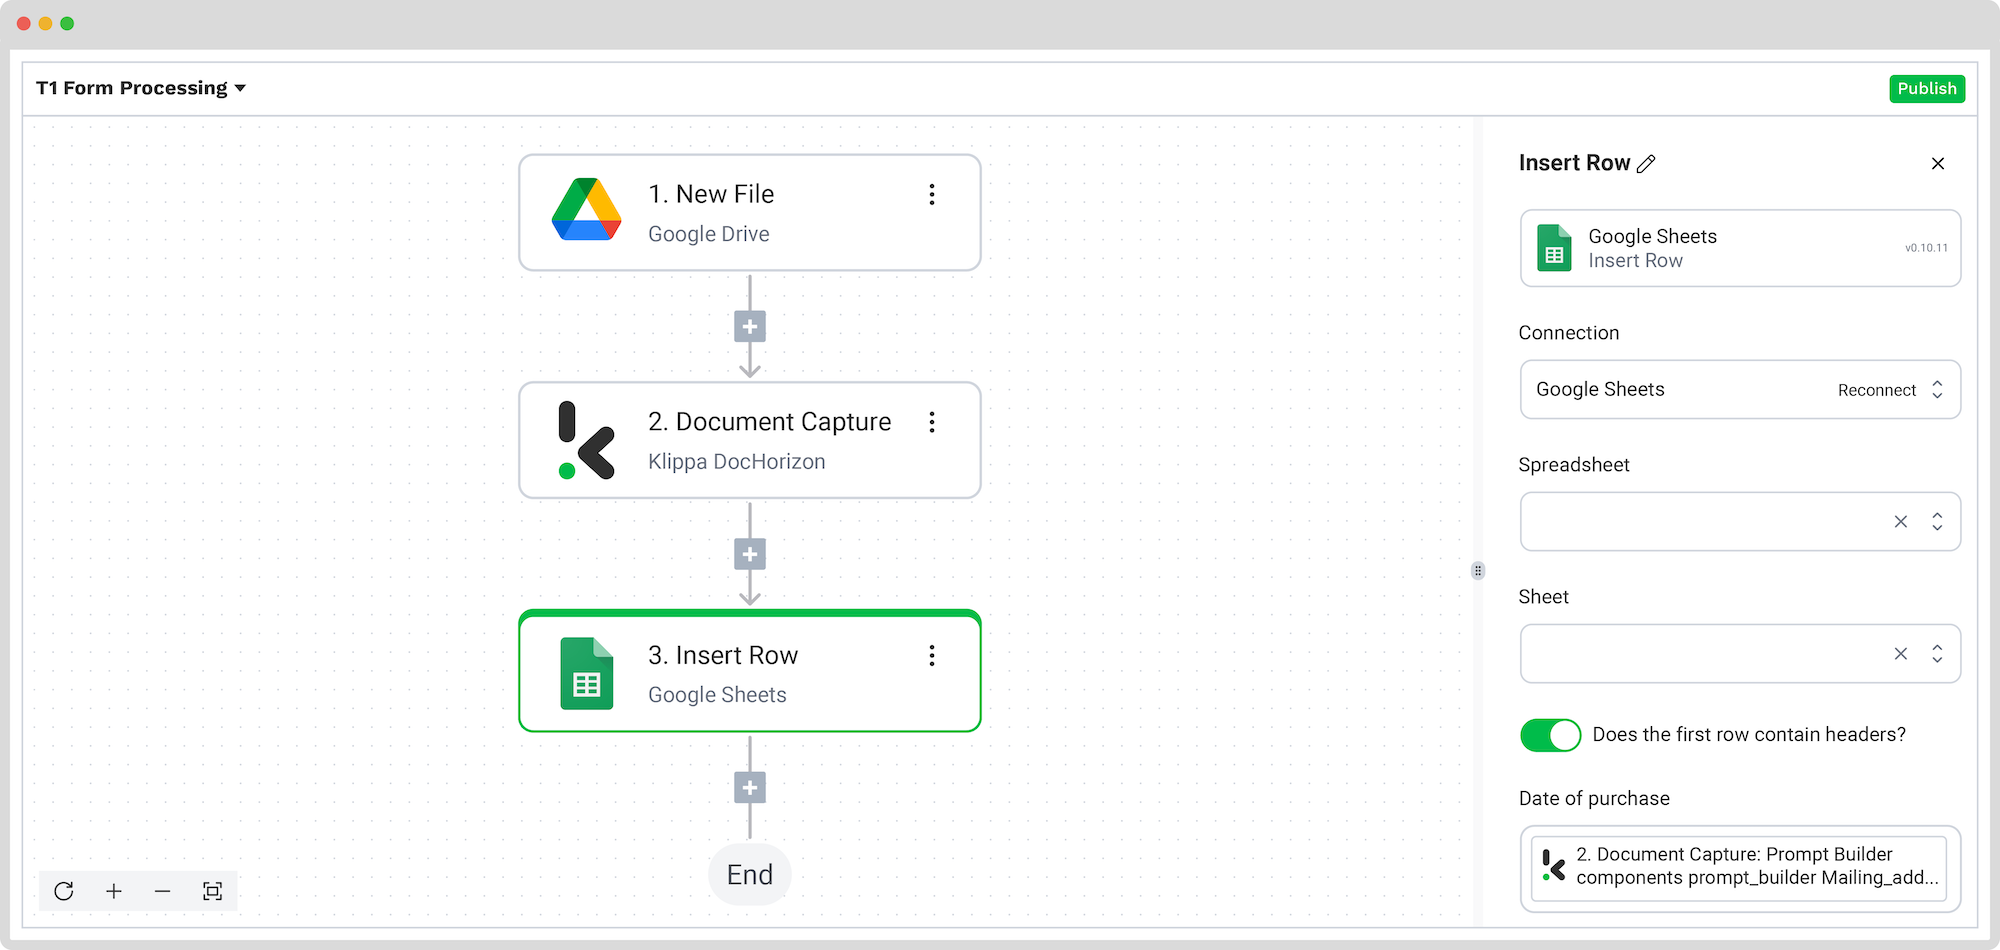
Step 5: Choose your output source
This is the last step of our flow – choosing a destination for the final output. Depending on your workflow, the destination can be your database, ERP system, accounting software, or any other platform.
For this example, we’ll create a Google Sheets file and set it as a final destination for our extracted data. Add Google Sheets: Insert Row and configure the following:
- Connection: Google Sheets
- Spreadsheet: Name of your spreadsheet
- Sheet: Name of your sheet (if multiple sheets are in the file)
If the first row of your sheet contains headers, toggle the “Does the first row contain headers?” and match the headers with extracted fields:
- Header (e.g., “Mailing Address”): Document Capture: Prompt Builder -> components -> prompt_builder -> Mailing_address
Test this step and you’re all set!
Congratulations! All the form data is now available in your Google Sheets file. With this setup in place, you can publish the flow, and any new forms added to the Google Drive folder will be processed automatically. That’s how you can save time while ensuring accuracy in your workflows.
And remember: if you’re processing a high volume of documents, you don’t have to set up the flow yourself. We’d love to hear about your use case and help you get started!
Automate Forms Processing with Doxis
Looking for an easy way to process your forms? We’ve got you covered! With Doxis AI.dp, you can easily automate any document workflows. By using Doxis’ advanced module, you can set up a seamless workflow tailored specifically to your needs:
- Data extraction OCR: Automatically extract data from any type of document.
- Human-in-the-loop: Ensure almost 100% accuracy with our human-in-the-loop feature, allowing internal verification or support from Doxis’ data annotation team.
- Document conversion: Convert documents in any format – such as PDF, scanned images, or Word documents – into various business-ready data formats, including JSON, XLSX, CSV, TXT, XML, and more.
- Data anonymization: Protect sensitive information and ensure regulatory compliance by redacting privacy-sensitive data, such as personal information or contact details.
- Document verification: Authenticate documents automatically and identify fraudulent activity to reduce the risk of fraud.
At Doxis, we value privacy – all of our document workflows are HIPAA, GDPR, and ISO compliant, ensuring secure data processing. With peace of mind about data safety, take the next step and streamline your document workflows.
If you want to automate your workflow with Doxis’ intelligent document processing solution, don’t hesitate to contact our experts for additional information or book a free demo!
FAQ
Document processing automation uses technologies like OCR, AI, and machine learning to extract, classify, and export data from documents, automatically and at scale, reducing manual work, errors, and costs.
Use a platform like Doxis AI.dp to build a custom workflow. Simply upload a sample form, define which fields to extract using Prompt Builder, set your input source (e.g., Google Drive), and choose your output (e.g., Google Sheets). Once configured, all incoming forms will be processed automatically.
Yes. Doxis offers a free trial with €25 in credits, allowing you to explore the platform’s features and capabilities before deciding.
Absolutely. Doxis complies with global data privacy standards, including GDPR. Your data is encrypted, securely processed, and never shared with third parties without your consent.