Accurate records, compliance, and efficiency are but a few words that sit at the forefront of the minds of anyone who handles receipts daily. You may even find yourself wading through a sea of paper receipts or digital scans, struggling to process them efficiently and extract the relevant information for financial or expense reporting.
Fortunately, there are solutions available to streamline this process and transform the way you handle receipts: scanning them directly into Excel. In this blog, we’ll explore how you can harness the power of modern technology to seamlessly scan receipts into Excel, revolutionizing your workflow in just a few simple steps.
Key Takeaways – Ways to Scan Receipts into Excel
- Manual entry into a receipt tracker: Create clear column headers for Date, Vendor, and Amount, then type in data from each receipt manually, using formulas to calculate totals automatically.
- Use Excel’s built‑in “Data from Picture” tool: In Excel, select “Data from Picture” to take or insert a photo of a receipt. Review and correct any extracted details before placing them into your spreadsheet.
- Use Adobe Acrobat’s OCR feature: Scan receipts into Adobe Acrobat, use the “Recognize Text” tool to make the content editable, and export it into Excel for tracking and reporting.
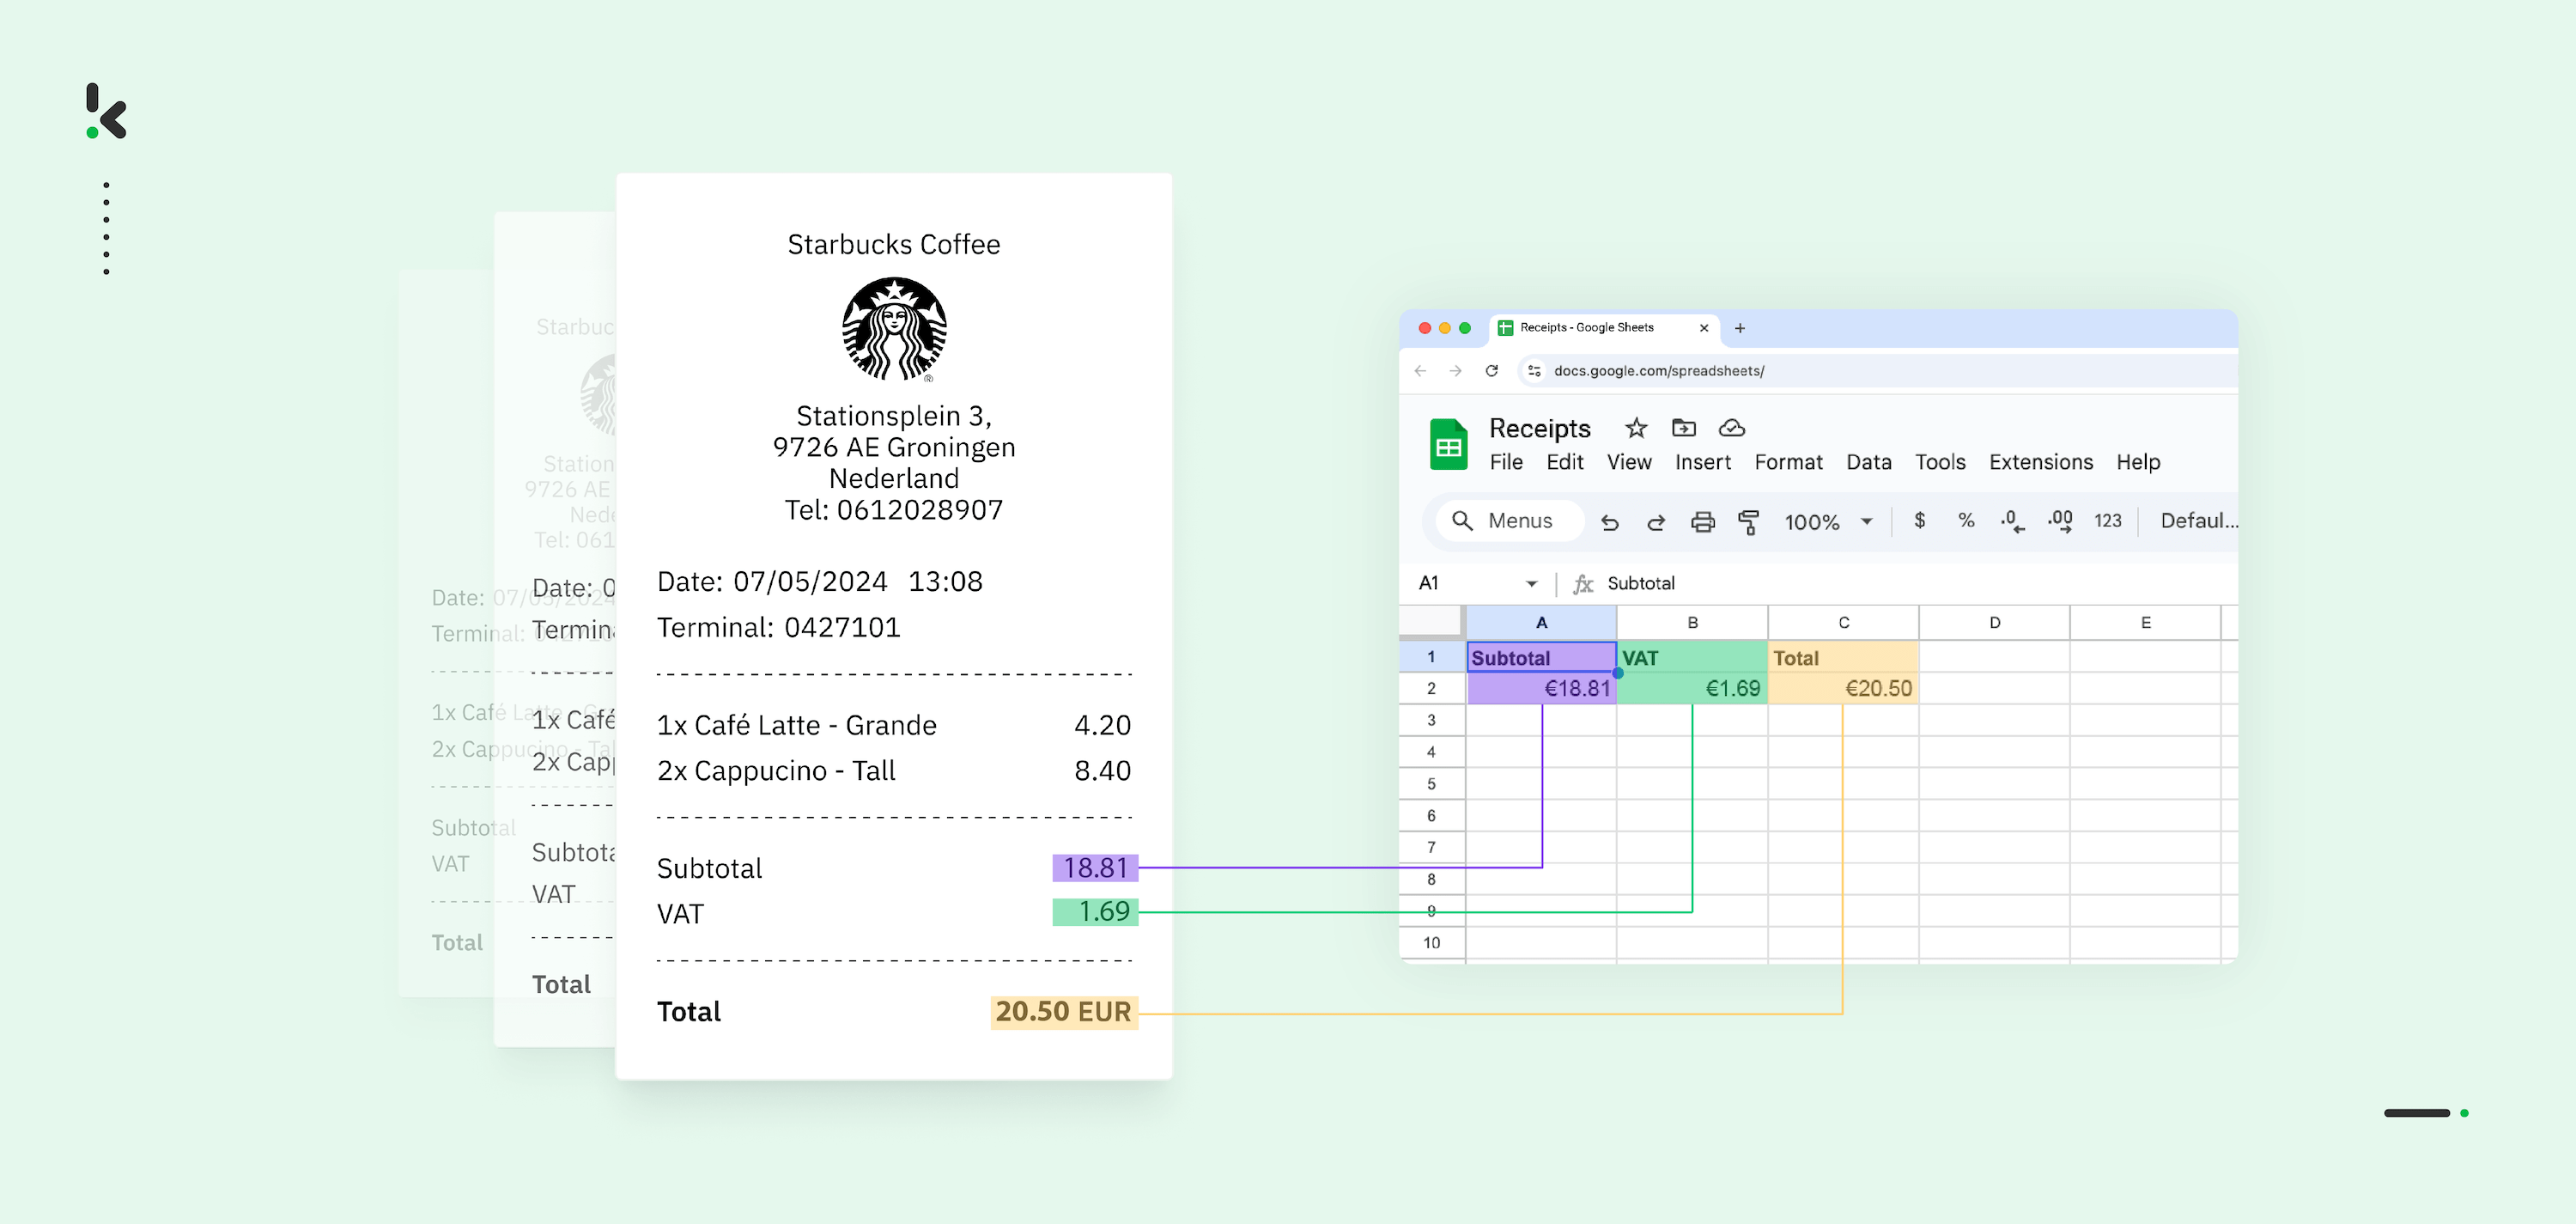
- Use a dedicated receipt scanning app like Klippa DocHorizon: Capture paper receipts via photo or upload e‑receipts to Klippa’s OCR‑enabled Intelligent Document Processing platform. The system automatically extracts key data such as date, vendor, and total, then exports it directly to Excel or as a CSV file.
Why Convert Receipts into Excel?
First, let’s break down why it is beneficial for the finance team to log receipts into Microsoft Excel sheets instead of storing them and keeping a physical journal.
Duplicate Detection
When receipts are converted into Excel, it becomes easier to identify duplicate expense claims. With Excel, you can sort and filter to quickly spot entries with identical or similar details, reducing the risk of accidental double payments or fraudulent activities.
Streamlined Organization
Converting receipts to Excel allows for centralized organization of all financial data. Instead of sifting through piles of paper or numerous digital files, you can neatly categorize and access receipts within a single Excel format or a spreadsheet, making it easier to locate specific transactions whenever needed.
Seamless Data Analysis
Microsoft Excel provides tools for expense tracking and management. By inputting receipt data into Excel spreadsheets, you can categorize expenses, calculate totals, and generate comprehensive reports effortlessly. This simplifies the expense management process, making it easier to monitor spending, budget effectively, and identify areas for cost optimization.
Digitization of Physical Documents
Storing receipts in Excel format contributes to efficient document management. Unlike physical receipts, which can easily get lost or damaged, digital records in Excel are easily searchable and can be securely archived for future reference. This ensures that important financial documents are organized, accessible, and protected against loss or damage.
Common Methods for Scanning Receipts into Excel
There are several ways to turn your paper and digital receipts into structured Excel data. The right method for you will depend on your workflow, available tools, and the level of automation you need. Here are the most common approaches:
1. Apps with OCR Technology
Optical Character Recognition (OCR) uses machine learning to “read” receipt images and extract key fields such as vendor name, date, and total amount.
With an OCR-enabled app like Klippa’s Receipt OCR, you can capture receipts using your phone camera or upload existing PDFs and e‑receipts. The app automatically processes the data and exports it directly into Excel or CSV, reducing manual entry and potential errors.
Other OCR scanning applications work similarly, offering varying integration options depending on the software.
2. Adobe Acrobat Scanning and OCR
If you already use Adobe Acrobat, you can scan paper receipts directly from your scanner into Acrobat, then enable its OCR feature to make the text editable. Once the data is recognized, simply export the document as a spreadsheet file and open it in Excel.
This method is ideal for offices relying on multifunction printers or scanners and already managing PDFs as part of their workflow.
3. Excel’s “Data from Picture” Feature
Microsoft Excel includes a handy “Data from Picture” tool that allows you to import data directly from an image. You can take a photo of a receipt with your device’s camera or select an existing image file. Excel then analyzes the picture, identifies tabular data, and places it into your spreadsheet.
This built-in feature is convenient for occasional users who don’t need full OCR automation but want quick extraction without external software.
4. Manual Receipt Trackers
For teams processing small volumes of receipts, a manual tracker in Excel may suffice. Create column headers for details such as date, vendor, item, quantity, and total, then enter the data from each receipt manually. While time-consuming, this method gives full control over data entry and formatting.
Use Excel formulas — such as =Quantity*UnitPrice for line totals and SUM for aggregations to speed up calculations.
Step-by-Step Workflow for Scanning Receipts into Excel
Regardless of whether you use an OCR app like Klippa DocHorizon, Adobe Acrobat, Excel’s built-in tools, or even manual entry, most receipt-to-Excel processes follow the same foundational workflow. Here’s how it works:
Step 1 – Capture the Receipt Image
Start by obtaining a clear, high-quality image of your receipt.
- For paper receipts, use a scanner or take a perfectly lit photo with your phone. Avoid shadows, wrinkles, and cut-off edges.
- For digital receipts, save the email attachment or PDF in a consistent format such as JPG, PNG, or PDF.
Tip: Standardized, high-resolution images make data extraction faster and more accurate. Check out our full receipt capturing guide for more information.
Step 2 – Organize Your Files
Keep your receipts centralized and easy to find:
- Store them all in one dedicated folder (local drive or cloud platform).
- Use logical naming conventions like
Vendor_Date_Amount.pdf. - Separate files into subfolders for expense categories, months, or departments if needed.
Tip: Organized filing supports bulk imports and better data management in Excel. If you already have a large set of receipt files — or want to rename them automatically for consistency — check out our guide on renaming PDF files in bulk to speed up this step.
Step 3 – Extract the Data
This is where you convert receipt images into usable data:
- Using OCR: Tools like Klippa automatically read receipts and fetch key fields such as vendor name, date, total, tax, and line items.
- Using Excel’s “Data from Picture” feature: Capture or upload an image directly into Excel for quick conversion.
- Manual typing: Enter details by hand into your spreadsheet for full control (but slower processing).
Tip: Ensure OCR tools are properly configured for your receipt formats to minimize errors. If you want a detailed walkthrough, check out our guide on extracting data from receipts for best practices and step-by-step instructions.
Step 4 – Review and Validate Accuracy
Before sending your data to Excel, verify it’s correct:
- Check totals, tax amounts, and dates against the original receipt.
- Look for missing fields or strange formatting.
- Correct typos, misreads, and misplaced decimal points.
Tip: Even the most advanced OCR benefits from human verification, especially for unusual layouts.
Step 5 – Import into Excel
Once your data is extracted and verified, bring it into Excel:
- Match data fields with your spreadsheet column headers.
- Paste the data directly or import CSV/Excel files generated by your scanning tool.
- Apply formulas such as
=SUM()for totals, or set conditional formatting to highlight duplicates or unusual values.
Tip: Automating formulas and categorization in Excel can save hours of manual adjustments.
By following these core steps, you can digitize and manage your receipts in Excel accurately and efficiently. And if you want to automate every stage, from image capture to Excel import, platforms like Klippa DocHorizon can execute this workflow end-to-end with minimal manual input.
How to Convert Receipts Into Excel With Klippa
In this section, we will demonstrate how you can easily convert receipts into an Excel spreadsheet and automate this process, simplifying the task of processing and managing your receipt data.
Klippa DocHorizon is a powerful Intelligent Document Processing (IDP) platform that automates document workflows and offers flexibility for various use cases by supporting more than 100 document types and formats.
Let’s walk you through a step-by-step process of converting receipts to Excel using Klippa DocHorizon. For our example, we will process a PDF receipt from Google Drive as our input source and choose Excel as our output format.
Step 1: Sign up on the platform
Start by signing up for free on the DocHorizon Platform. Enter your email address and password, then provide details such as your full name, company name, use case, and document volume. After that, you’ll receive a free credit of €25 to explore all the platform’s features and capabilities.
After logging in, create an organization and set up a project to access our services. Go to Project Settings → Services. For our goal – scanning receipt data to Excel – enable the Document Capturing – Financial and Flow Builder to get started. This setup ensures you have everything you need right from the start!

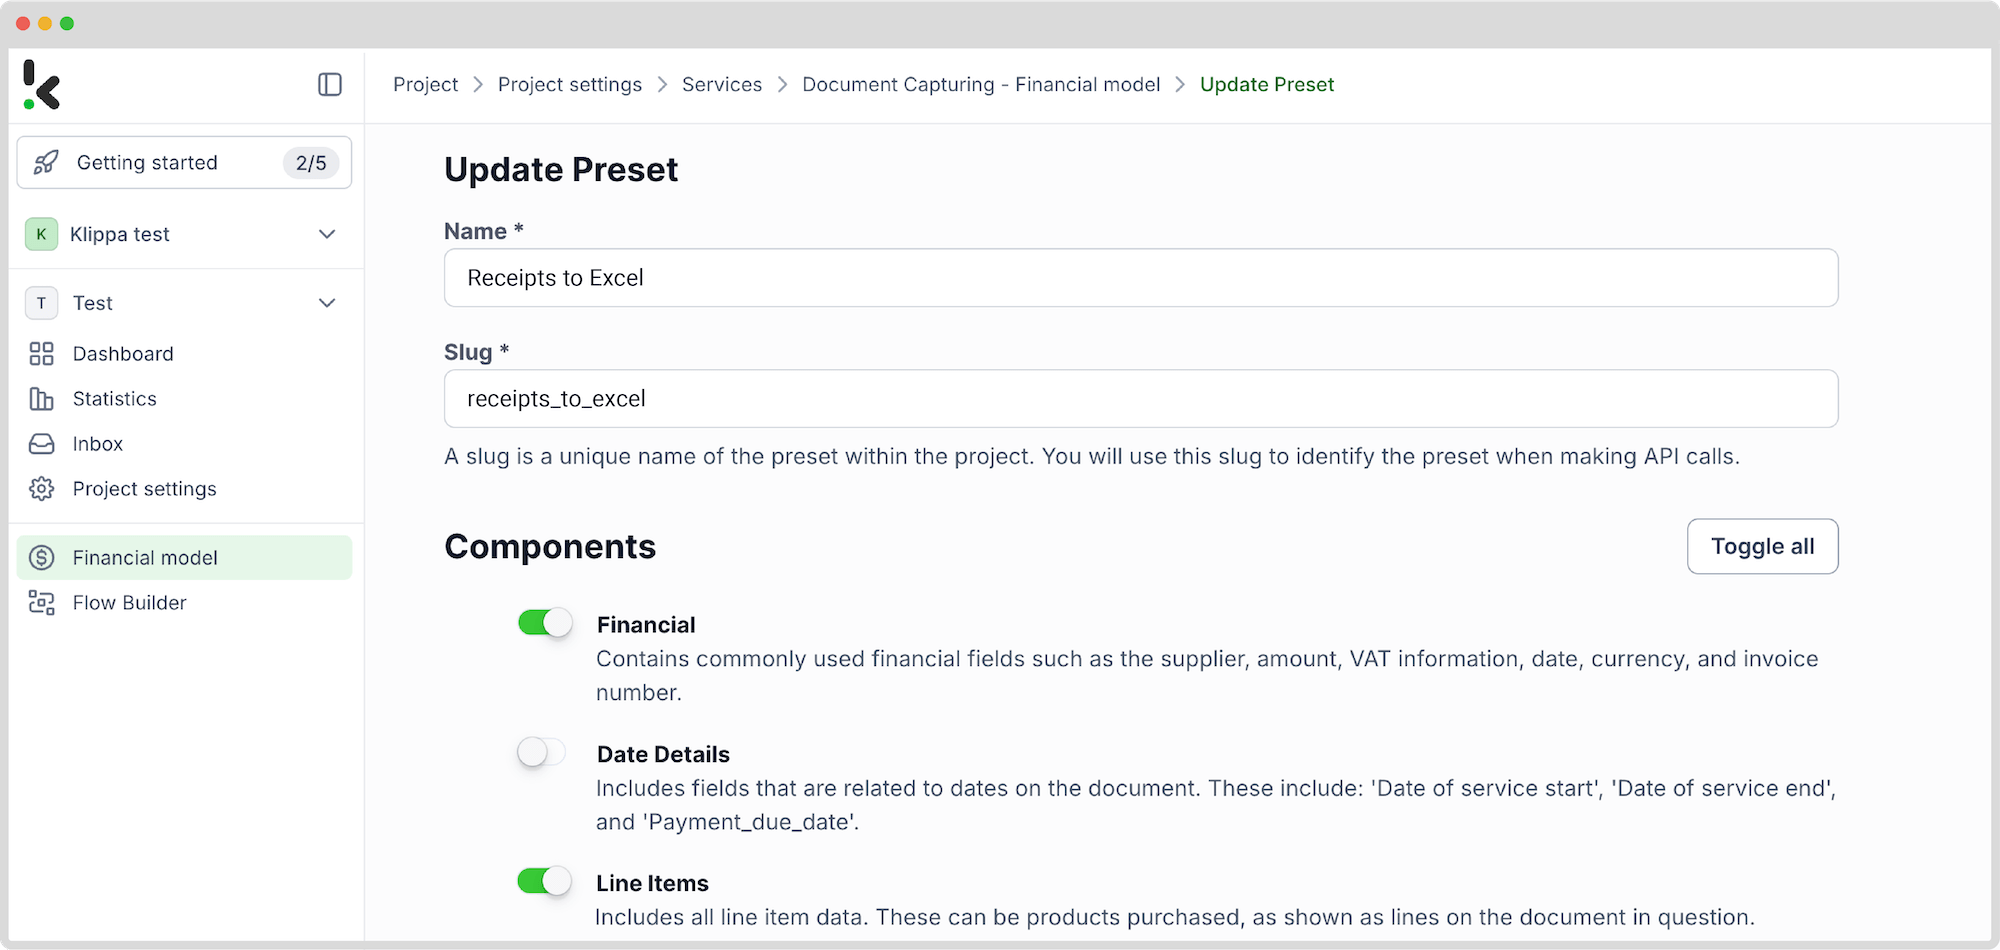
Step 2: Create a preset
You might wonder why we chose the Financial Model. This model is designed to simplify your financial workflows by automating data extraction, analysis, validation, and classification. It efficiently processes a broad variety of financial documents, including invoices, purchase orders, bank statements, and many more.
Create a new preset, let’s name it “Receipts to Excel”. This preset activates the components you need for your specific use case. Let’s enable the Financial and Line Item components to process fields like transaction number, products purchased, and amount from a receipt.
Here’s a tip: You can customize the preset depending on your use case by enabling more components, such as Date Details, Reference Details, Amount Details, Document Language, Payment Details, etc.
You’re almost done! Click “Save” to finalize your settings, and you’ll be ready for the next step.
Step 3: Select your input source
Now that you have enabled the Flow Builder and created a preset, it’s time to build your flow. A flow is a sequence of steps that define how your receipt data is scanned and then converted to an Excel document.
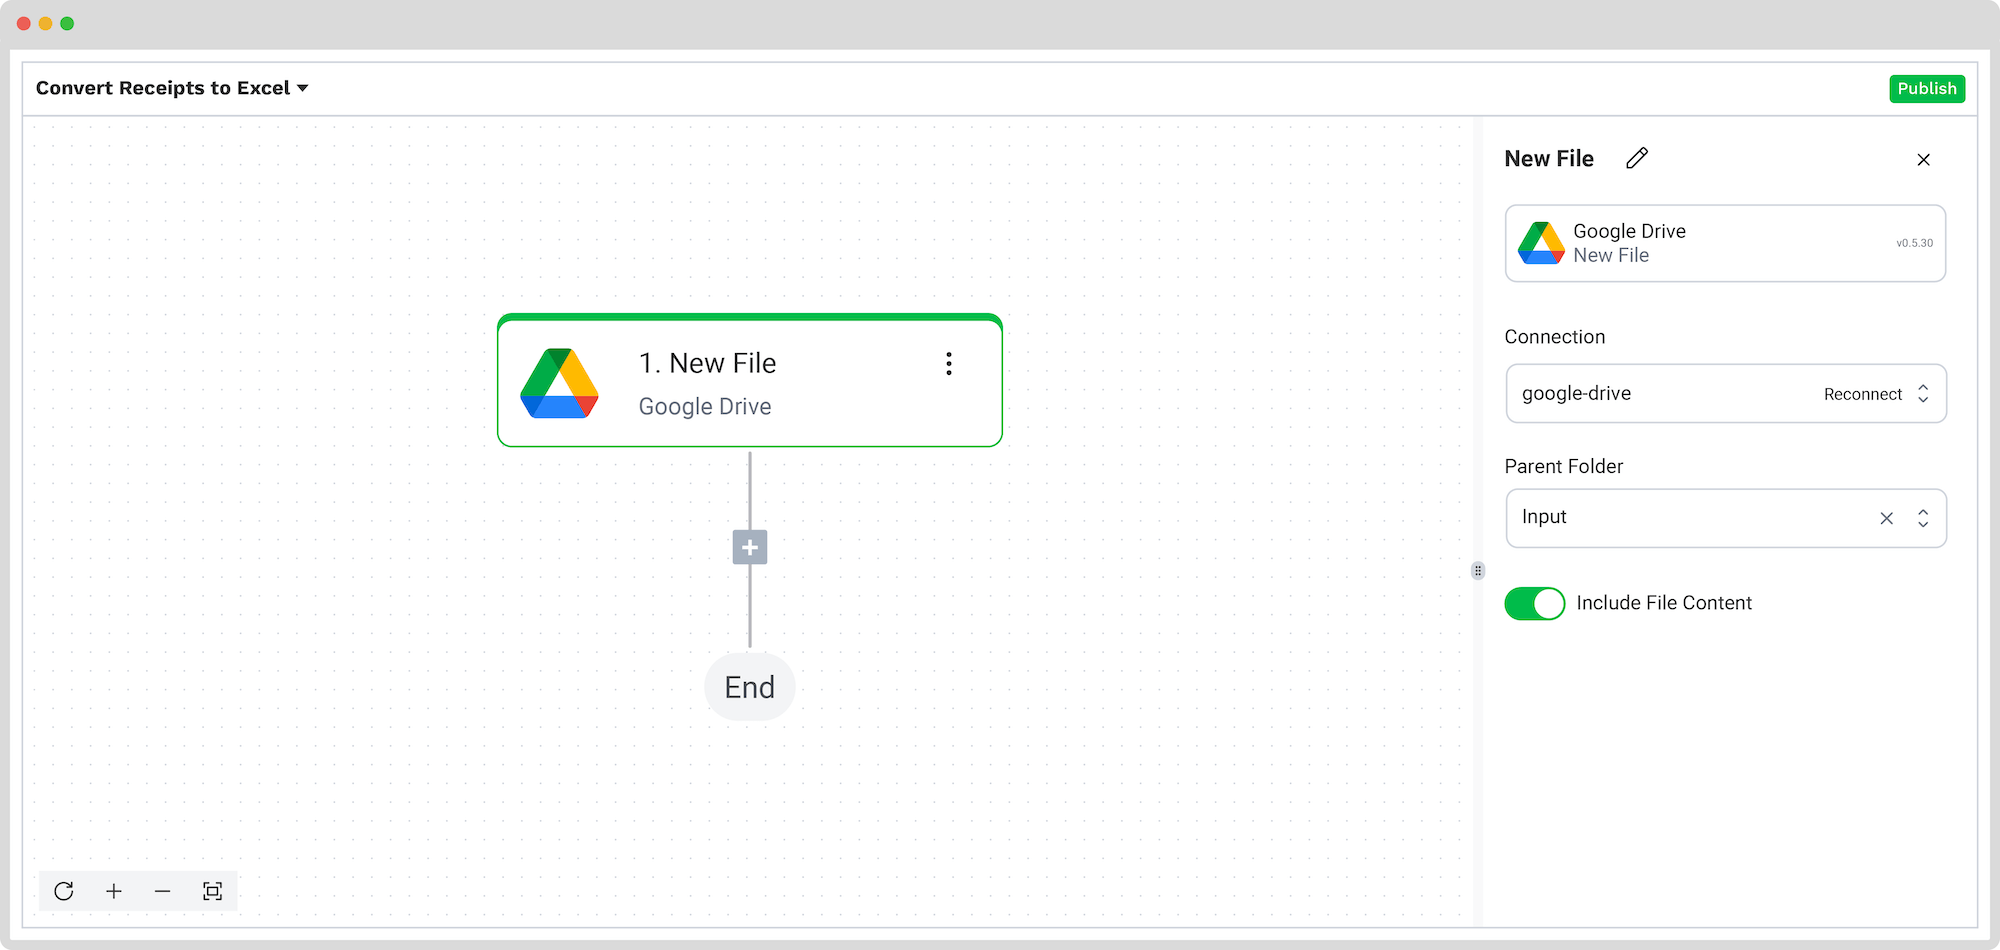
Click New Flow → + From scratch and assign your flow a name. We’ll name the flow “Convert Receipts to Excel”. For this example, you’ll create a folder named “Input” in Google Drive and upload all your receipts there.
Next, choose your input source by selecting “Google Drive” and “New File” as your trigger. This is going to start your flow. On the right side, fill out the following sections:
- Connection: Assign any name to your connection (e.g. “google-drive”) and authenticate with Google
- Parent Folder: Input
- Include File Content: Check this box to ensure file content is processed
Here’s a tip: You have several options for selecting your input source: you can upload files directly from your device or connect to over 100 external sources, including Google Drive, Dropbox, Outlook, Box, Salesforce, Zapier, OneDrive, and your company’s database.
Test this step by clicking on Load Sample Data: remember to have at least one sample document in your input folder while setting up your flow.
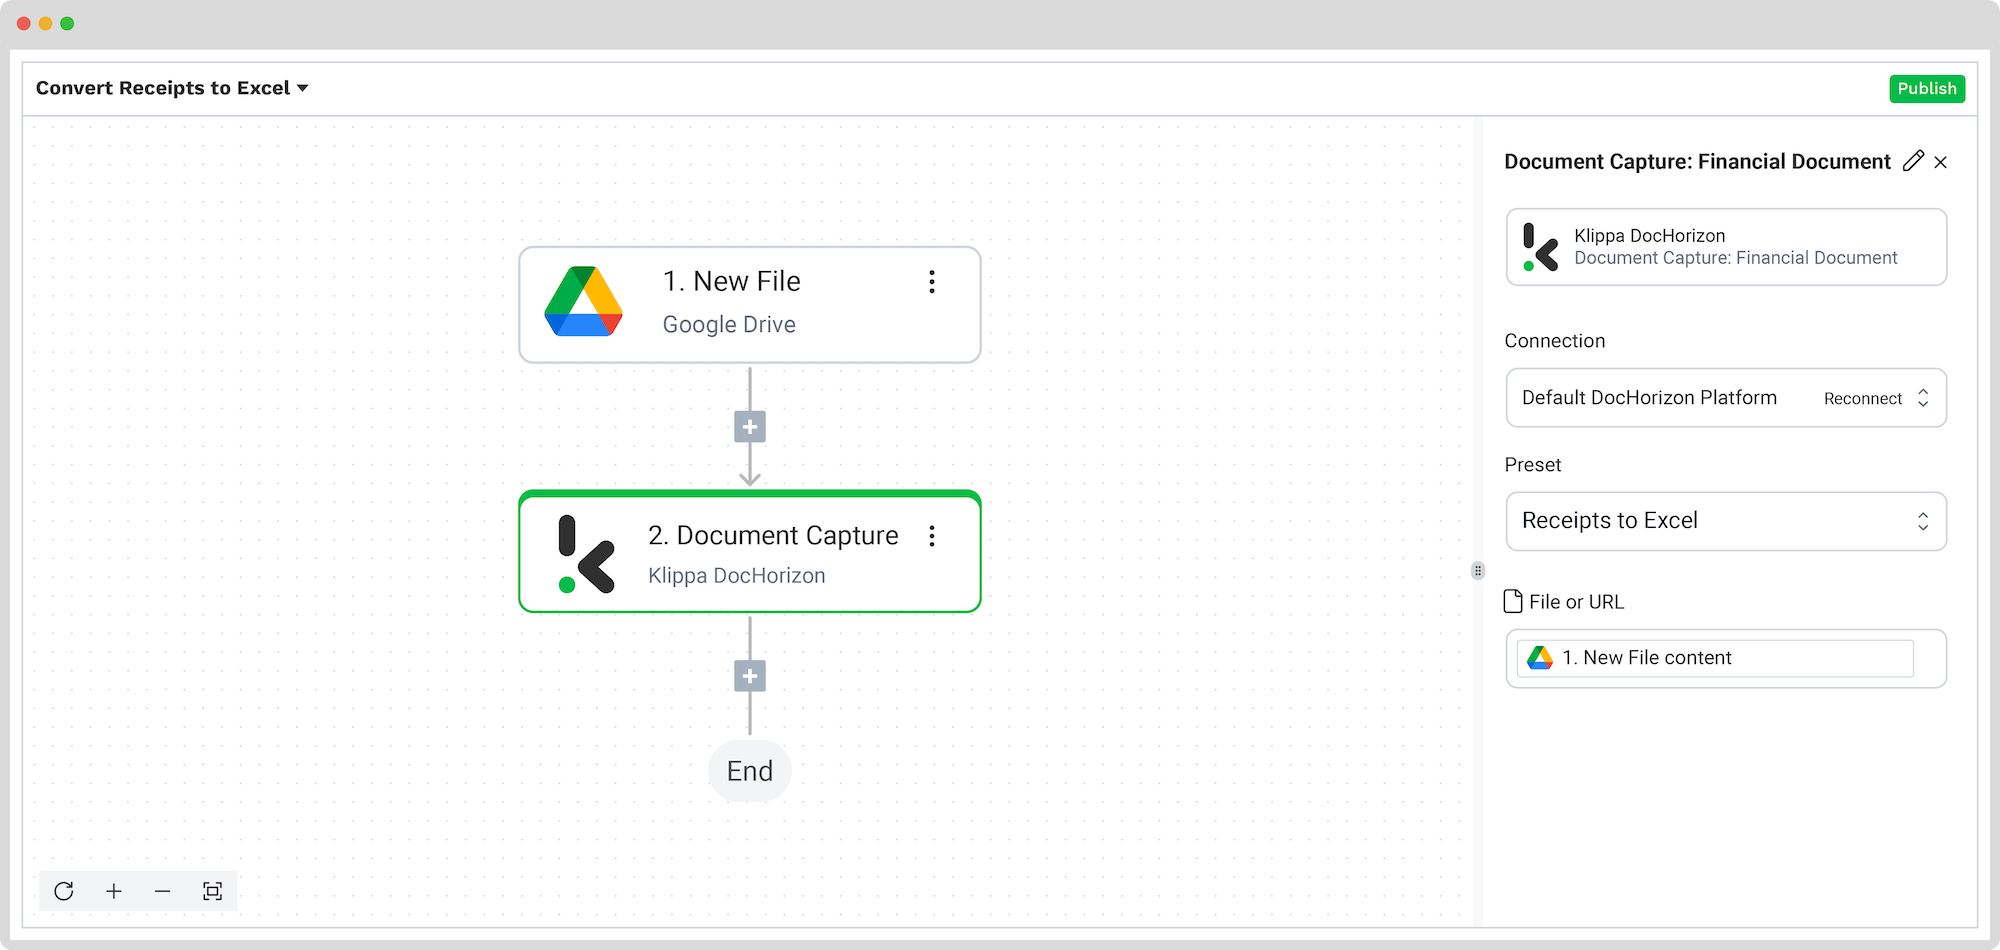
Step 4: Capture and extract data
Now, it’s time to extract the necessary data by using the previously created preset to process all the selected data fields from your receipts in the input folder.
In the Flow Builder, press the + button and choose Document Capture: Financial Document.
To proceed, configure the following:
- Connection: Default DocHorizon Platform
- Preset: The name of your preset (in our case, “Receipts to Excel”)
- File or URL: New file → Content
Then, test the step to ensure everything is working correctly. Once the test is successful, you’re ready to move on to the next step: saving your results!
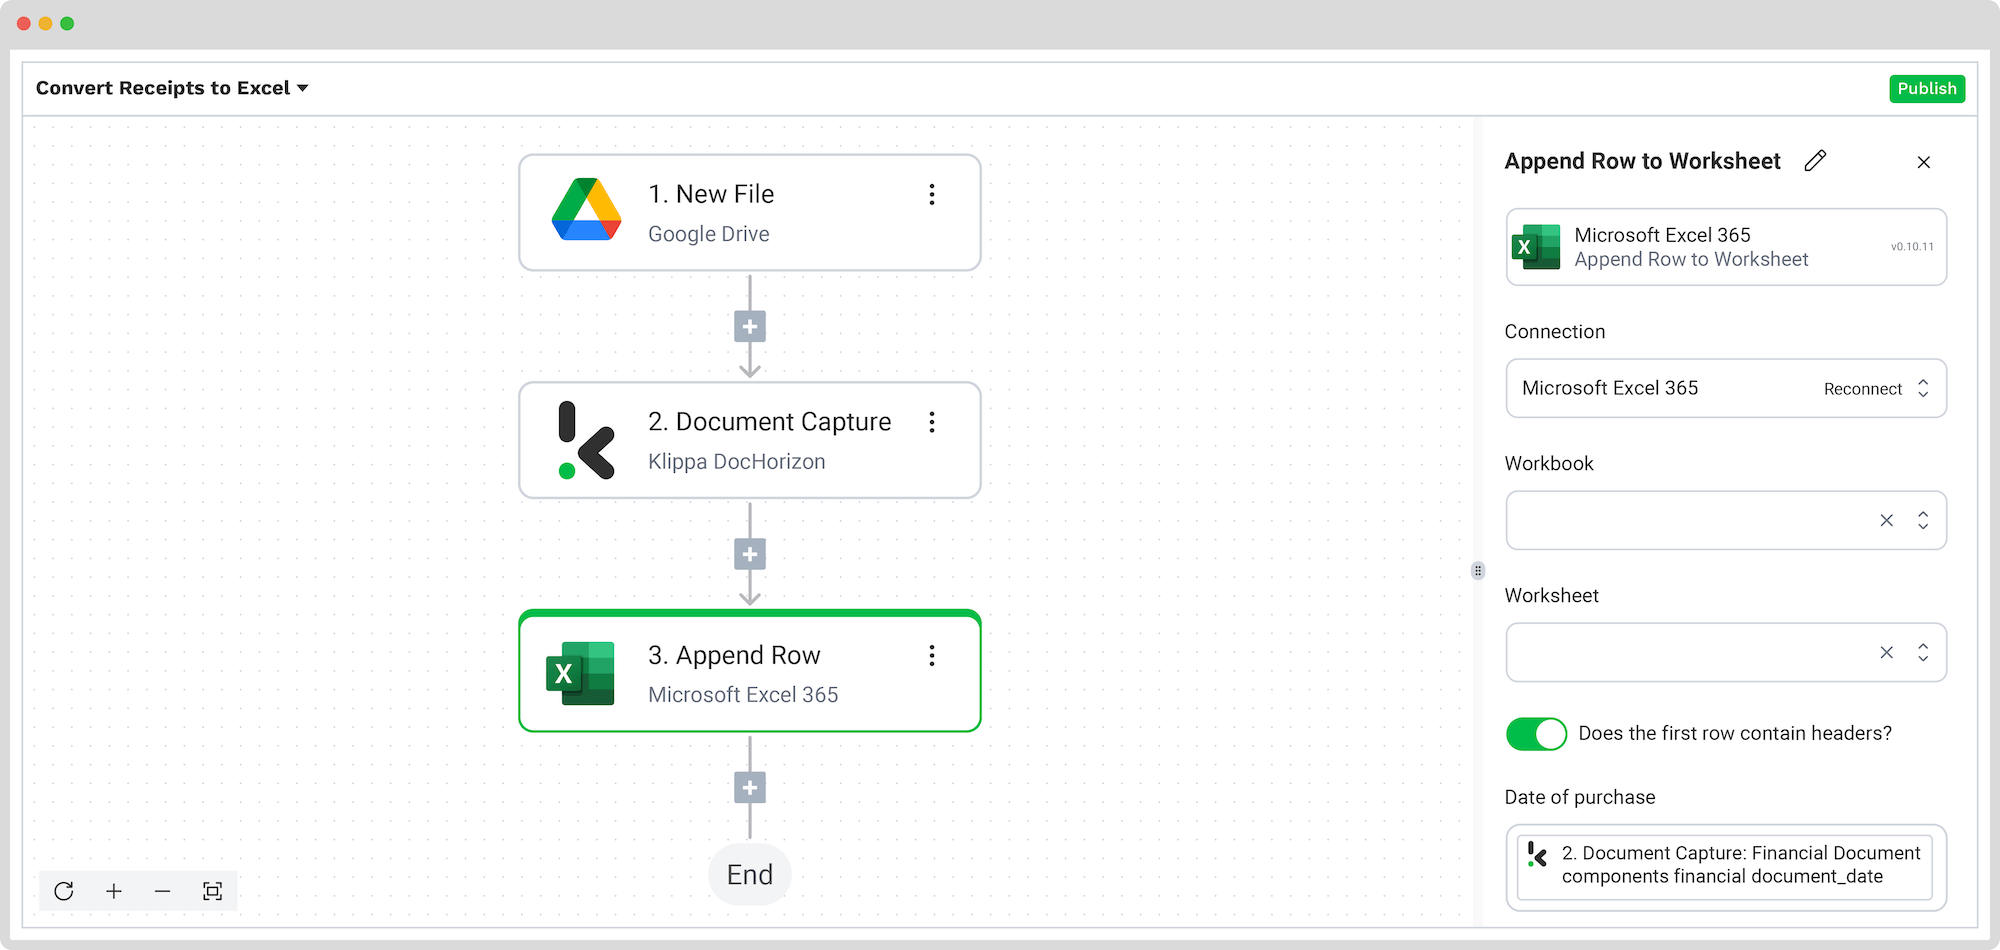
Step 5: Save the file
Now let’s set up an output destination for our extracted data. In this case, we want to compile our receipt data into an Excel sheet, but you can also choose one of many available software integrations, such as QuickBooks, Xero, or Zoho.
To proceed, follow these steps in the Platform:
- Select Excel from the search bar and choose Append Row to Worksheet
- On the right side, fill in the following fields:
- Connection: Connect to your Microsoft account (Microsoft Excel 365)
- Workbook: The name of the workbook where you want to store your receipts
- Worksheet: Name of the sheet
Here’s a tip: If your worksheet contains headers, → toggle the “Does the first row contain headers?” button. This option will inform the platform that row 1 is occupied.
If you’ve followed this tip, you’ll see another section with the names of the headers in your output file. In our case, the names are: Date of Purchase, Name of the Store or Vendor, and Total Amount Paid.
Let’s try it out with the Date of Purchase: in the Data Selector, open Document Capture: Financial Document → components → financial → document_date. Follow the same steps for the other two header sections.
- For the Name of the Store or Vendor: in the Data Selector, open Document Capture: Financial Document → components → financial → merchant.
- For the Total Amount: in the Data Selector, open Document Capture: Financial Document → components → financial → insert_total_amount.
Test this step by clicking the button at the bottom right, and you’re all set!
Congratulations! All the receipt data is now available in your Microsoft Excel Sheet. With this setup, you can publish the flow, and any new receipts added to the folder will be processed automatically. That’s how you can save time while ensuring accuracy in your workflows.
Just know that you don’t have to do everything yourself. Feel free to reach out to us if you’re handling high document volumes or have a unique use case. We’d love to hear your story!
Industry Use Cases for Scanning Receipts into Excel
Scanning receipts into Excel isn’t just for finance teams. It’s a practical workflow used across many sectors. Here are some common scenarios where organized, searchable receipt data makes a difference:
Corporate Expense Management
Centralizing employee expense claims in Excel makes policy enforcement easier. Finance teams can quickly filter by employee, date, or category to approve, reject, or reimburse claims.
If you want to fully automate expense submission, approval workflows, and reporting, you can use an expense management platform like Klippa SpendControl. Watch our SpendControl overview video on YouTube to see exactly how expense management can be streamlined from receipt capture to reimbursement.
Retail Operations
Stores and retail chains use Excel to analyze sales trends and track returns. Digitized receipts help identify peak shopping periods, product performance, and reconcile daily transactions.
Hospitality and Travel
Hotels, restaurants, and travel agencies process large volumes of receipts for bookings, meals, transportation, and tours. Storing data in Excel simplifies billing, cost analysis, and compliance with tax regulations.
Field Services and Contractors
Technicians, contractors, and service providers often manage multiple purchases across jobs. An Excel tracker helps attribute costs to specific projects, providing clear documentation for clients.
Event Management
Organizers use receipt data in Excel to monitor budgets for venue hire, catering, equipment rentals, and logistics, ensuring events stay on budget and all costs are documented.
By scanning receipts into Excel, every sector — from retail to travel to contracting — benefits from improved organization, better visibility over spending, and easier compliance.
Automatically Convert Receipts to Excel with Klippa DocHorizon
Looking to save your receipt data in Excel? We’ve got you covered! With Klippa DocHorizon, an advanced intelligent document processing platform, you can easily automate any of your workflows. By leveraging Klippa’s advanced module, you can set up a seamless workflow tailored to your needs:
- Data extraction OCR: Automatically extract data from any type of receipt.
- Human-in-the-loop: Ensure almost 100% accuracy with our human-in-the-loop feature, allowing internal verification or support from Klippa’s data annotation team.
- Document conversion: Convert receipts in any format – such as PDF, scanned images, or Word documents – into various business-ready data formats, including JSON, XLSX, CSV, TXT, XML, and more.
- Data anonymization: Protect sensitive information and ensure regulatory compliance by anonymizing privacy-sensitive data, such as personal information or contact details.
- Document verification: Authenticate receipts automatically and identify fraudulent activity to reduce the risk of fraud.
At Klippa, we value privacy! All of our document workflows are HIPAA, GDPR, and ISO compliant, ensuring secure data processing. With peace of mind about data safety, take the next step and streamline your document workflows.
If you want to automate your workflow with Klippa’s intelligent document processing solution, don’t hesitate to contact our experts for additional information or book a free demo!
FAQ
You can use OCR-enabled tools, like Klippa’s Receipt OCR, to automatically read receipt images and export data into Excel. Other options include Microsoft Excel’s “Data from Picture” feature, Adobe Acrobat’s OCR tool, or dedicated apps like Klippa DocHorizon that fully automate the workflow.
Not necessarily. Excel’s “Data from Picture” lets you import from images without extra software. However, if you process large volumes or need high accuracy, OCR platforms like Klippa provide faster, more reliable results with automation.
Yes. With mobile apps, including Excel’s own mobile version, you can take a photo of a receipt and convert it into editable data. OCR-based apps like Klippa offer additional features such as bulk scanning, fraud detection, and direct Excel export.
Create clear column headers (Date, Vendor, Amount, Tax, Category) and use filters or pivot tables for easy sorting. Storing your receipts digitally in organized folders also helps when importing them in bulk.
Klippa captures receipts from your chosen source (camera, email, cloud storage), uses OCR and AI to extract key data fields, validates the results, and exports them directly into your Excel sheet — all within a custom automated workflow.
Yes. Klippa complies with GDPR, HIPAA, and ISO 27001 standards. All documents are encrypted both in transit and at rest, and sensitive details can be anonymized automatically to meet privacy requirements.
Absolutely. Klippa offers a free trial with €25 in credits so you can test the platform’s features, set up your own workflow, and see how it integrates with Excel before making a decision.