
Microsoft Word is fantastic for writing, but it can be frustrating when it comes to handling numbers, tables, and complex data.
If you’re working on a financial report, analyzing survey results, or organizing project details, Excel is a much better tool.
But what if your data is stuck in a Word document?
Converting your Word file to an Excel spreadsheet can be a game-changer. This isn’t just about moving text; it’s about transforming unstructured data into a format that allows for in-depth analysis and informed decision-making. Excel is great at sorting, filtering, and applying formulas—capabilities that Word doesn’t easily support.
In this blog, you’ll find three different ways to transfer your data from Word to Excel smoothly and efficiently. Let’s start with the most straightforward one.
Key Takeaways
- One method is to perform the conversion manually. This approach allows you to convert one document at a time and is generally quite fast.
- Another option is to use free tools, which can be very convenient and often include additional features for editing. However, if you need to convert multiple documents, this method can quickly become cumbersome.
- Lastly, you can use an automated solution that allows for bulk uploads, making it easy to convert multiple Word documents to Excel at once.
How to Convert Word to Excel
The simplest method to convert a single Word document to Excel starts in Microsoft Word. By following the next steps, you’ll have your data in Excel in no time.
1. Open your Word document
Start by opening the Word document that contains the data you want to convert.
2. Save the document as plain text (.txt)
Once you’ve opened the correct document, go to the toolbar at the top and click on ‘File’. From the dropdown menu, select ‘Save As’.
In the Save As window, choose a location and enter a file name, such as ‘Top Secret Document for Excel’. Next, change the file type to ‘Plain Text (.txt)’ using the dropdown menu. Click ‘Save’.
You’ll see a ‘File Conversion’ pop-up—just click ‘OK’ to proceed.
3. Open Excel and choose ‘Data’
Next, open Microsoft Excel and select ‘New’ to start a blank workbook. Once the new spreadsheet opens, go to the ‘Data’ tab in the toolbar at the top of the screen. This tab is located between ‘Formulas’ and ‘Review’ and provides options for managing and analyzing your data.
4. Click on ‘From Text/CSV’ and choose your Word document
After clicking on the ‘Data’ tab, find the ‘Get & Transform Data’ section on the far left. Click on ‘From Text/CSV’. This will open the ‘File Explorer’. Select the plain text file you saved from your Word document and click ‘Import’.
5. Adjust how your data is imported
After clicking ‘Import’, a new window will appear allowing you to adjust how your data is imported. You’ll see three tabs: ‘File Origin’, ‘Delimiter’, and ‘Data Type Detection’.
Focus on the ‘Delimiter’ tab, where you can choose the character that separates your data, such as a comma, tab, or space. The default settings usually work fine, but you can adjust them if needed. The other tabs, ‘File Origin’ and ‘Data Type Detection’, generally don’t require changes for a Word document.
6. Click ‘Load’ and save your spreadsheet
After adjusting the settings, click ‘Load’ at the bottom left corner. This will display your Word document’s data in an Excel spreadsheet. If you want to make further changes, you can use the ‘Transform Data’ option.
Once you’re satisfied with the result, save your work by going to the ‘File’ tab and selecting ‘Save As’. Regularly saving your file helps keep your documents organized and up to date.
Free Tools to Convert Word to Excel
If you’d prefer to avoid the hassle of converting a Word document manually, you can use one of the many free online tools available. A few solid options are:
The main advantage of these tools is that they offer more features than just the Word to Excel conversion. For example, they allow you to merge, edit, or unlock documents. Also, they support more document formats, such as PDF, XPS, OXPS, PS, and RTF.
Challenges with Converting Word to Excel
When you convert documents from Word to Excel manually or with free tools, you might encounter several common challenges. Luckily, these issues are manageable and can be resolved easily.
Annoying ads during document conversion
Online conversion tools often come with intrusive pop-up ads that can be annoying and may pose security risks to your computer.
Choose reputable, ad-free conversion tools, or consider investing in a premium tool to avoid ads. Alternatively, using Microsoft Office’s built-in features or other offline methods can help you steer clear of these interruptions.
Compromised file security
Online conversion services might expose sensitive data, as some tools store copies of your files on their servers.
Use tools that prioritize data privacy and ensure your files are deleted after conversion (or never stored). For highly sensitive information, stick to offline conversion methods or use Microsoft Office features to keep your data secure.
Slow document conversion
Converting large Word documents with complex data can be slow, particularly with online tools that process files on remote servers.
Break down large documents into smaller sections to speed up the conversion process. Using powerful, locally installed software can also expedite the process by leveraging your computer’s resources rather than relying on an internet connection and remote servers.
Poor data integrity
Conversion can sometimes result in lost formatting or missing data, especially with complex tables or documents.
Review the converted Excel file carefully to check for accuracy and completeness. Make any necessary adjustments to data and formatting manually. Excel’s built-in data cleaning and formatting tools can help restore the intended structure and clarity of your data.
Difficulties with complex data
Documents with embedded images, hyperlinks, or advanced formatting might not transfer correctly to Excel.
For documents with intricate elements, manually copy and paste specific sections into Excel, or re-add complex elements after conversion. Excel provides features for batch editing or adding hyperlinks, which can simplify this process.
By addressing these potential issues, you can ensure your data remains secure and accurately transferred. However, if you want to convert Word documents to Excel in bulk, value data security, and require accurate data for decision-making, there’s only one solution: document management software.
With document management software like Doxis AI.dp, your company can ensure smooth, secure, and robust file conversion workflows. How does that work? Just keep on reading!
Convert Word to Excel Automatically with Doxis AI.dp
In this section, we will demonstrate how you can easily extract data from your Word documents into an Excel spreadsheet and automate this process, ensuring that you will never have to handle documents manually again.
Doxis AI.dp is a powerful Intelligent Document Processing (IDP) platform that automates document workflows and offers flexibility for various use cases by supporting more than 100 document types and formats.
Let’s walk you through a step-by-step process of extracting data from a Word document to an Excel sheet using Doxis AI.dp. For our example, we will process an invoice in a Word format from Google Drive as our input source and choose Excel as our output format.
Step 1: Sign up on the platform
Start by signing up for free on the AI.dp Platform. Enter your email address and password, then provide details such as your full name, company name, use case, and document volume. After that, you’ll receive a free credit of €25 to explore all the platform’s features and capabilities.
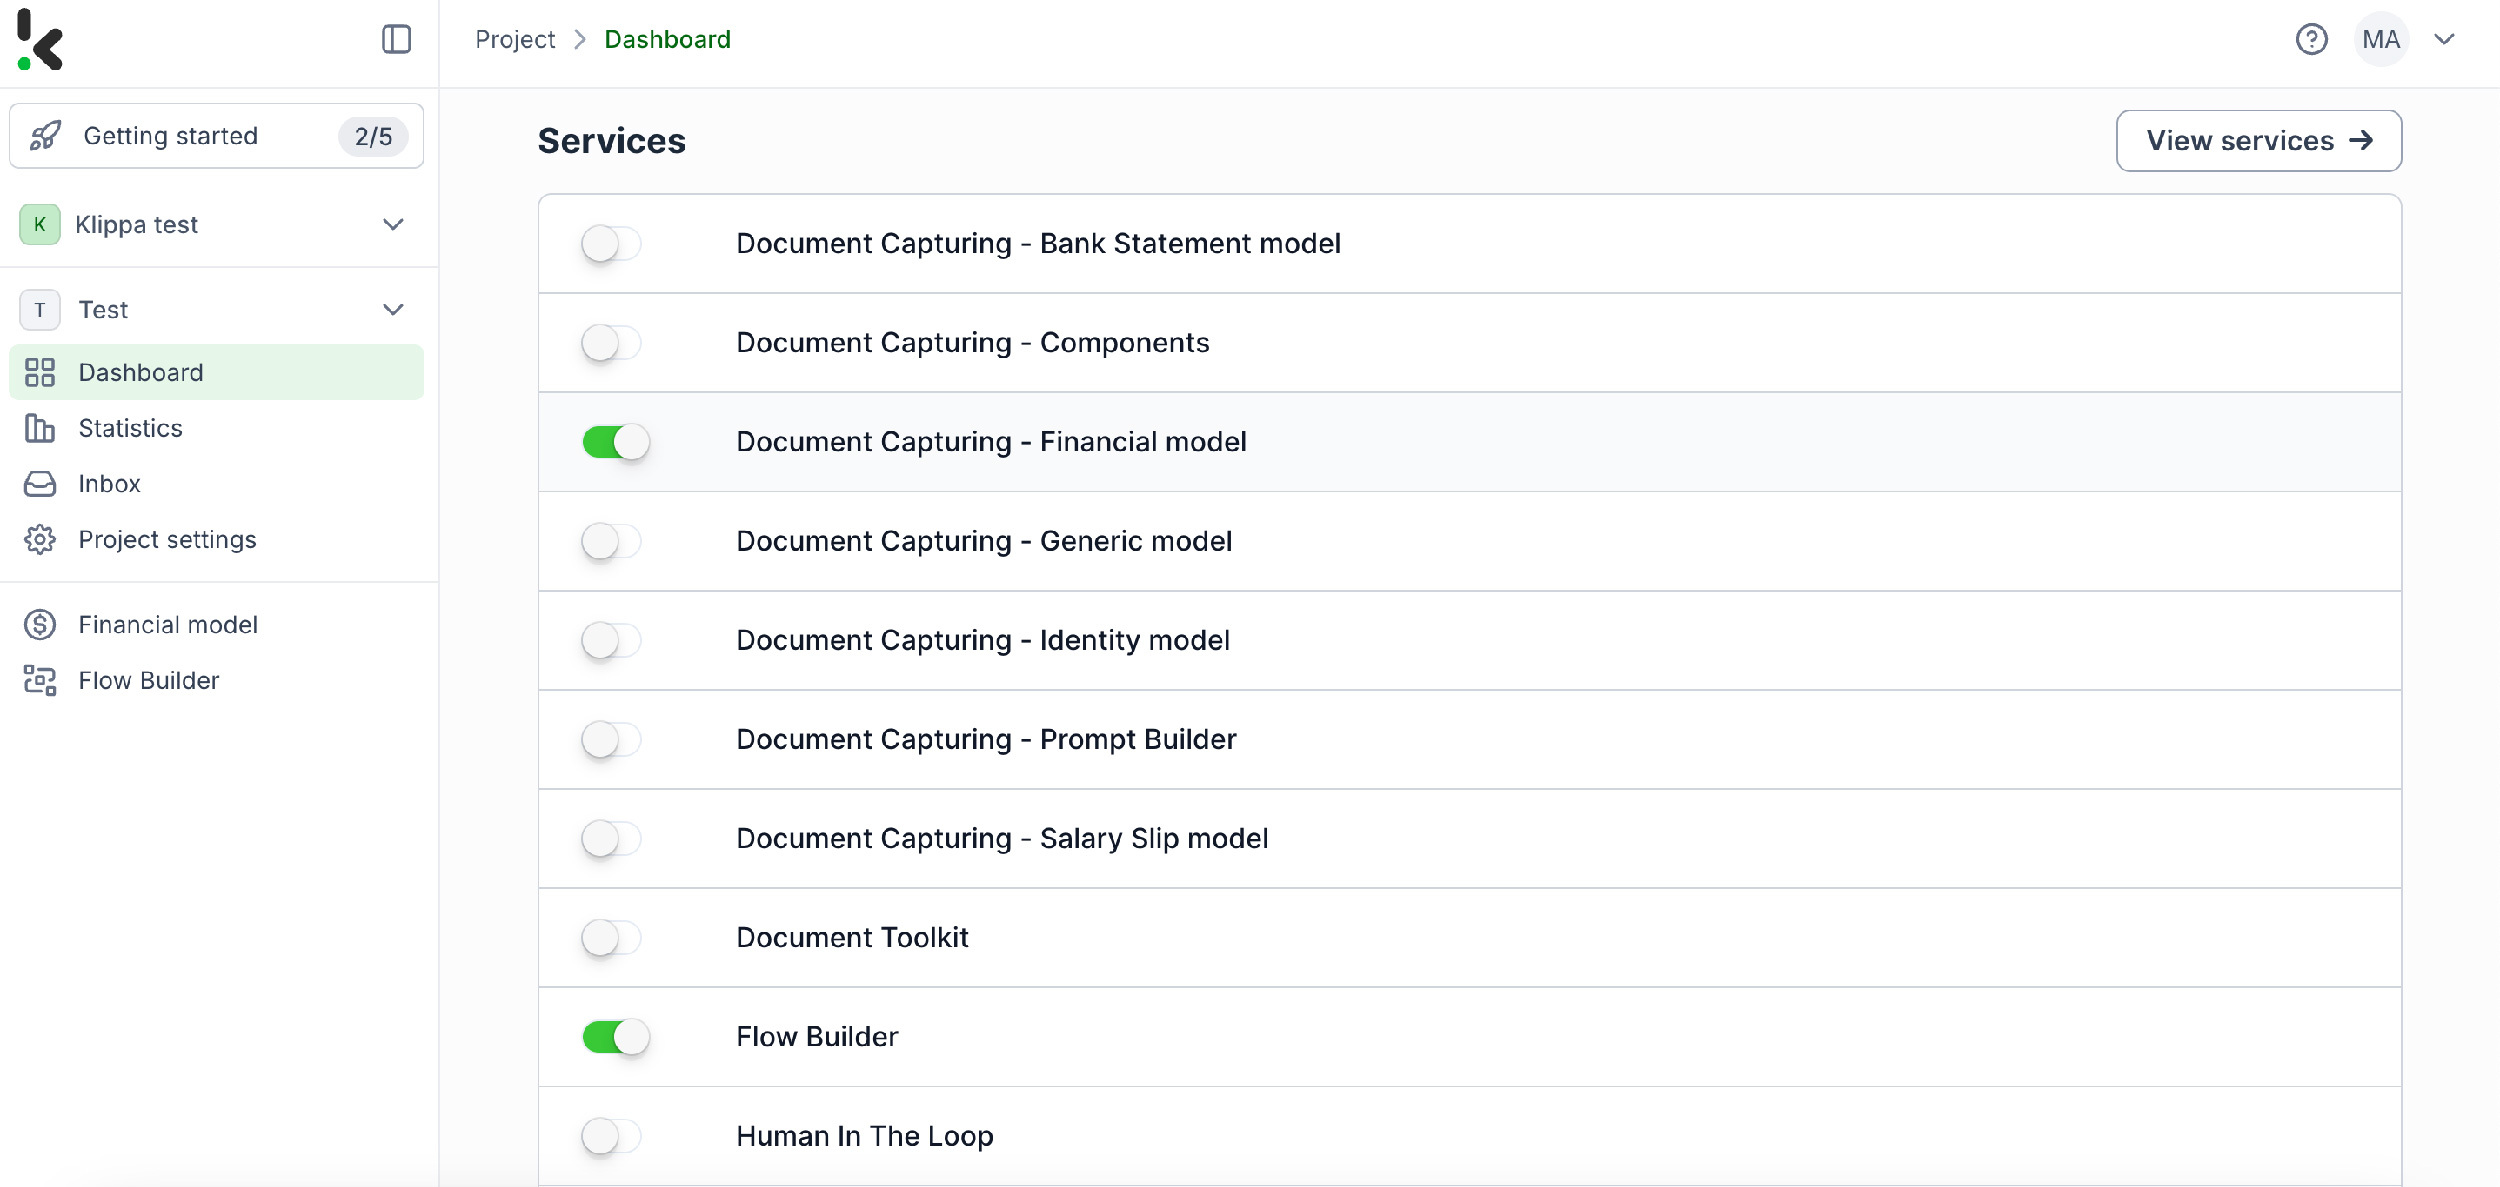
After logging in, create an organization and set up a project to access our services. Go to Project Settings → Services. For our example we will be using invoices in word format so we need to enable the Document Capturing – Financial and Flow Builder to get started. This setup ensures you have everything you need right from the start! If your Word documents include items like resumes, bank statements, and others, you can select the appropriate model.
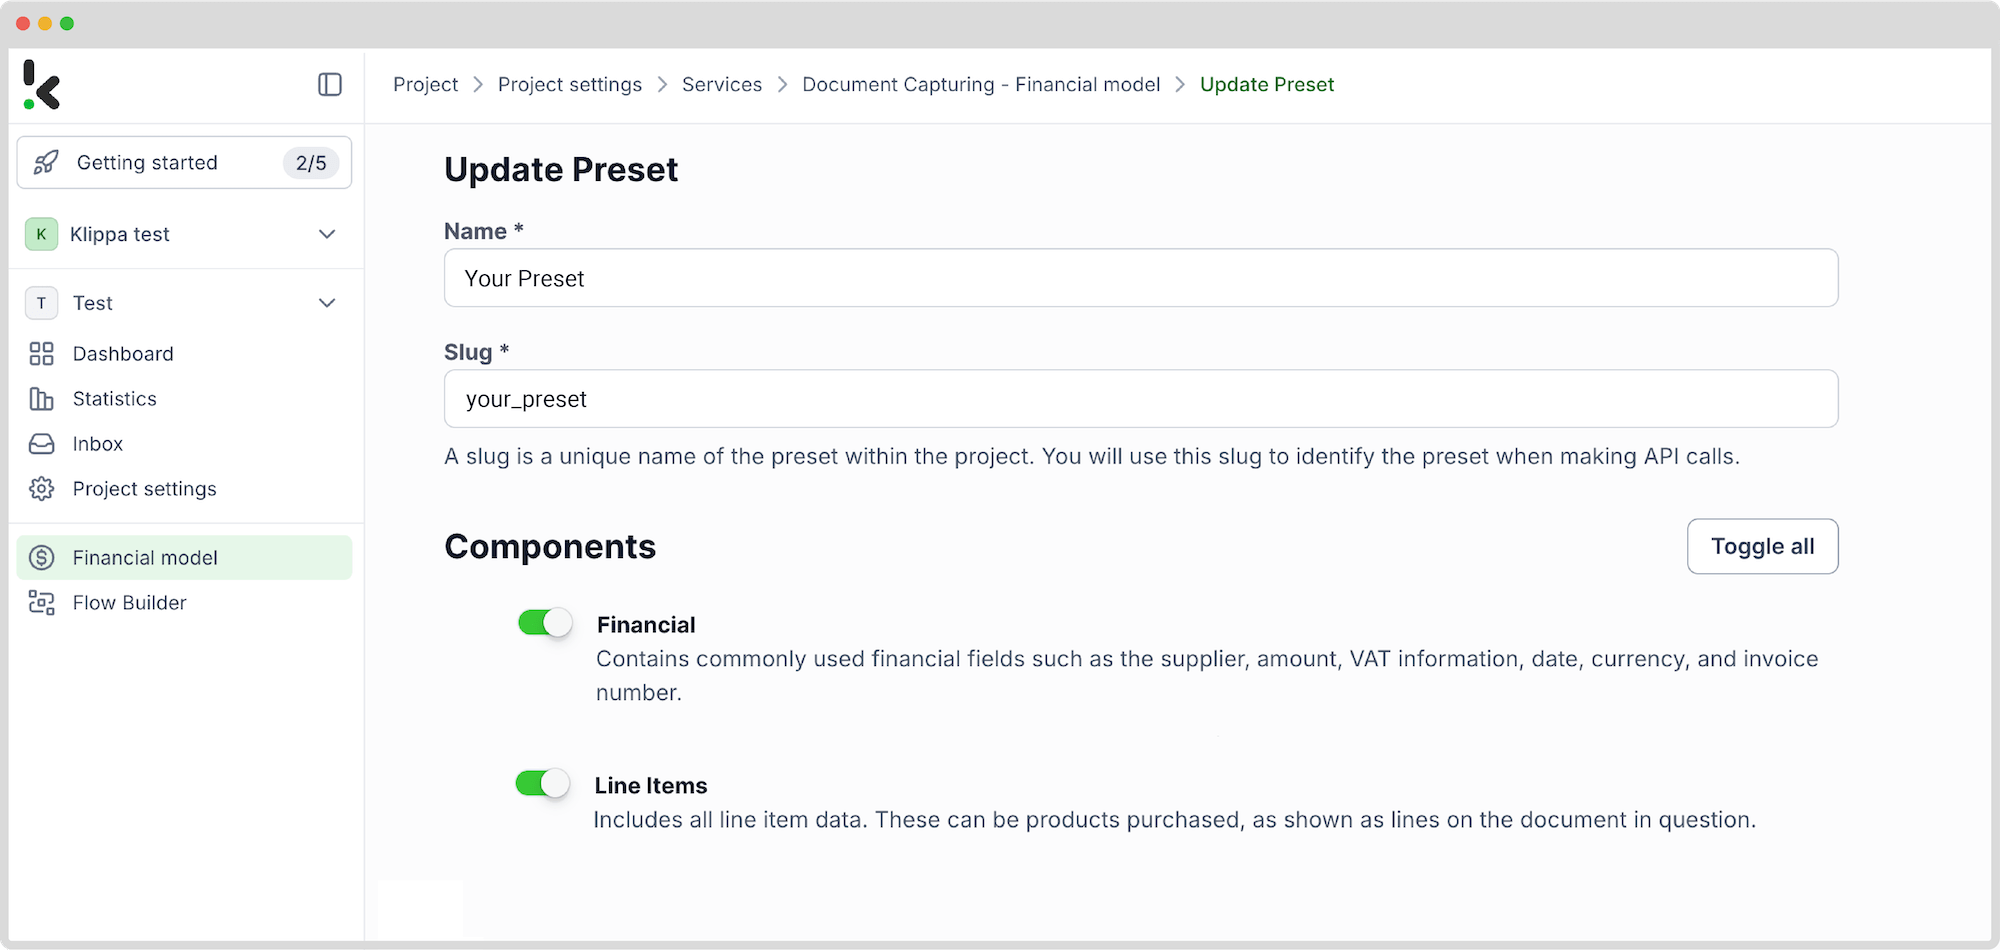
Step 2: Create a preset
Create a new preset, let’s name it “Extract Word to Excel”. This preset activates the components you need for your specific use case. Let’s enable the Financial and Line Item components to process fields like transaction number, products purchased, and amount from an invoice.
Here’s a tip: You can customize the preset depending on your use case by enabling more components, such as Date Details, Reference Details, Amount Details, Document Language, Payment Details, etc.
You’re almost done! Click “Save” to finalize your settings, and you’ll be ready for the next step.
Step 3: Select your input source
Now that you have enabled the Flow Builder and created a preset, it’s time to build your flow. A flow is a sequence of steps that define how your Word data is extracted into Excel.
Click New Flow → + From scratch and assign your flow a name. We’ll name the flow “Extract data from Word to Excel”. For this example, you’ll create a folder named “Input” in Google Drive and upload your invoices there.
Next, choose your input source by selecting “Google Drive” and “New File” as your trigger. This is going to start your flow. On the right side, fill out the following sections:
- Connection: Assign any name to your connection (e.g. “google-drive”) and authenticate with Google
- Parent Folder: Input
- Include File Content: Check this box to ensure file content is processed
Here’s a tip: You have several options for selecting your input source: you can upload files directly from your device or connect to over 100 external sources, including Google Drive, Dropbox, Outlook, Box, Salesforce, Zapier, OneDrive, and your company’s database.
Test this step by clicking on Load Sample Data: remember to have at least one sample document in your input folder while setting up your flow.

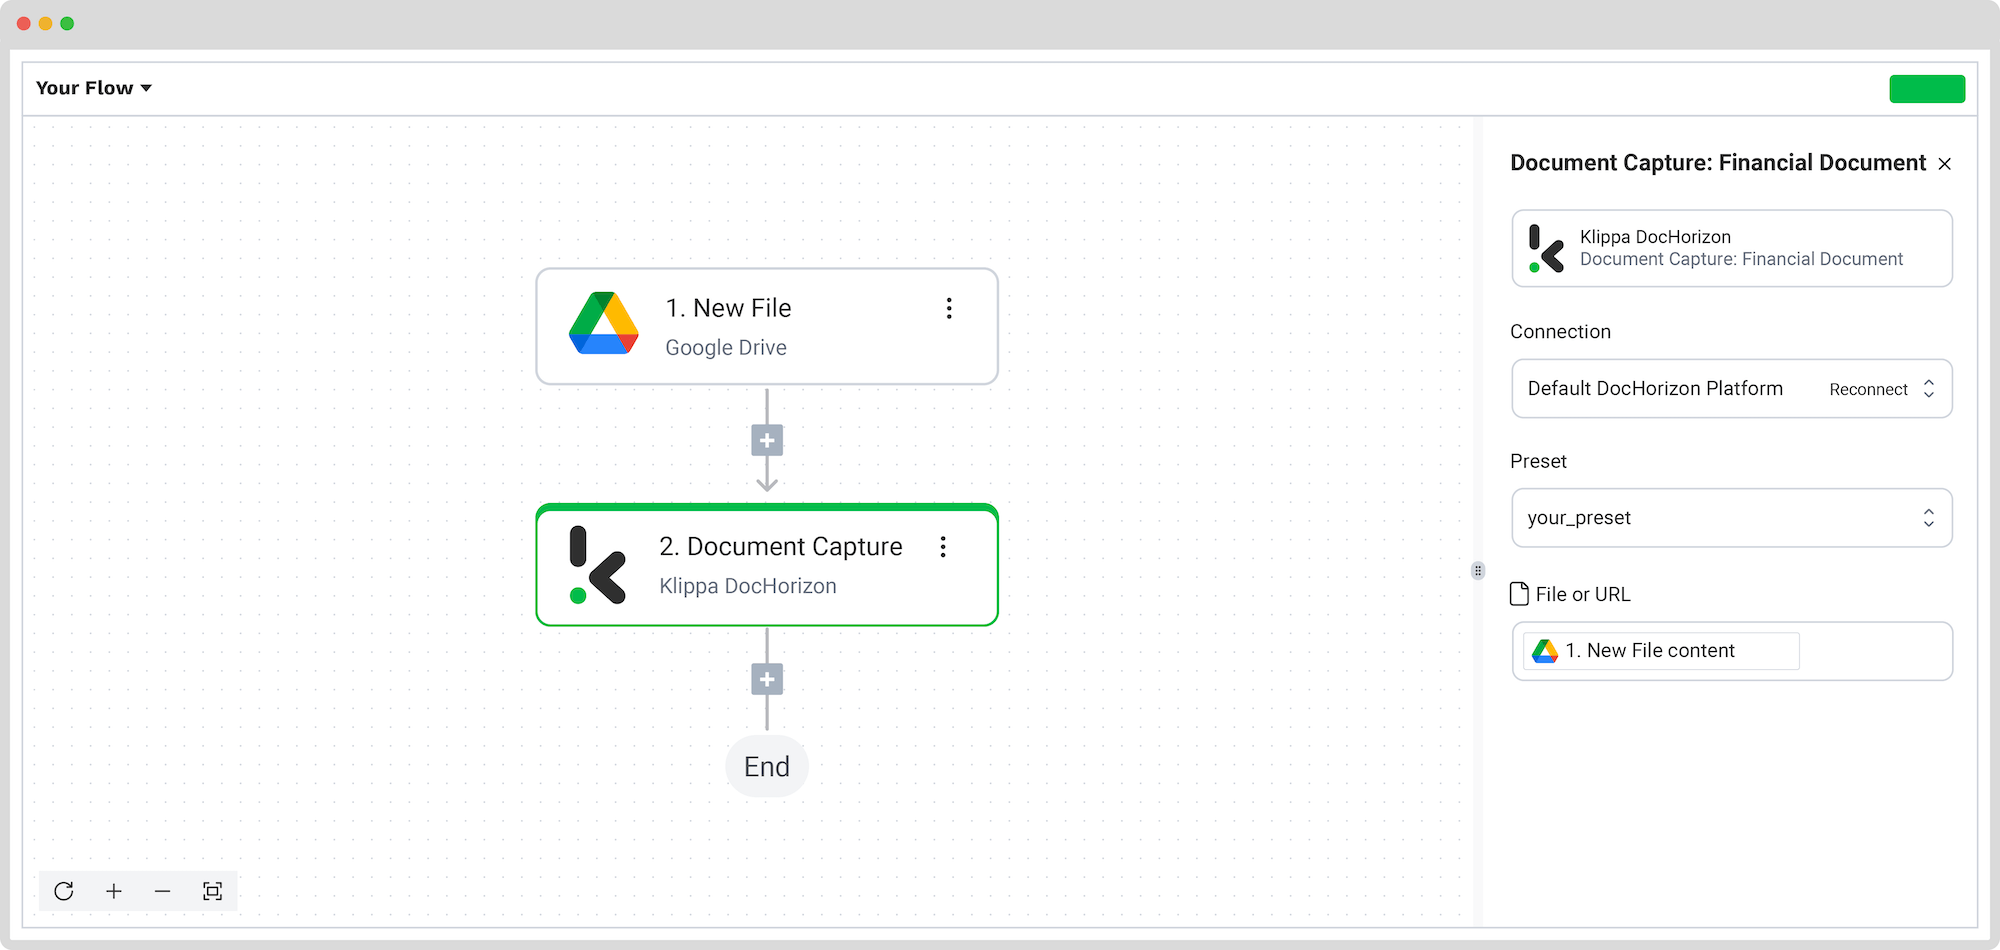
Step 4: Capture and extract data
Now, it’s time to extract the necessary data by using the previously created preset to process all the selected data fields from the invoices in the input folder.
In the Flow Builder, press the + button and choose Document Capture: Financial Document.
To proceed, configure the following:
- Connection: Default AI.dp Platform
- Preset: The name of your preset (in our case “extract_data_from_word_to_excel”)
- File or URL: New file → Content
Then, test the step to ensure everything is working correctly. Once the test is successful, you’re ready to move on to the next step: saving your results!
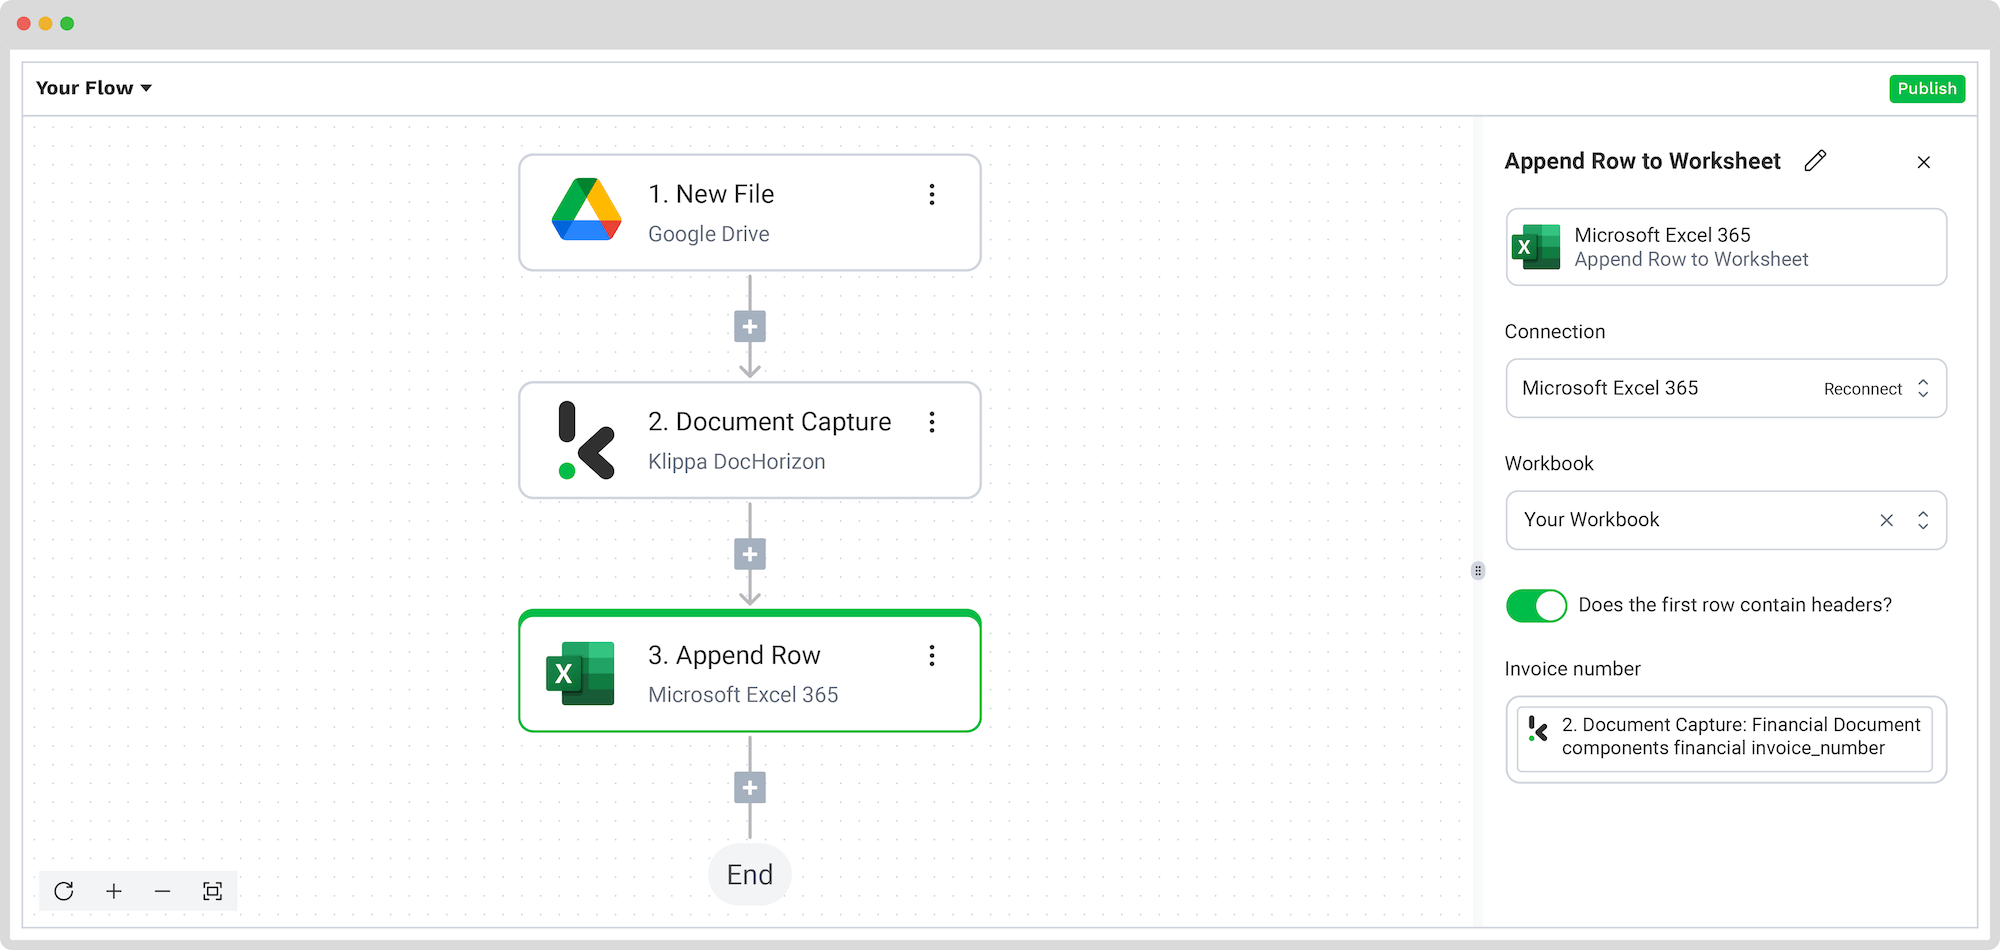
Step 5: Save the file
Now let’s set up an output destination for our extracted data. In this case, we want to compile our invoice data into an Excel sheet, but you can also choose one of many available software integrations.
To proceed, follow these steps in the Platform:
- Select Excel from the search bar and choose Append Row to Worksheet
- On the right side, fill in the following fields:
- Connection: Connect to your Microsoft account (Microsoft Excel 365)
- Workbook: The name of the workbook you created for this workflow
- Worksheet: Name of the sheet
Here’s a tip: If your worksheet contains headers, → toggle the “Does the first row contain headers?” button. This option will inform the platform that row 1 is occupied.
If you’ve followed this tip, you’ll see another section with the names of the headers in your output file. In our case, the names are: Invoice Number, Total Amount, and Date.
Let’s try it out with the Invoice Number: in the Data Selector, open Document Capture: Financial Document → components → financial → invoice_number. Follow the same steps for the other two header sections.
Test this step by clicking the button at the bottom right, and you’re all set!
Congratulations! All the invoice data is now available in your Excel Sheet. With this setup, you can publish the flow, and any new invoices in word format (or any other formats) added to the folder will be processed automatically. That’s how you can save time while ensuring accuracy in your workflows.
And remember: if you’re processing a high volume of documents, you don’t have to set up the flow yourself. We’d love to hear about your use case and help you get started!
How Doxis Can Assist in Document Processing
Doxis AI.dp offers a powerful document processing platform that enables you to automate virtually any document workflow. By integrating various modules and your preferred applications, you can create an effortless and unique workflow that suits your needs.
With Doxis you benefit from:
- Custom workflows: Create your unique document workflows by simply connecting any of the AI.dp functionalities: data extraction, capture, classification, conversion, anonymization, verification, and more.
- Wide document support: Process any document in all Latin alphabet languages or customize data fields for extraction for any use cases.
- Many integration capabilities: Easily integrate our solutions through our platform, which supports over 50 data integration options, including cloud solutions, CRM, ERP, and accounting software.
- Best-in-class security & compliance: Stay compliant and secure by default since Doxis is an ISO 27001 & 9001 certified and GDPR-compliant software provider. We don’t store any customer data on our servers.
Ready to find out more about our document processing capabilities? Book a free demo below or contact our experts for any questions you might have!
FAQ
You have several options for extracting data from Word to Excel. You can do this manually or by using a free tool like Online2PDF. These methods are effective if you only need to convert a couple of files. However, if you have a larger volume of files to convert, an automated tool like AI.dp would better meet your needs.
You can automate Word to Excel data extraction with intelligent document processing (IDP) platforms like Doxis AI.dp. These solutions read documents, extract structured data, and automatically export it to Excel, perfect for handling any documents at scale.
Yes. Doxis offers a free trial with €25 in credits, allowing you to explore the platform’s features and capabilities before deciding.
Absolutely. Doxis complies with global data privacy standards, including GDPR. Your data is encrypted, securely processed, and never shared with third parties without your consent.