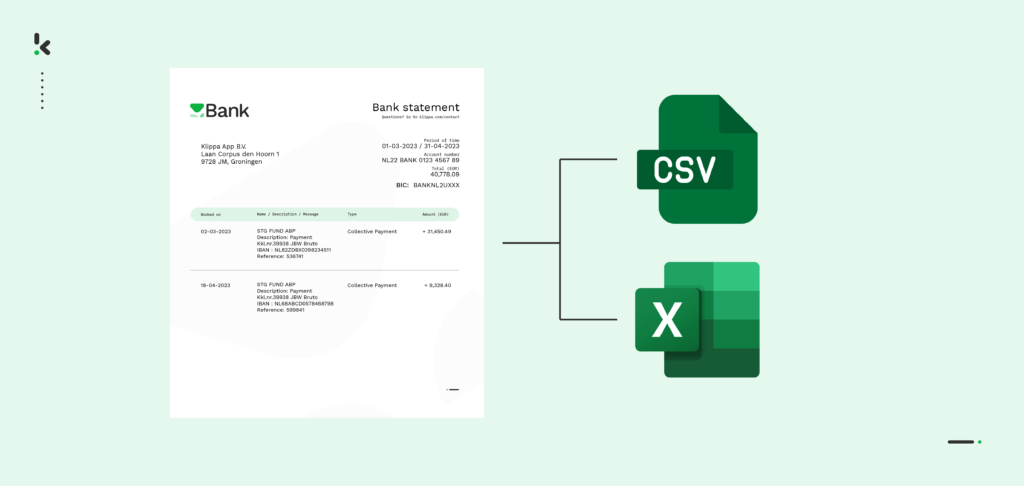

Importing financial data from your organization’s bank statements into accounting software or financial databases used to be a hassle. The old copy-and-paste trick worked just fine in the case of already digitized documents. However, the real problem arises when you need to process older transactions, PDFs, or scanned images of bank statements.
Nowadays, this process is completely automated, thanks to Intelligent Document Processing. An IDP platform uses Optical Character Recognition technology to digitally convert bank statements, by extracting financial information in an instant. The real benefit? It also converts it to Excel or CSV formats, given the financial nature of the data.
In this blog, we will guide you on a step-by-step journey on how to convert bank statements to Excel and CSV formats. Thanks to Klippa’s IDP platform, this process only takes 5 minutes to set up. Let’s start!
Quick Guide: 3 Ways to Convert Bank Statements to Excel or CSV
Method 1 — Online PDF‑to‑CSV/Excel Converters
- Download your statement as a PDF from your bank portal.
- Choose a converter tool.
- Upload the PDF and select CSV or Excel output.
- Run conversion and download the file.
- Review formatting and totals for accuracy.
Method 2 — Using Excel’s Built‑In Import
- Save your statement as a PDF or CSV if your bank offers it.
- In Excel: Data → Get Data → From File → From PDF/CSV.
- Map detected tables to columns (Account Number, Date, Amount).
- Clean up extra rows or headers.
- Save as .XLSX or CSV.
Method 3 — Automation with an IDP Platform
- Upload a PDF/scanned statement to an IDP tool like Klippa DocHorizon.
- Use OCR + presets to extract fields from any layout.
- Output directly to Excel, CSV, or other formats.
- Use Human‑In‑The‑Loop (HITL) to verify accuracy.
- Automate recurring imports and integrations with ERP/Accounting software.
Tips for Success
- Double‑check totals before uploading to accounting systems.
- Use OCR tools for scanned statements to reduce manual entry.
- Ask your bank if direct CSV download is available — it saves time.
- Automate recurring imports with IDP workflows or accounting platform integrations.
- Secure your data with GDPR/ISO‑compliant tools.
How to Convert Bank Statements to Excel or CSV: Detailed Walkthroughs
To convert bank statements to Excel or CSV, you’ll usually need to download the statement from your bank (typically as a PDF), then use a software tool to transform it. You can choose from online converters, automation platforms, or Excel’s own features to process and organize the data.
Here’s how to do it:
1: Download the File
- From your online banking platform, check for an option to export statements.
- Select the date range for the transactions you want to export.
- Download and save the PDF statement to your device.
Tip: Many modern banks allow you to download your bank statements directly in CSV format from their online banking portals.
2: Convert Using Online Tools
- If your statement is in PDF format, you can use an online converter like Bank Statement Converter or SmallPDF.
- Upload your PDF and select CSV or Excel as the output.
Why use online tools?
They’re fast, free, or low-cost, and don’t require any setup. For simple, well-formatted PDFs, they work great and save you time.
Where they fall short:
Bank statements aren’t always simple. Sometimes it includes scanned images, irregular formatting, or complex tables. Online converters can miss data or mess up the formatting, which means you’ll spend time fixing errors, defeating the point of automation.
3. Automate Conversion Using IDP Solutions, like Klippa DocHorizon
Converting bank statements to Excel or CSV is straightforward with an Intelligent Document Processing (IDP) tool like Klippa DocHorizon.
Why IDP tools are the go-to option:
IDP platforms combine OCR and AI technologies to accurately extract data even from scanned or poorly formatted documents. They automatically handle diverse document layouts and complex tables without manual intervention.
This automation reduces errors, improves efficiency, and scales easily for high volumes of documents, making IDP tools essential for modern finance teams.
How to Automatically Convert Bank Statements with Klippa
Here’s how you can do it with the Klippa DocHorizon platform step-by-step:
Step 1: Sign Up and Set Up Your Project
- Sign up for free on the DocHorizon platform.
- Enter your email, create a password, and provide details (full name, company name, use case, document volume).
- You’ll receive €25 in free credits.
- After logging in, create an organization and set up a project.
- Go to Project Settings → Services and enable:
- Document Capturing – Bank Statements
- Flow Builder
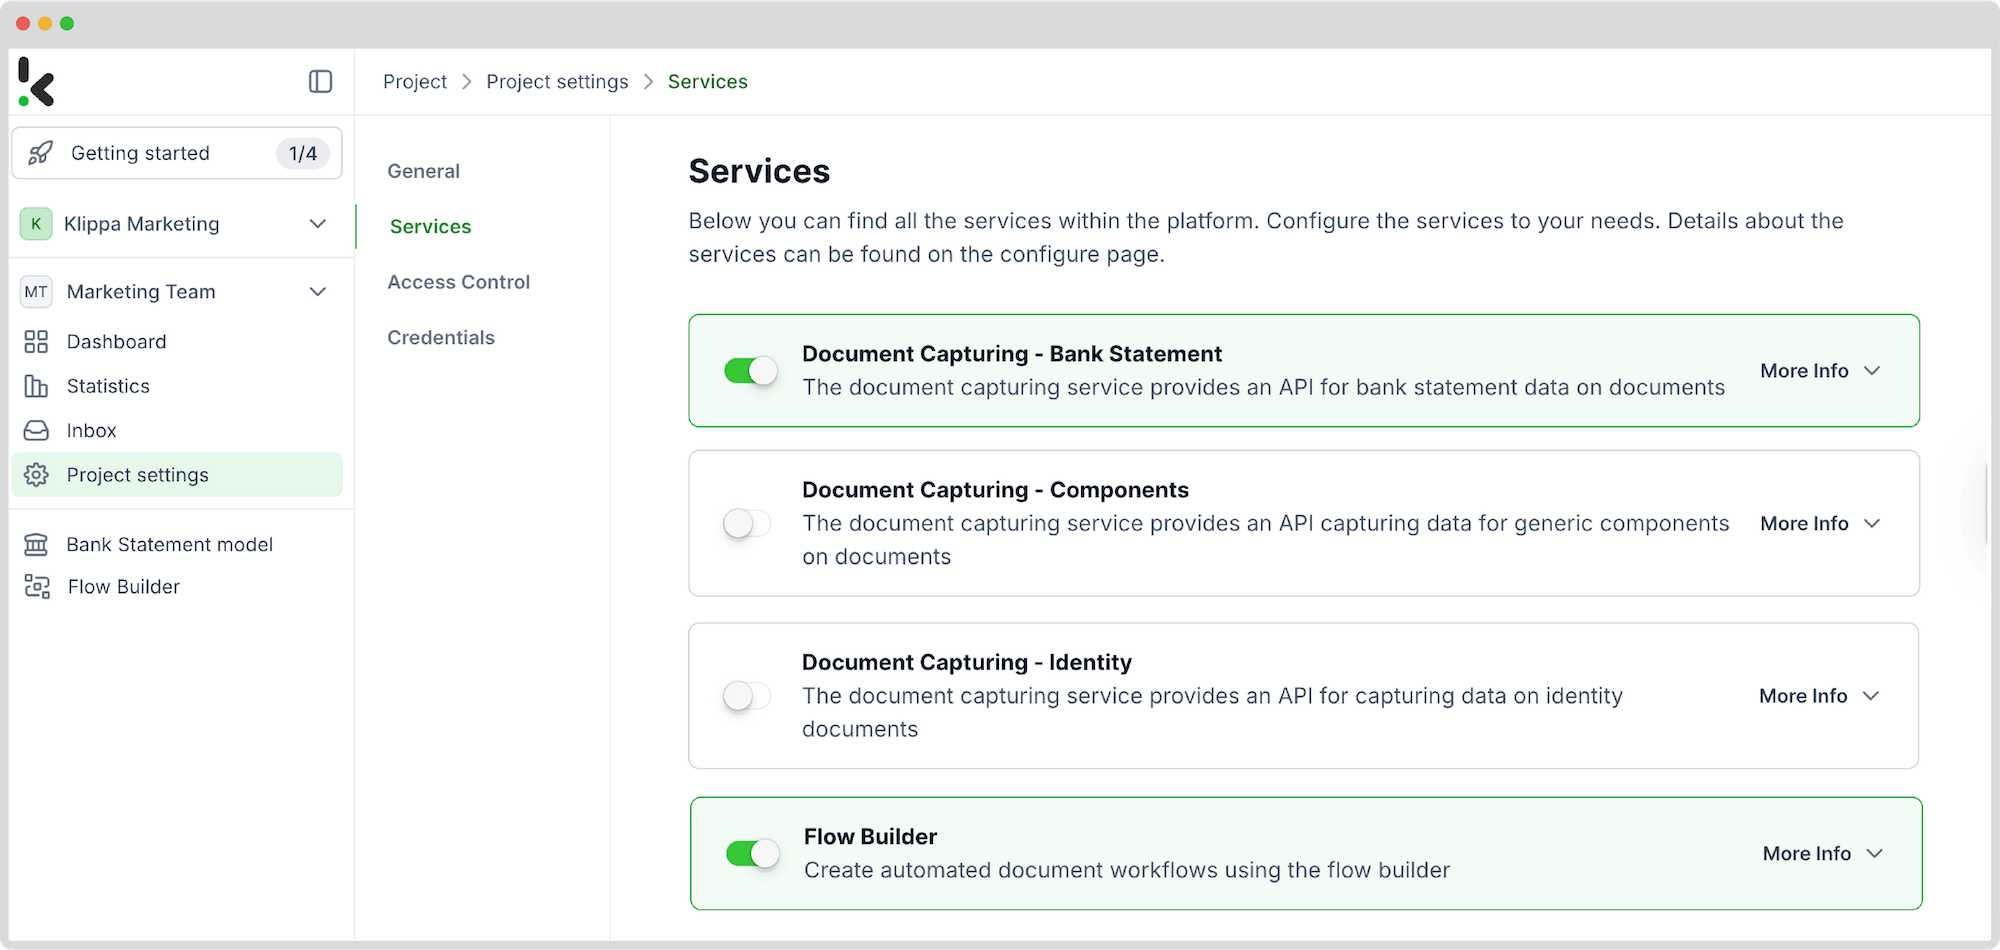

Step 2: Create a Data Extraction Preset
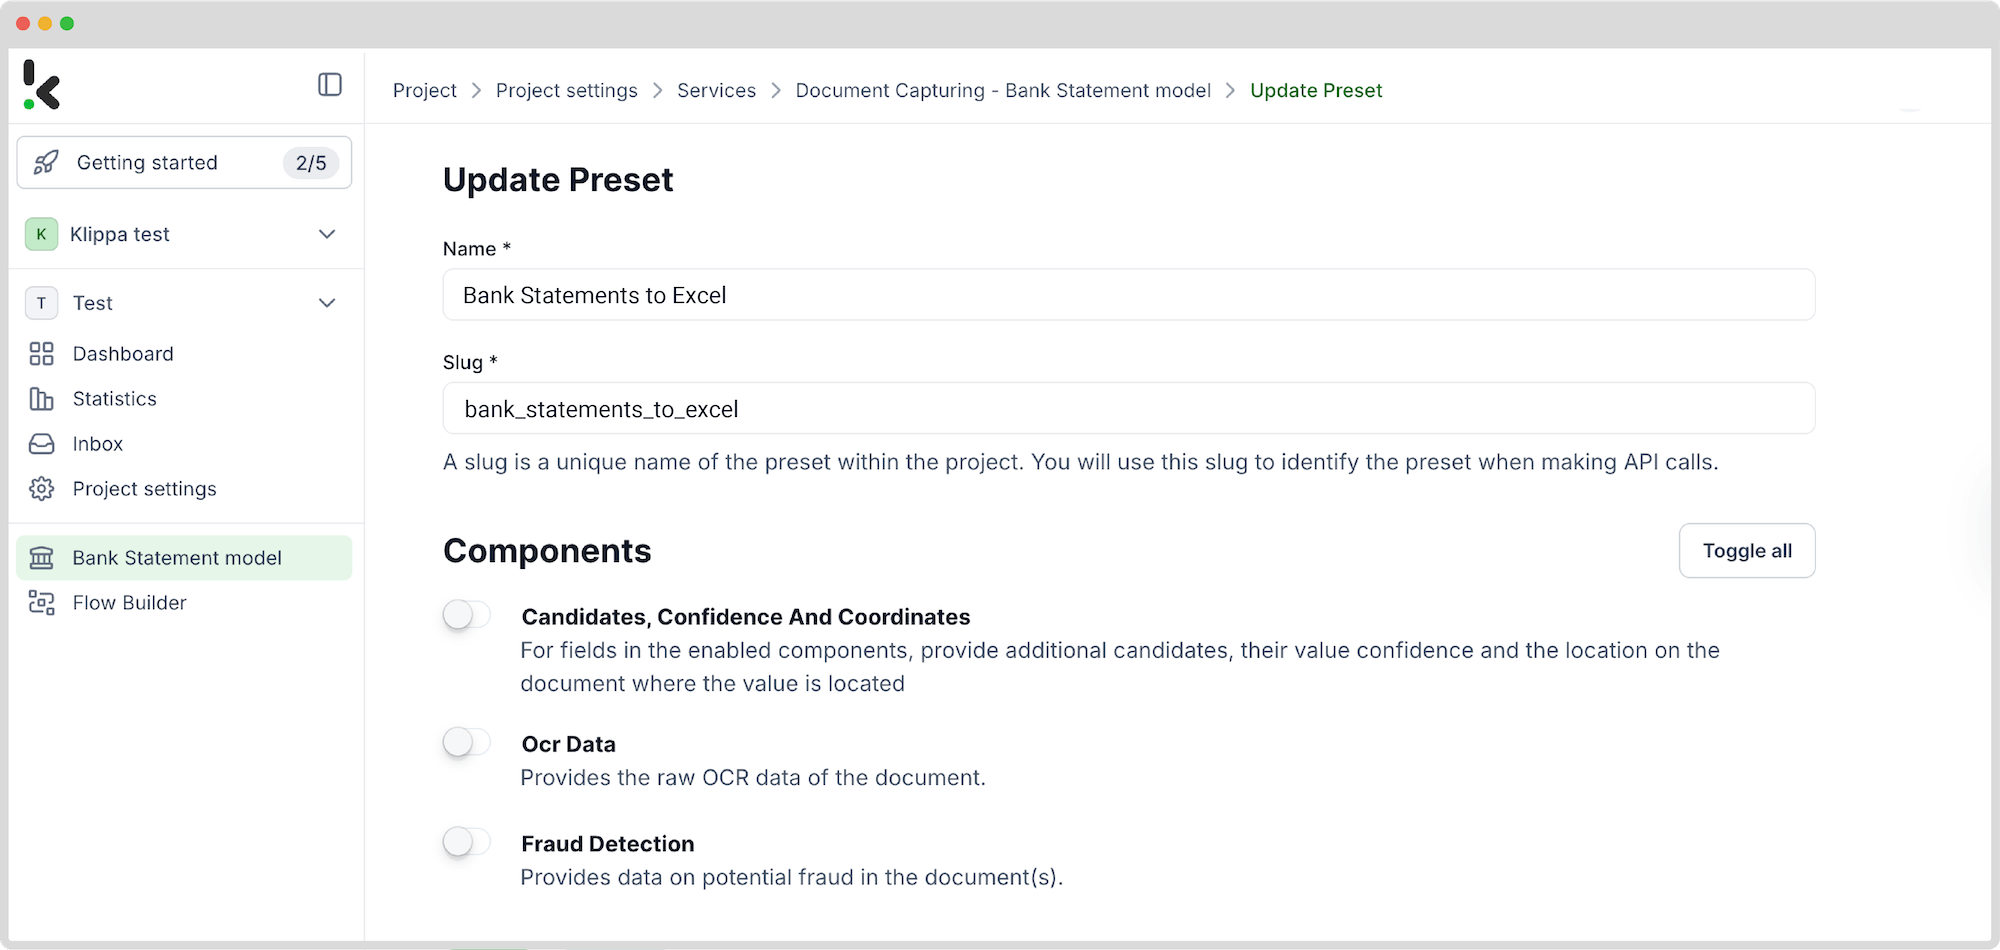
- In the left menu, click “Bank Statement Model.”
- Create a new preset and name it (e.g., “Bank Statements to Excel”).
- Select components and define the fields to extract.
- Keep default options or customize further (e.g., add raw OCR data).
- Click “Save.”

Step 3: Choose Your Input Source
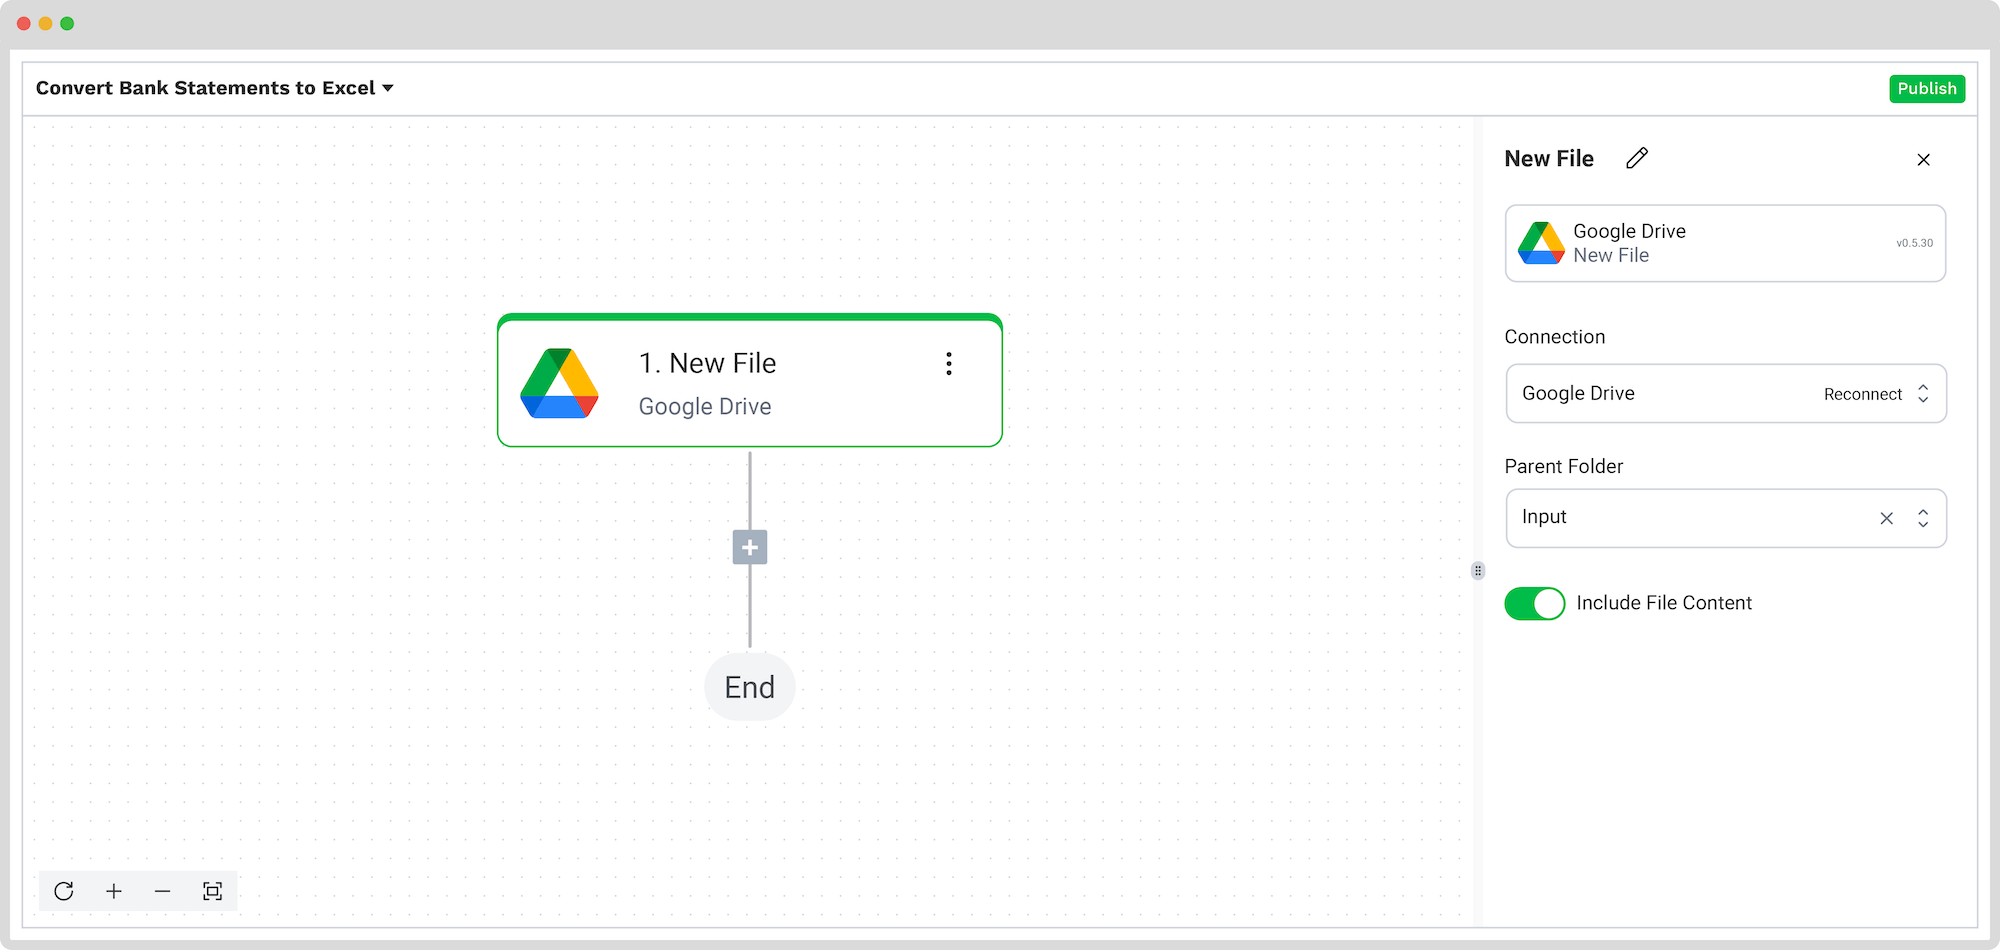
- In Flow Builder, click “New Flow → + From Scratch.”
- Name your flow (e.g., “Convert Bank Statements to Excel”).
- Create a folder named “Input” in Google Drive and upload invoices.
- Set Google Drive and “New File” as the trigger.
- Fill out:
- Connection: Assign a name (e.g., “google-drive”) and authenticate with Google
- Parent Folder: Input
- Include File Content: Check this box
- Click “Load Sample Data” to test with a document.

Step 4: Capture and Extract Data
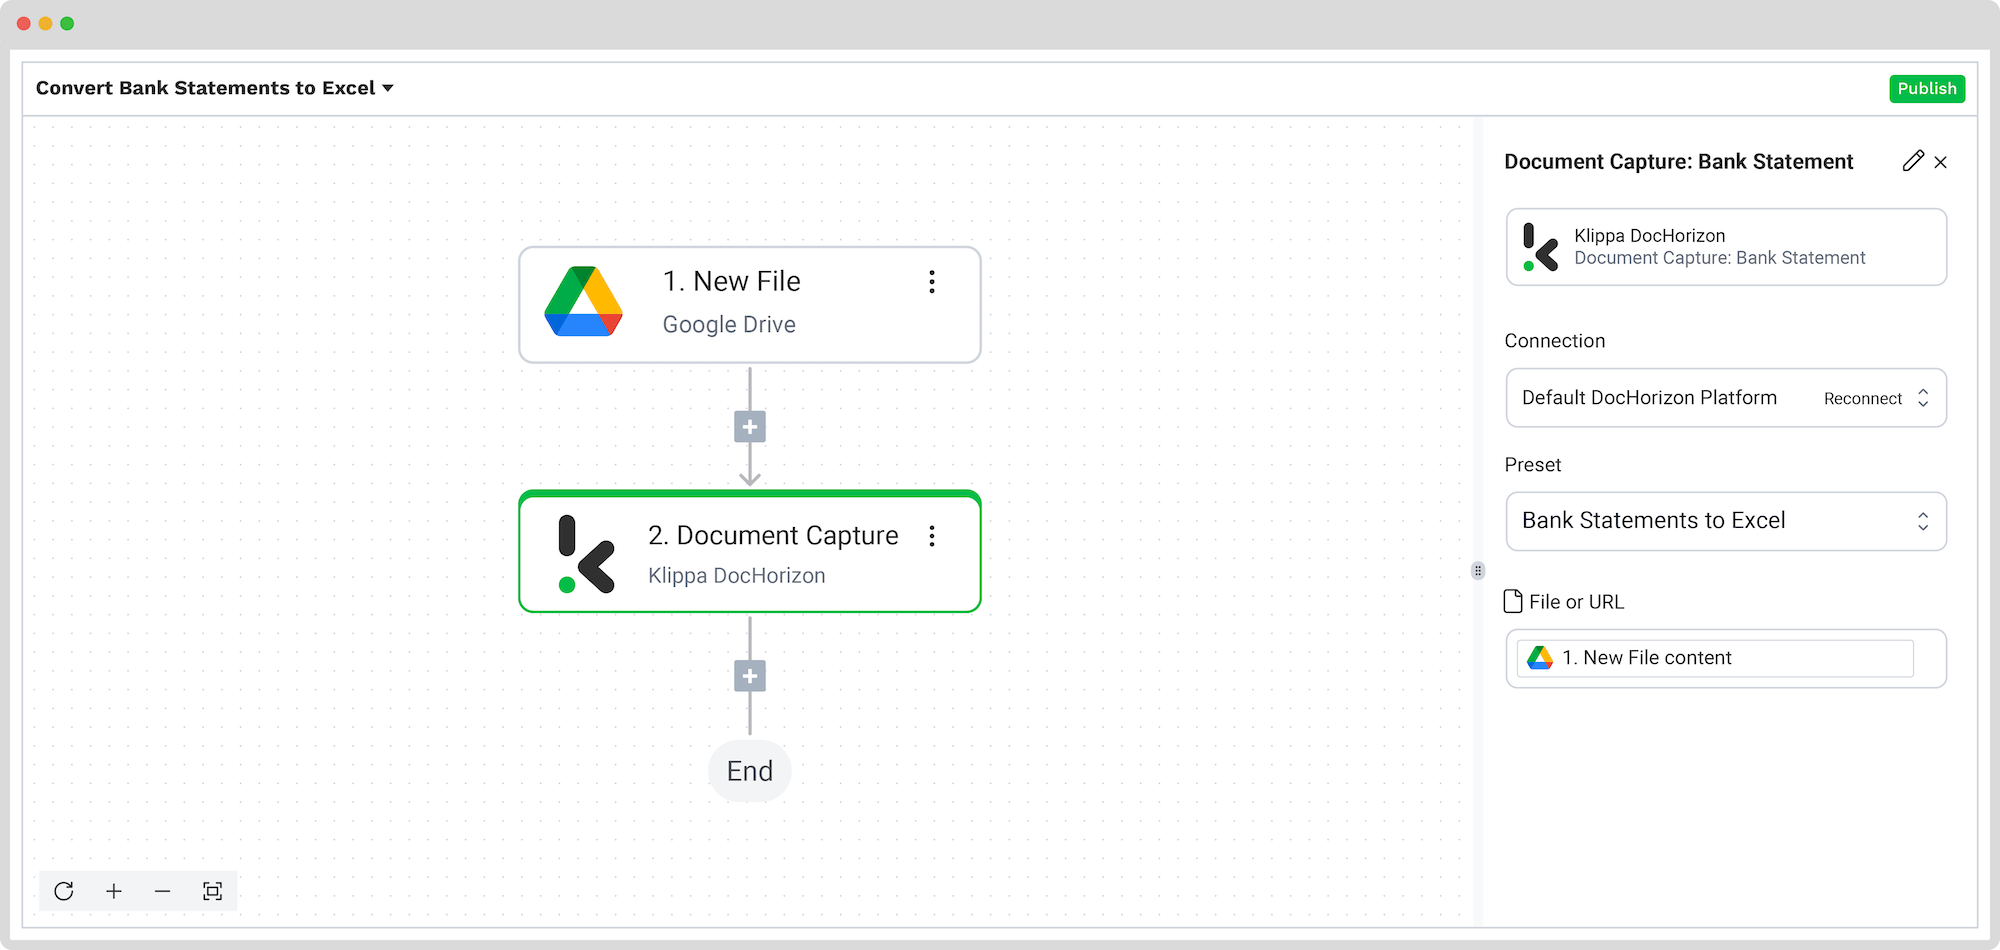
- Add a step: “Document Capture: Bank Statement.”
- Configure:
- Connection: Default DocHorizon Platform
- Preset: Choose your preset (e.g., “Bank Statements to Excel”)
- File or URL: New file → Content
- Test the step to ensure data is extracted correctly.

Step 5: Save as CSV or Excel
To Save as CSV:
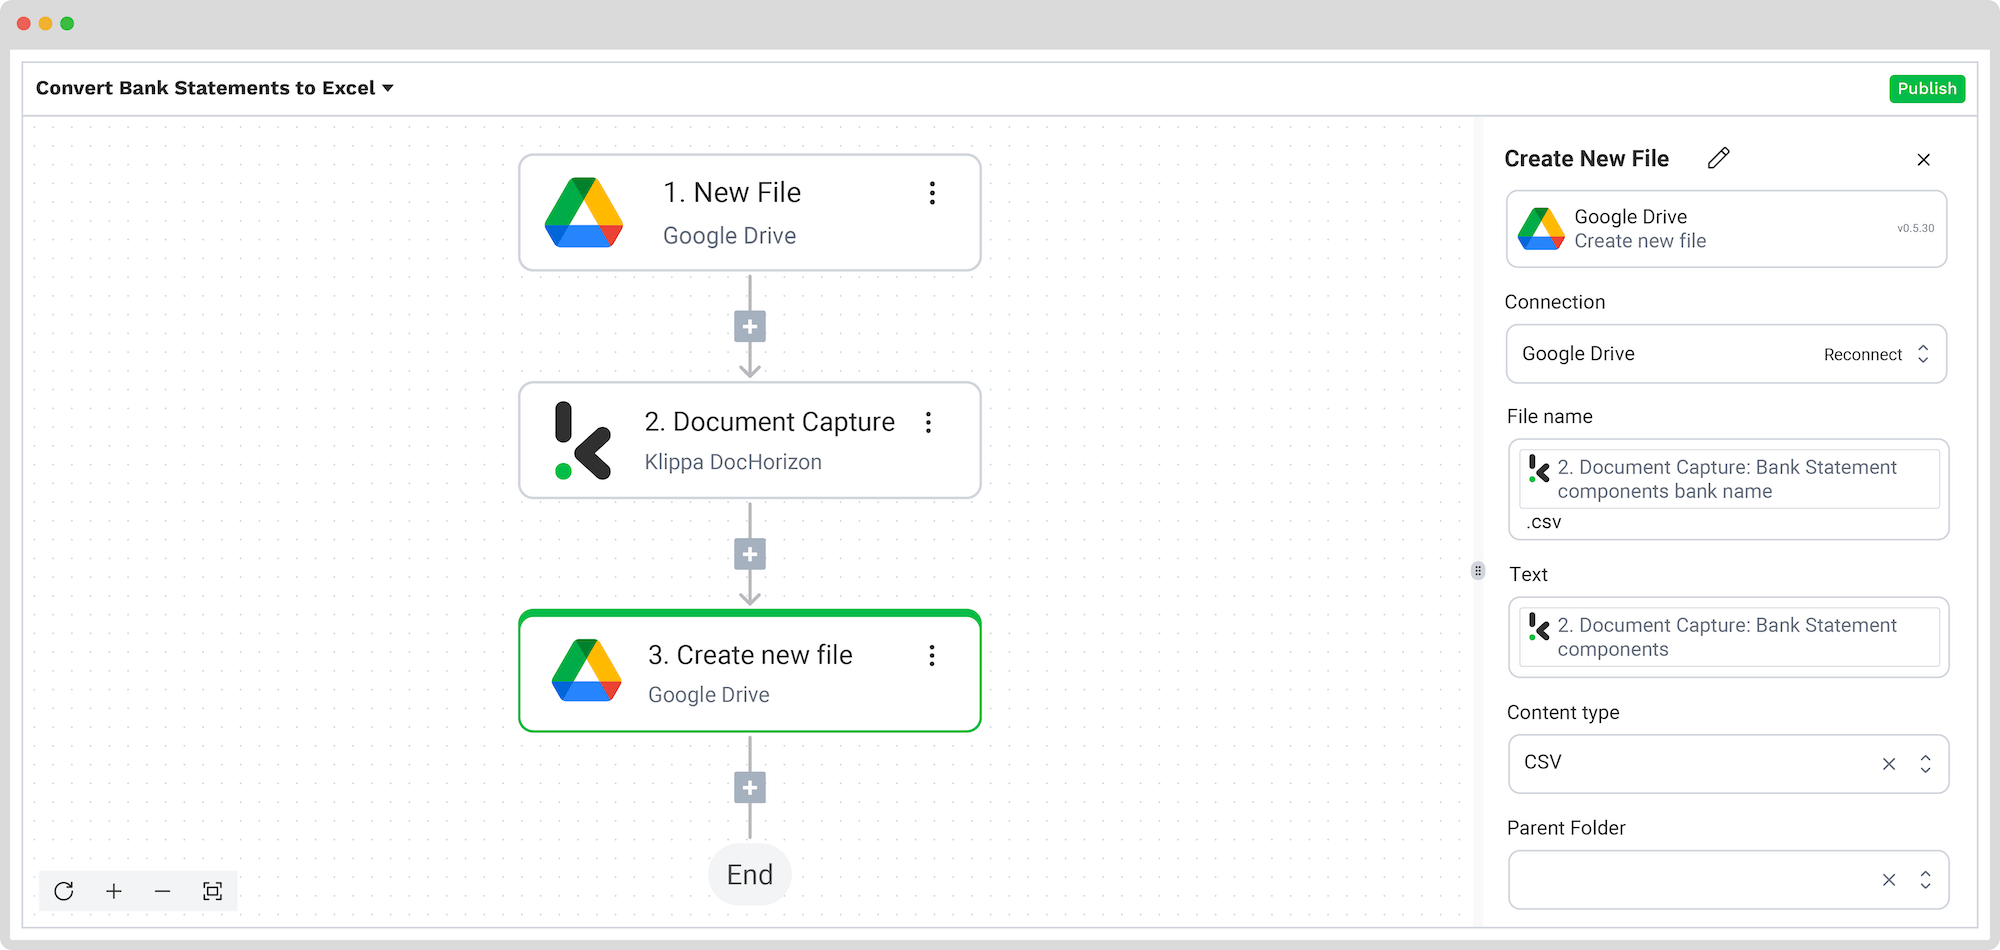
- Add a step: “Create New File → Google Drive.”
- Configure:
- Connection: google-drive
- File Name: Use bank name or another identifier + “.csv”
- Text: Document Capture: Bank Statement → components
- Content Type: CSV
- Parent Folder: Output folder
- Click the test button to confirm.

To Save in Excel:
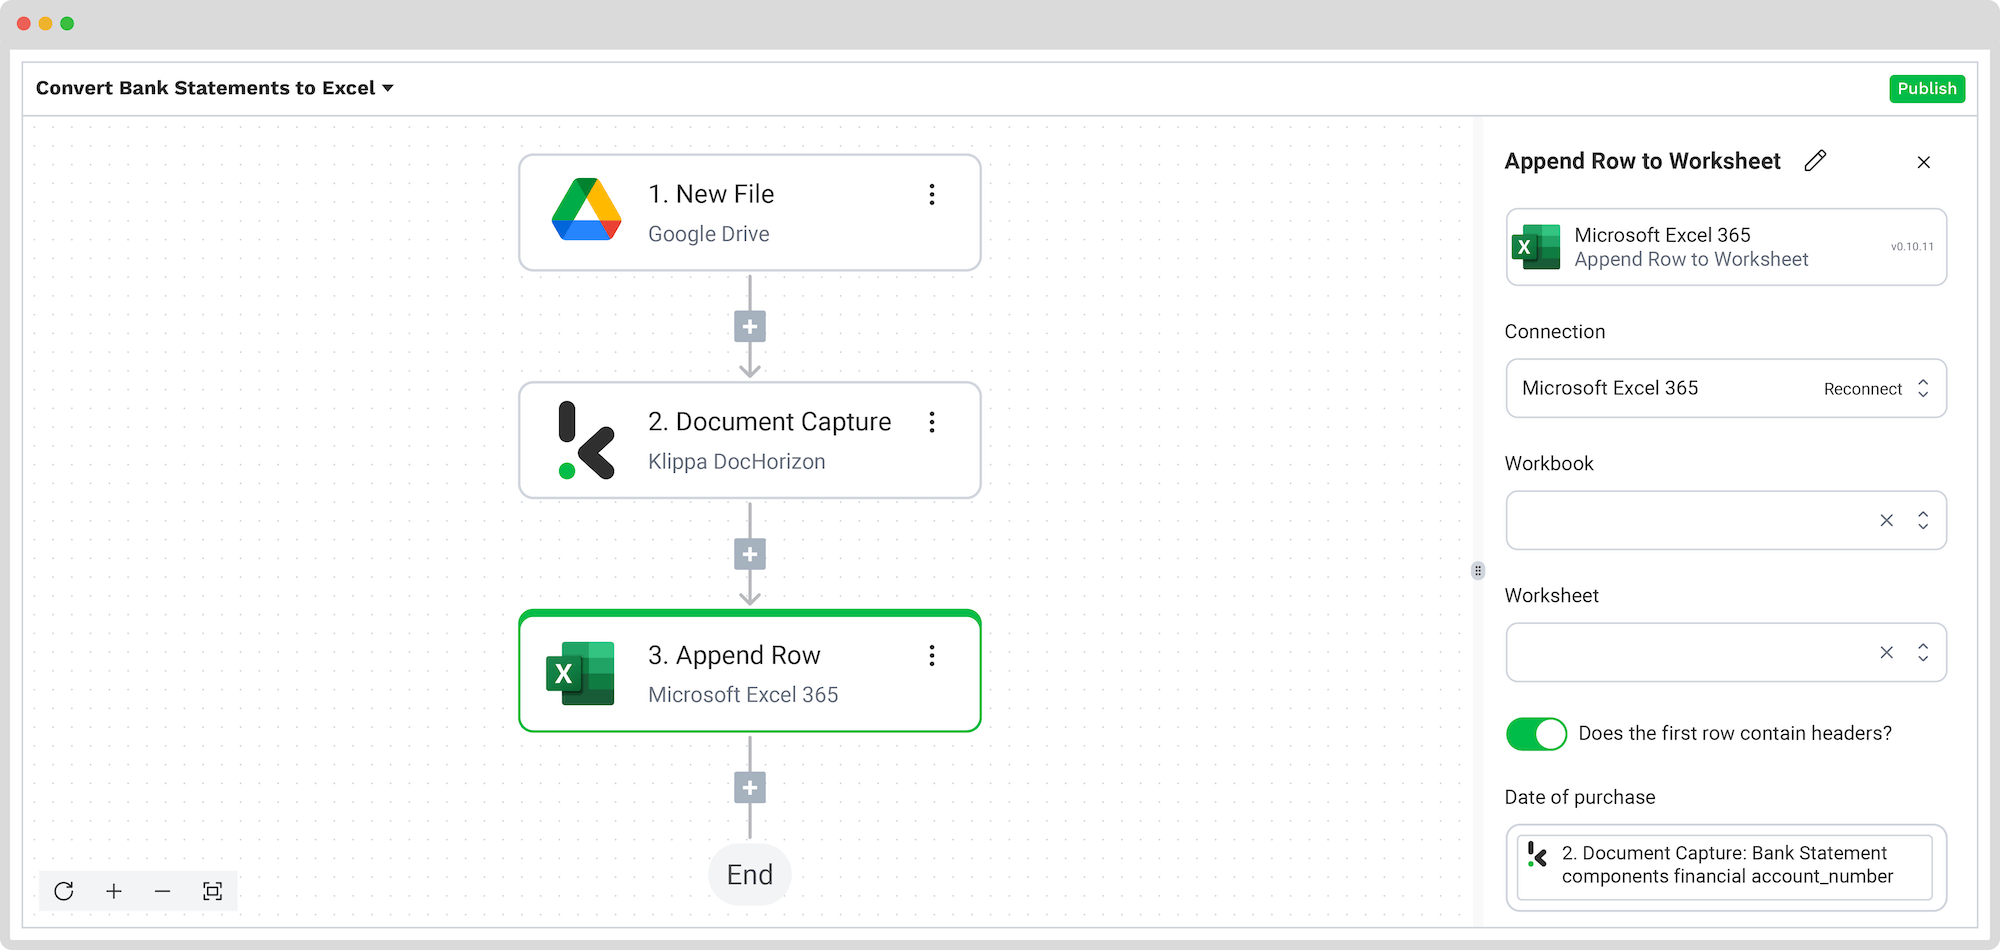
- Add a step: “Append Row to Worksheet → Excel.”
- Fill in:
- Connection: Connect Microsoft Excel 365 account
- Workbook: Your Excel workbook name
- Worksheet: Target sheet name
- If headers exist:
- Toggle “Does the first row contain headers?”
- Map data fields (e.g., Account Number, Opening Balance, Date Range)
- Click the test button to confirm.

Once set up, publish the flow. Any new document added to the input folder will be processed automatically.
4. Using Excel to Convert PDFs and CSVs
If you’re using Microsoft Excel, you can import both PDF and CSV bank statements easily:
To import a PDF:
- Open Excel and go to the “Data” tab.
- Select “Get Data > From File > From PDF.”
- Choose your PDF file. Excel will try to detect and extract tables.
- Clean up any extra rows or formatting using Excel tools or Power Query.
To import a CSV:
- Go to the “Data” tab and select “Get Data > From Text/CSV.”
- Choose your CSV file. Excel will recognize the structure and load it.
- Make any necessary formatting adjustments before saving.
Both methods allow you to then save your data in either Excel (.xlsx) or CSV format, depending on your needs.
5: Save the Document
- Once converted, review the file to make sure the formatting and data are correct.
- Save the document in your preferred format: CSV for databases or Excel for more flexible editing.
Important Considerations
- Double-check your data: Always review the converted CSV or Excel files to verify data correctness and proper formatting. Errors in financial data can have serious consequences.
- Check your bank’s export options: Some banks provide unique export formats or have specific steps for downloading statements. Check your bank’s website or support documentation to follow these properly.
- Keep your data safe: When using online tools or IDP platforms, choose those with strong reputations for security and privacy. Ensure they comply with regulations like GDPR to protect sensitive financial data.
Automate Bank Statement Conversion to Excel or CSV with Klippa
Looking to save your bank statement data to Excel or convert it into a CSV format? We’ve got you covered! With Klippa DocHorizon, an advanced intelligent document processing platform, you can easily automate any of your workflows. By leveraging Klippa’s advanced module, you can set up a seamless workflow tailored to your needs:
- Data extraction OCR: Automatically extract data from any type of document.
- Human-in-the-loop: Ensure almost 100% accuracy with our human-in-the-loop feature, allowing internal verification or support from Klippa’s data annotation team.
- Document conversion: Convert documents in any format – such as PDF, scanned images, or Word documents – into various business-ready data formats, including JSON, XLSX, CSV, TXT, XML, and more.
- Data anonymization: Protect sensitive information and ensure regulatory compliance by anonymizing privacy-sensitive data, such as personal information or contact details.
- Document verification: Authenticate documents automatically and identify fraudulent activity to reduce the risk of fraud.
At Klippa, we value privacy – all of our document workflows are HIPAA, GDPR, and ISO compliant, ensuring secure data processing. With peace of mind about data safety, take the next step and streamline your document workflows.
If you manage high volumes of financial documents or just want a faster way to process your bank statements, Klippa is the best solution to automatically convert your bank statements into structured data.
Don’t hesitate to contact our experts for additional information or book a free demo!
FAQ
To convert a bank statement to Excel, use an IDP solution like Klippa DocHorizon. Simply sign up for free on the platform and create a data extraction preset for bank statements. Upload your PDFs from sources like Google Drive or local folders, and let the platform automatically extract key data, such as account numbers, transaction dates, and amounts, into a structured Excel spreadsheet.
Yes, Klippa DocHorizon can convert PDF bank statements to Excel. Its smart OCR engine processes PDFs, extracts key financial data, and organizes it into a structured Excel format, providing a fully automated and customizable solution.
Yes, Klippa supports credit card statements as well. Just upload the PDF, select or create a preset for credit card formats, and export the transaction data to Excel.
Yes, Klippa can convert PDF bank statements to CSV. The platform extracts your data and formats it into CSV for seamless integration with accounting software or financial tools.
You can easily convert your bank statements to CSV using Klippa’s automated tool. Upload your bank statement to Klippa DocHorizon’s platform, define your output as CSV, and run your preset. The tool will extract all financial data and generate a ready-to-use CSV file you can download or sync to your cloud storage.
Yes, Klippa can convert scanned bank statements. It uses advanced OCR to recognize and extract data from image-based PDFs or scans, turning them into structured Excel or CSV outputs.
Yes, Klippa supports bulk processing. You can upload multiple bank or credit card statements, and the system will convert them all at once, ideal for teams or accountants managing high volumes.
Upload your PDF to Klippa DocHorizon, enable the Bank Statement model, and configure your flow to generate a CSV output. All relevant data, like transaction details and balances, will be extracted and formatted automatically.
If your bank doesn’t provide direct CSV downloads, use Klippa DocHorizon. Upload your PDF bank statement, extract the transaction data, and export it as a CSV file ready for import into your accounting system.
Yes. Klippa offers a free trial with €25 in credits, allowing you to explore the platform’s features and capabilities before deciding.
Absolutely. Klippa complies with global data privacy standards, including GDPR. Your data is encrypted, securely processed, and never shared with third parties without your consent.