Let us guess – you’re managing a business, handling multiple projects, and organizing your inbox, all at the same time. You might receive emails in various structures with attachments in different file formats, making it difficult to accurately and efficiently make sense of the data.
Using a structured application, such as Google Sheets, to organize the information might seem like a perfect solution. However, manually extracting and typing data into spreadsheets seems like an even bigger challenge.
What if we told you that you could parse emails to Google Sheets automatically? By employing Intelligent Document Processing, you too can streamline data and document management as well as enhance productivity. Follow our tutorial and learn to parse any email attachment to Google Sheets.
Let’s get started!
Key Takeaways
- Email-to-Google Sheets automation is possible and easy – With Klippa DocHorizon, you can fully automate the extraction of email attachments and push structured data directly into Google Sheets without manual work.
- No coding required, just smart workflows – Using DocHorizon’s visual Flow Builder, Presets, and Prompt Builder, you can customize the parsing and classification of documents without writing a single line of code.
- Compatible with any inbox and document type – Whether you use Gmail or another provider, and whether your attachments are invoices, packing lists, or something else, DocHorizon can handle it all.
- Secure, scalable, and tailored to your needs – The platform is GDPR, HIPAA, and ISO compliant. You can start small, test with free credits, and scale with full automation support, backed by human-in-the-loop and document verification options.
How to Extract Email Attachments to Google Sheets
We will demonstrate how you can easily automate the process of extracting data from your Gmail, or any other inbox, attachments into Google Sheets using Klippa DocHorizon.
Klippa DocHorizon is a powerful Intelligent Document Processing (IDP) platform that automates document workflows and offers flexibility for various use cases by supporting more than 100 document types and formats.
Let’s walk you through a step-by-step process of extracting data from emails to Google Sheets using our platform! Remember: All you have to do is configure your workflow once, and from then on, DocHorizon will completely automate the process for you.
In this flow, we’ll process PDF Invoices and Packing Lists as our example email attachments. We will separate document attachments from the email, extract data and organize it in different sheets in one Google Sheets file.
Step 1: Sign up on the platform
Start by signing up for free on the DocHorizon Platform. After that, you’ll receive a free credit of €25 to explore all the platform’s features and capabilities.
After logging in, create an organization and set up a project to access our services. Here, we will activate platform components that will allow us to extract data from invoices and packing lists from email to Google Sheets.
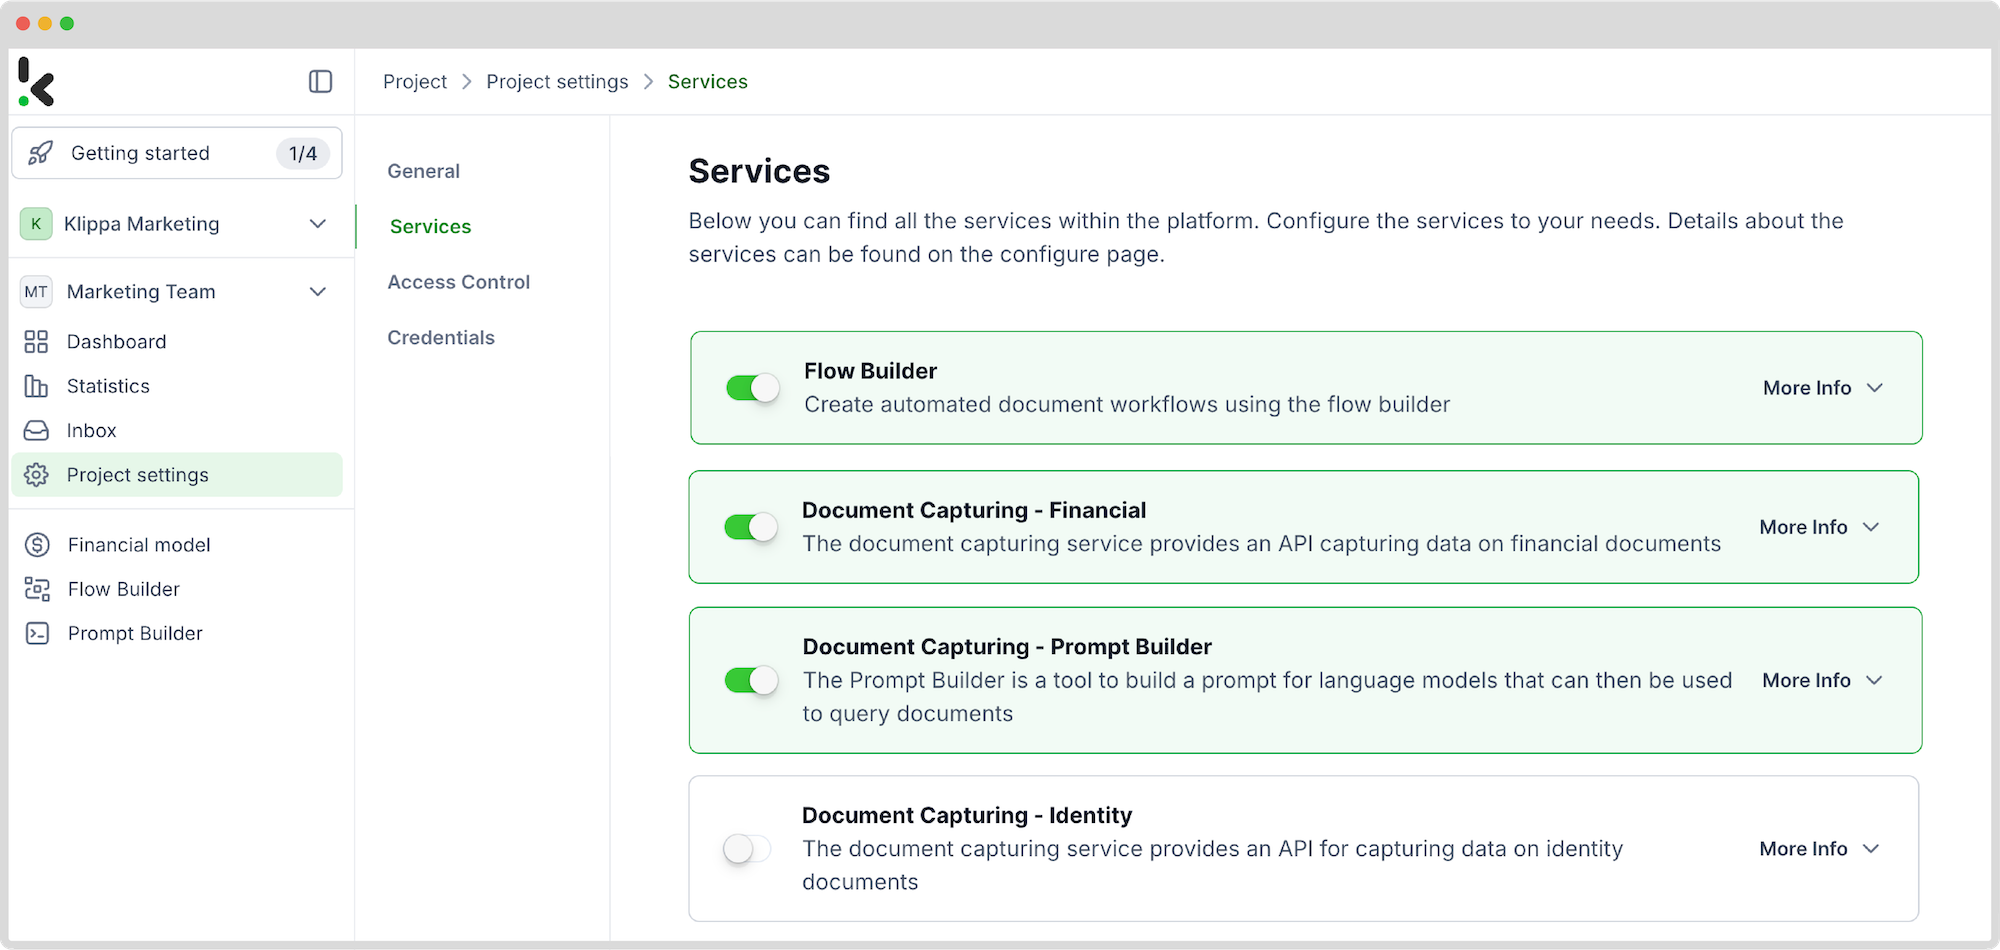
Go to Project Settings → Services and enable:
- Flow Builder
- Prompt Builder
- Document Capturing – Financial
This setup ensures you have everything you need right from the start! In the next steps, we will explain each service in detail.
Step 2: Create a preset for financial documents
We chose invoices and packing lists as our example documents for a reason — to demonstrate how you can process multiple document types within our platform. Let’s start with invoices.
Earlier, we enabled Document Capturing – Financial service. This model is designed to simplify the automation of data extraction, analysis, validation, and classification of financial documents, like invoices and receipts, by creating presets for your specific use case.
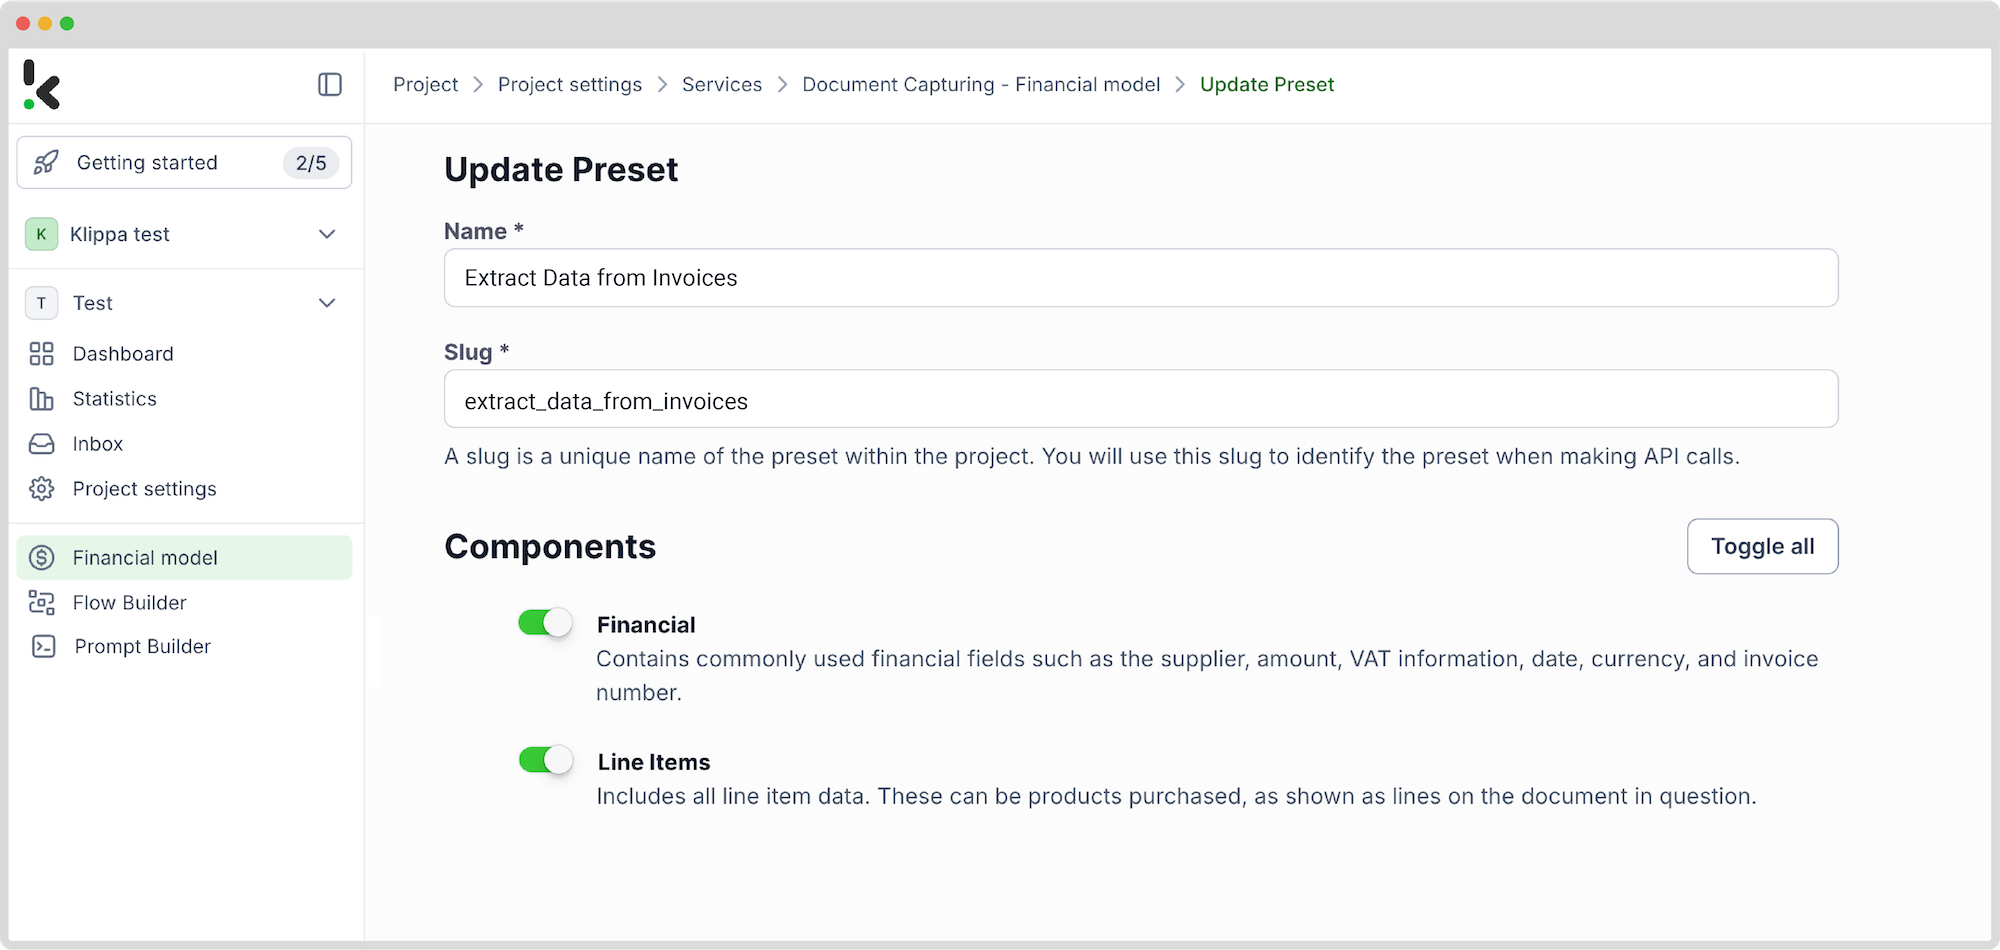
In your service area, click on Financial Model and follow these steps:
- Click +New Preset
- Name it (e.g., “Extract Data from Invoices”)
Now, you can activate the document components you want to process:
- We’ll enable the Financial and Line items components to process fields like supplier, amount, VAT information, date, currency, and invoice number.
Here’s a tip: You can customize the preset depending on your use case by activating more components, such as Date Details, Reference Details, Amount Details, Document Language, Payment Details, etc.
Click “Save” to finalize your settings.
Step 3: Configure Prompt Builder for other document types
Now, let’s move on to the packing lists. For that, we will need to use the previously activated Prompt Builder service.
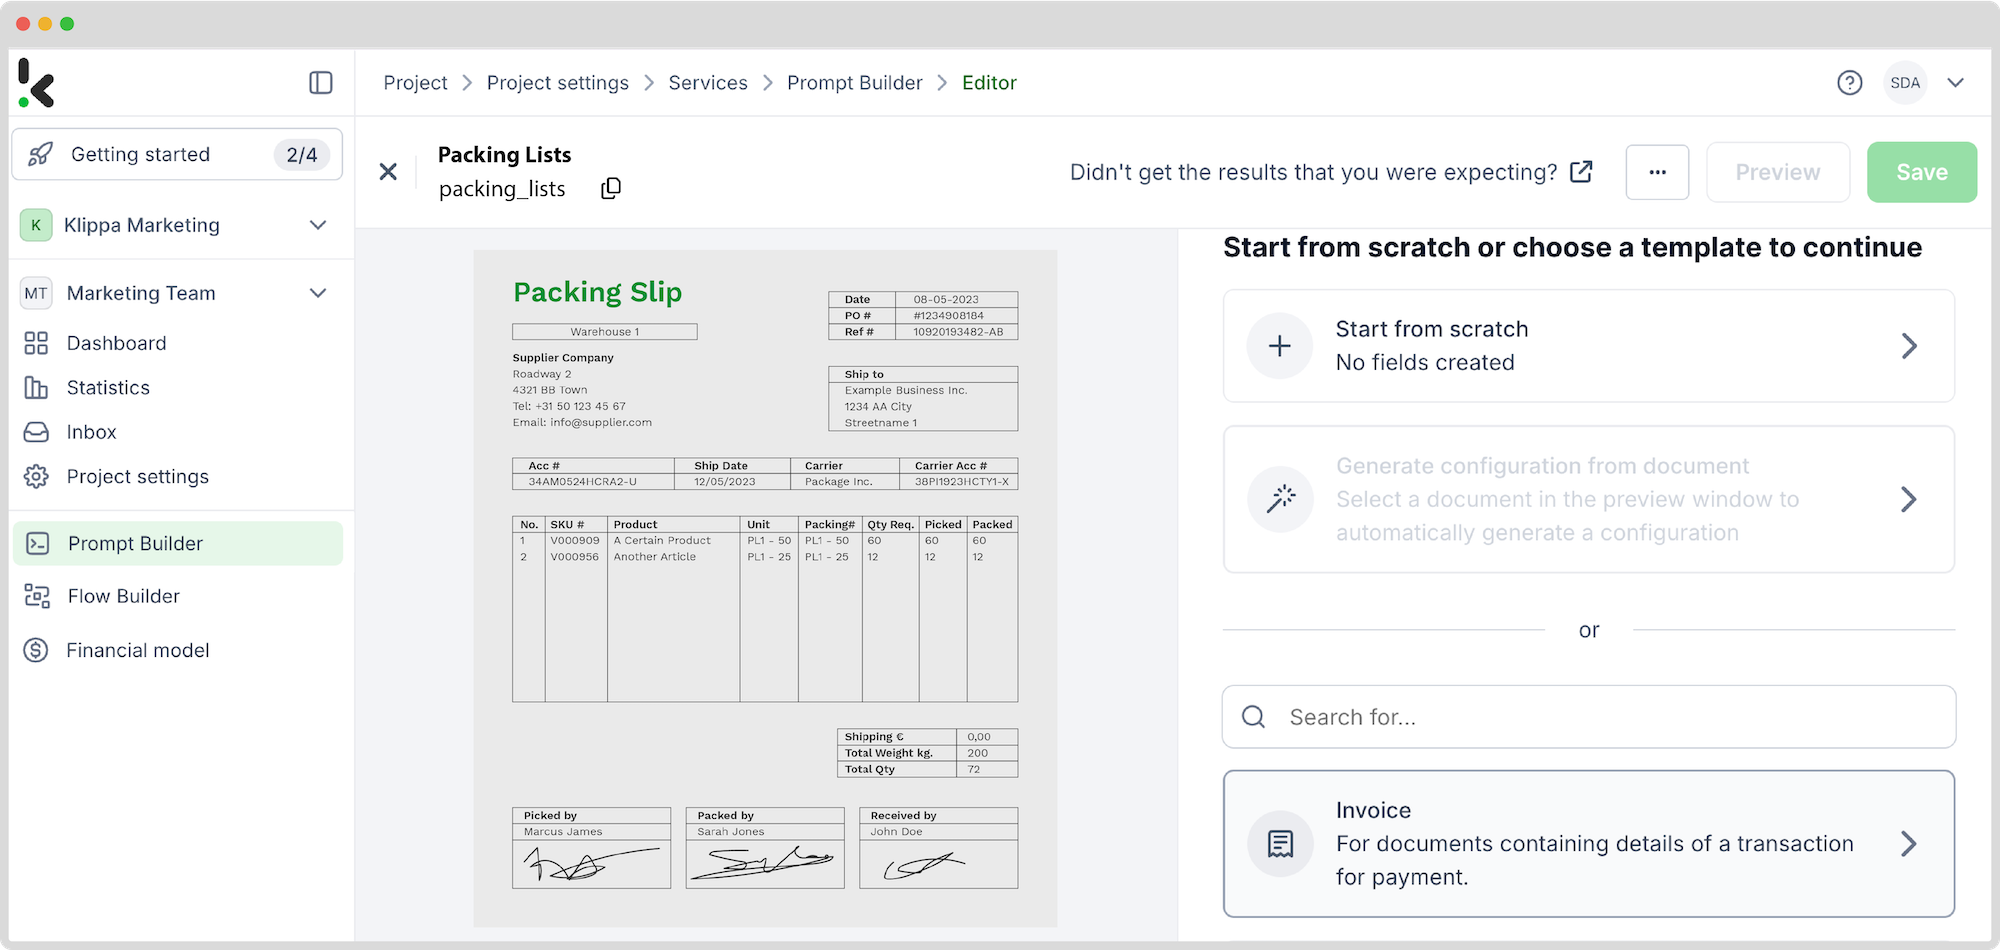
Prompt Builder allows you to build custom prompts for capturing data on any document. All you have to do is upload an example document and match the types of fields you want to process (e.g., document number, sender, receiver, etc.) with the areas on the document.
In your service area, click on Prompt Builder and follow these steps:
- Click +New Prompt
- Name it (e.g., “Packing Lists”)
- Click Create
- Upload your example document
Now you can choose to either match document fields with one of our existing document type templates or highlight and name the fields from scratch.
March your fields and click “Save” to finalize your settings.
Step 4: Start your flow – choose an input source
Now it’s time to design your flow. A flow is a sequence of steps that define how your email attachments are going to be extracted to Google Sheets.
In your service area, click on Flow Builder and follow these steps:
- Click on New Flow -> +From Scratch
The first step in building your flow is selecting your input source:
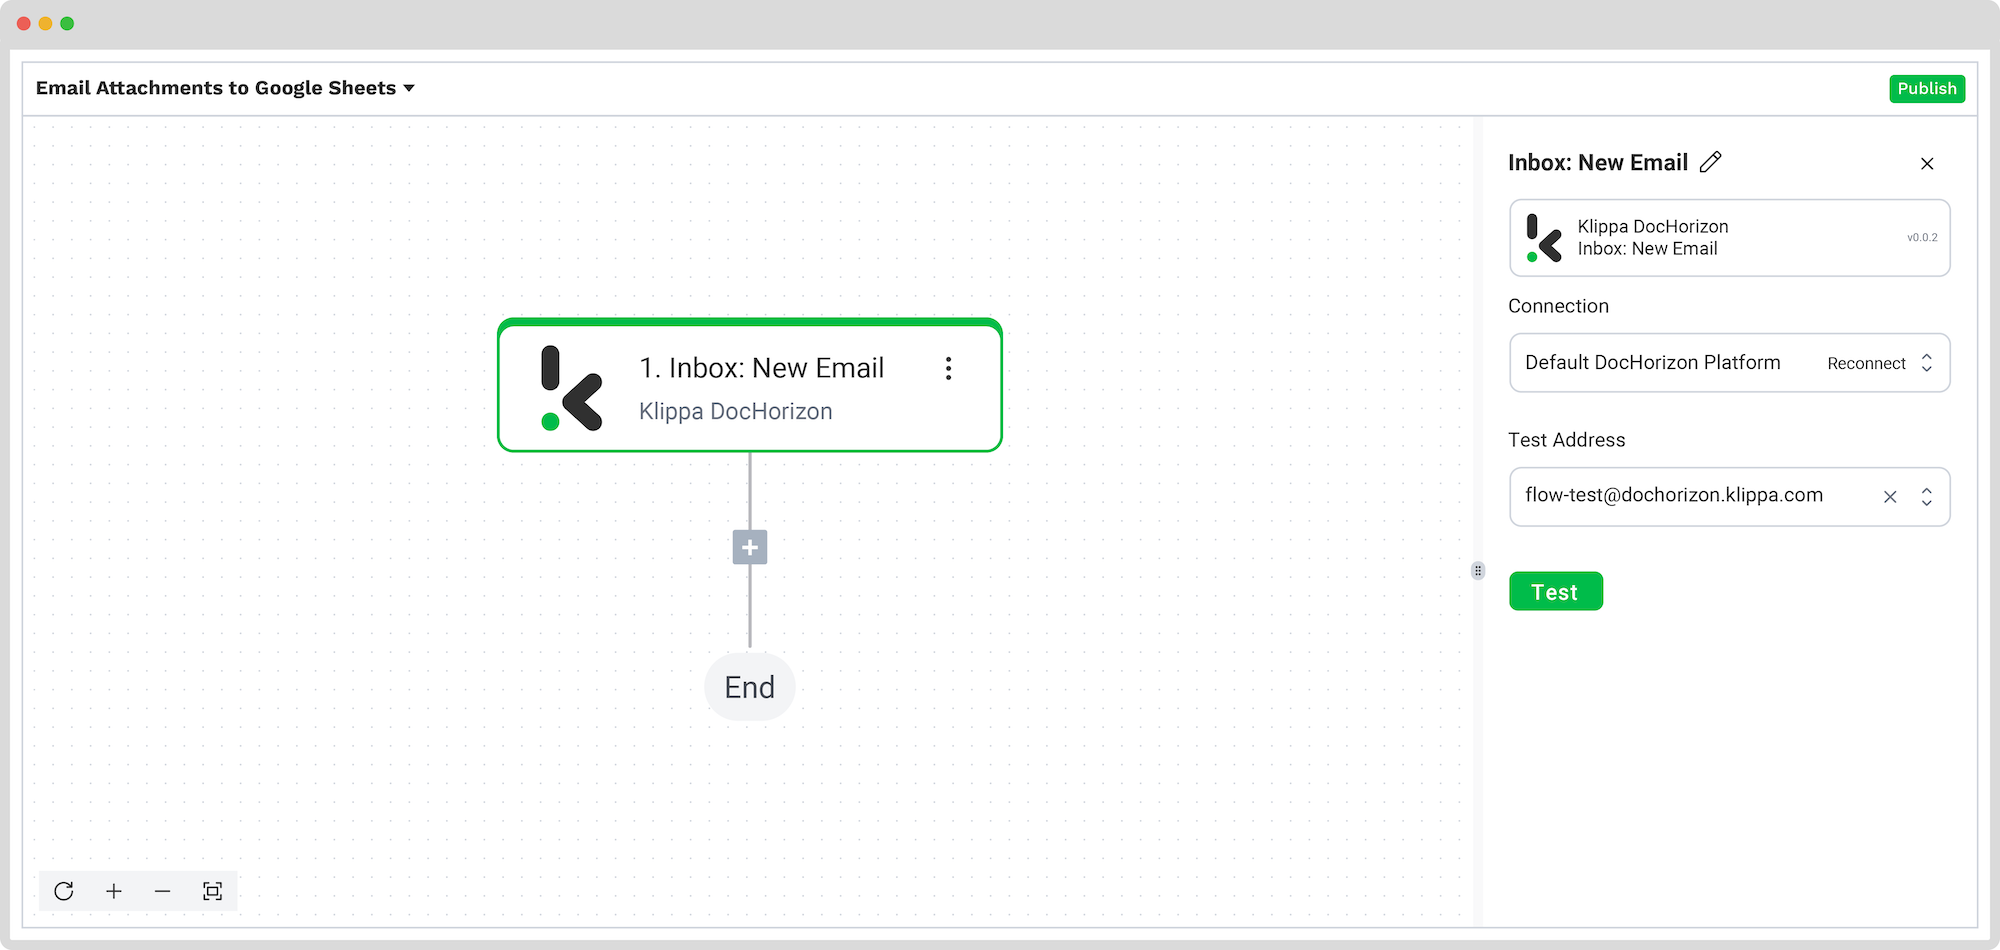
- Click on Select Trigger
- Find Klippa DocHorizon (Inbox: New Email)
With this trigger, the platform will create a unique DocHorizon email address which you can use to forward the attachments you wish to process.
- Click on the trigger and set the Connection to the Default DocHorizon Platform
- Test this step by sending an email with the attachment to the generated Test Address
Here’s a tip: Instead of forwarding emails to a DocHorizon email address, you can link your Gmail account directly to the flow or connect to over 100 other external sources. Please note that linking your account and parsing emails directly from Gmail will cause the flow to automatically process all incoming emails sent to that address.
Step 5: Add filters for email attachments
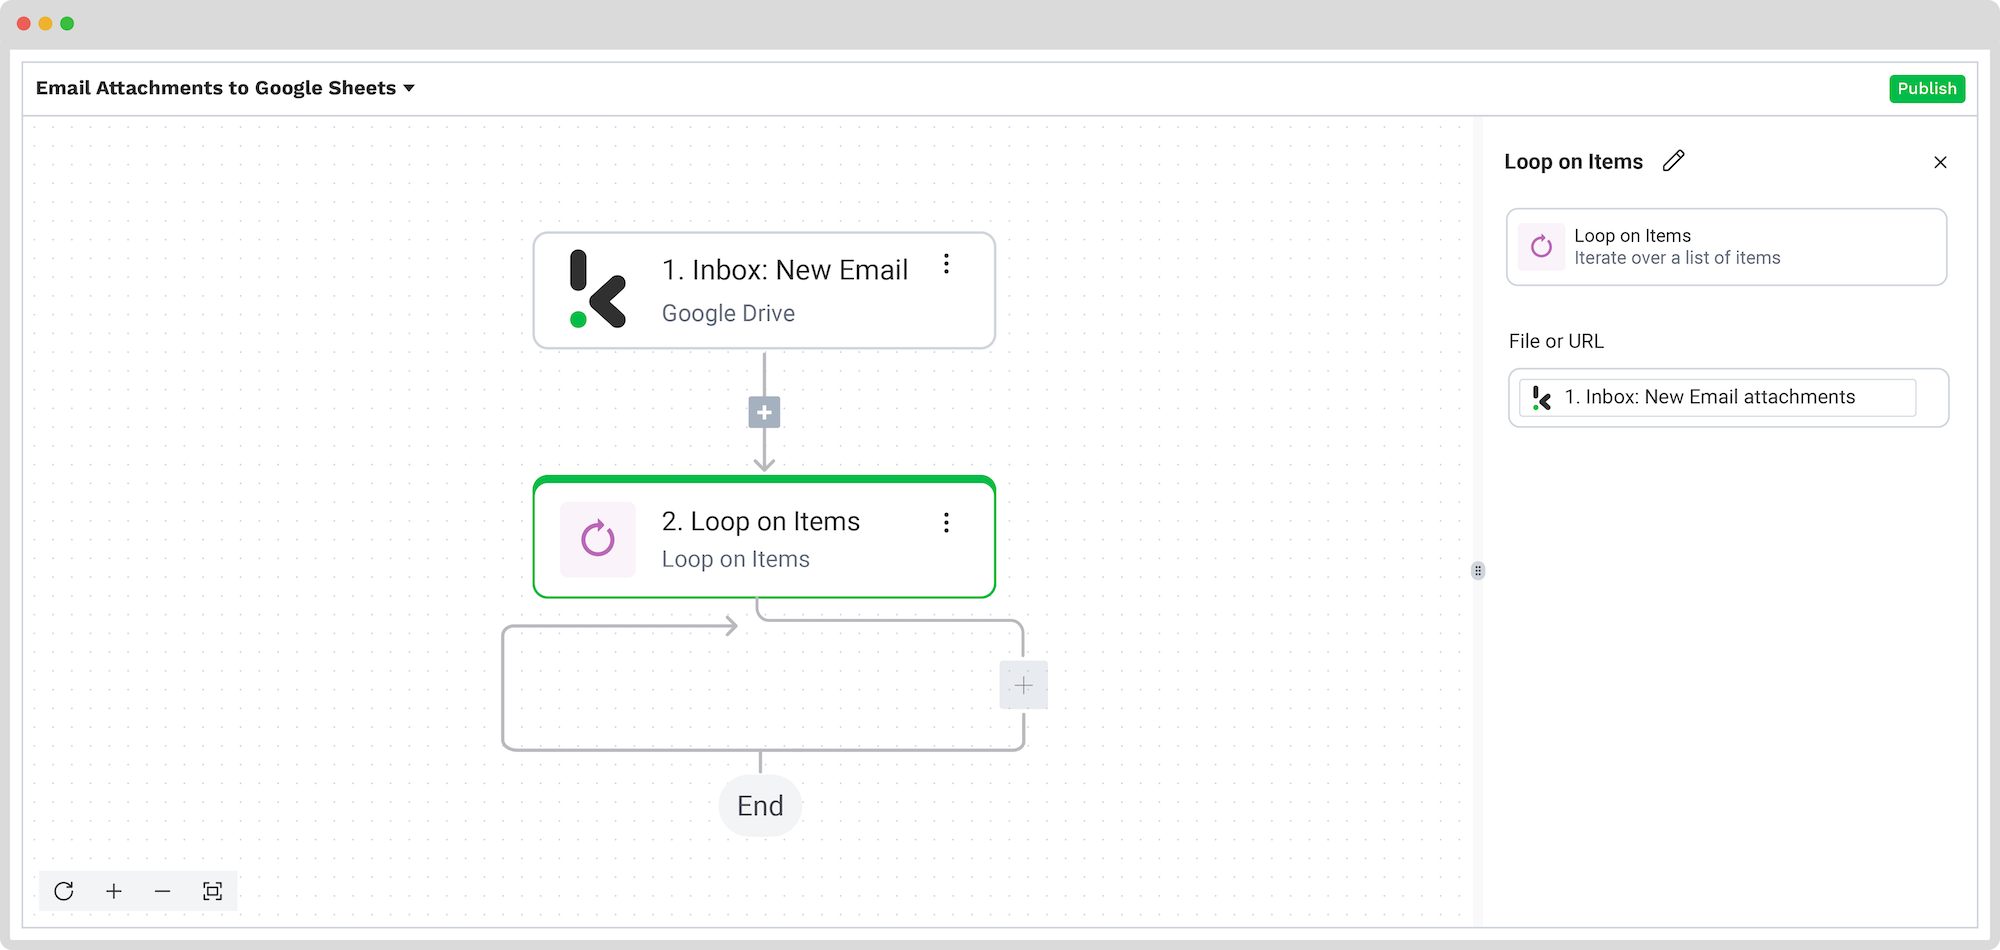
You might receive several attachments in your email. To make sure that the flow will process each attachment individually, we will add the Loop on Items step.
Add a Loop on Items step and configure the following:
- Click on the Items field
- Choose Inbox: New Email -> attachments
Test this step.
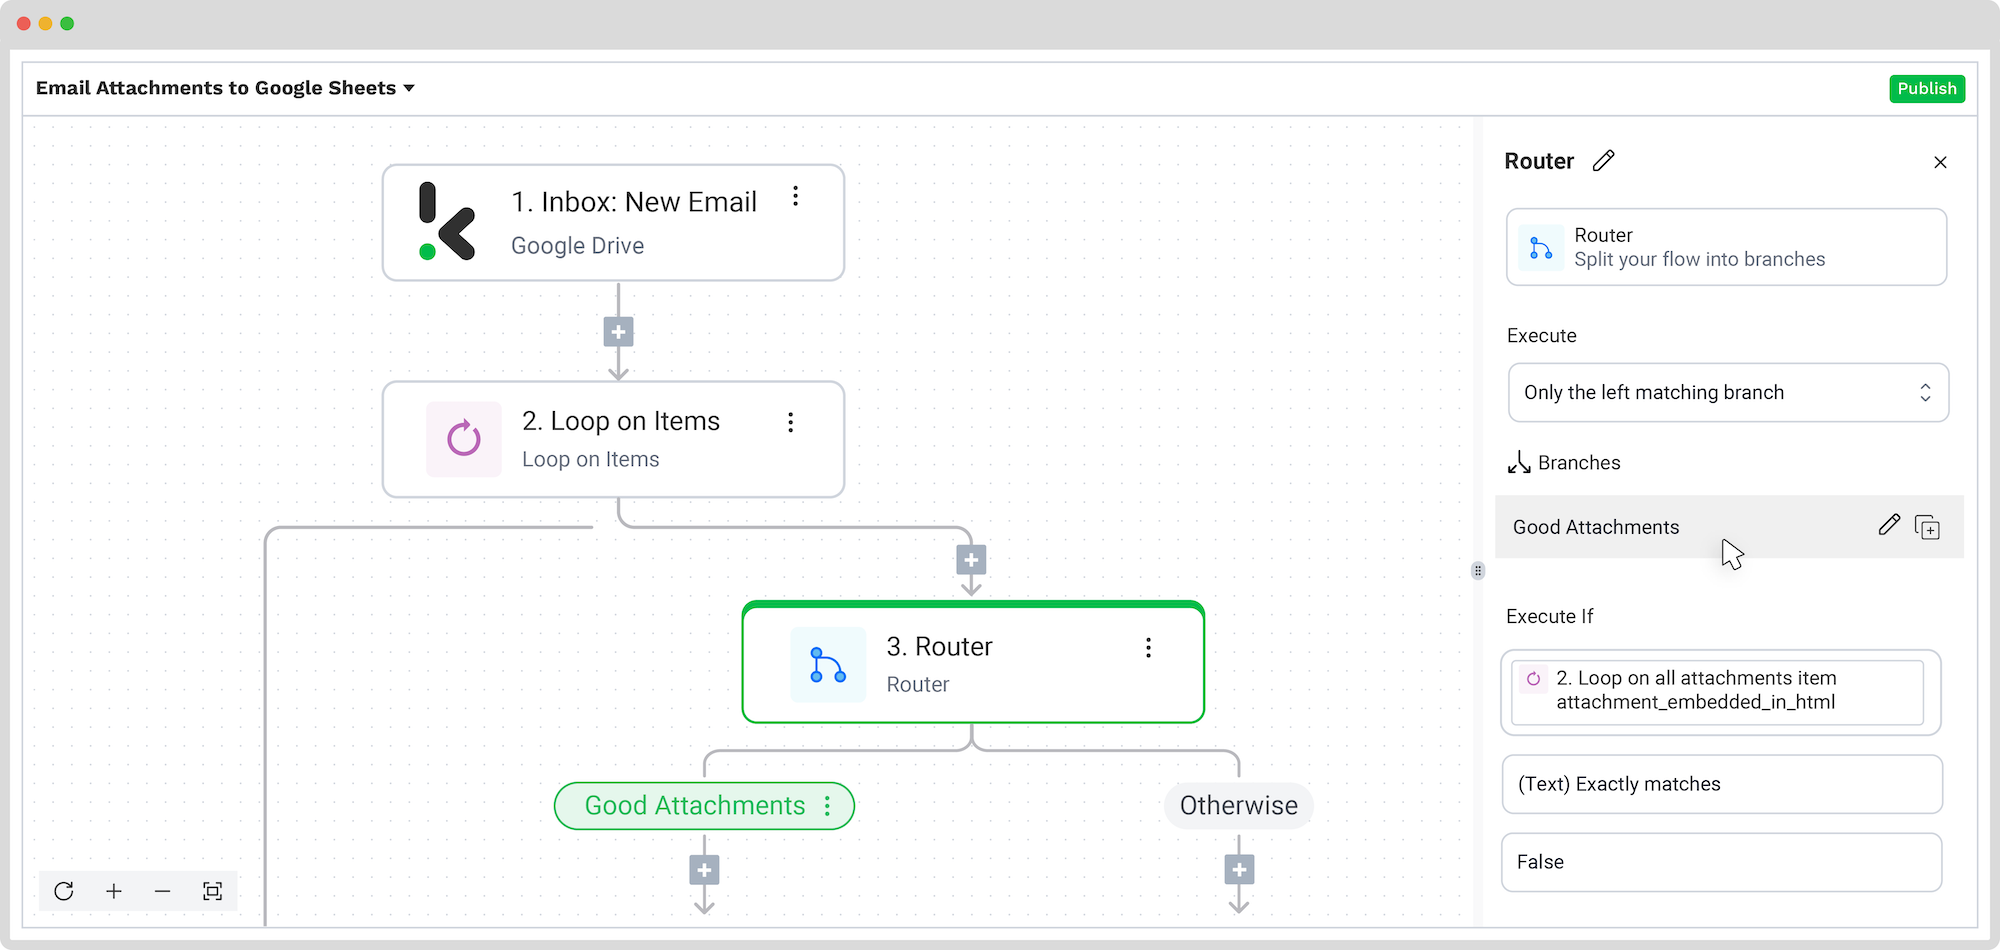
Next, we want the flow to process document attachments while ignoring other email components (e.g., email signatures). The Router step allows us to split the flow into branches depending on the applied conditions.
In our case, we want the router to check an email for attached documents and send them further into the flow (to the left of the branch), while other email components will be filtered out.
Add the Router step and configure the following:
- Click on the Execute field -> Only the first (left) matching branch
- Click on +Add Branch and name it (e.g., “Document Attachments” or “Good Attachments”)
To avoid processing email signatures and other non-essential elements, we will filter out content embedded in the HTML body of the email.
In the Execute if field, choose the following:
- Loop on items -> item -> attachment_embedded_in_html -> false
- (Text) Exactly matches
Test this step.
Step 6: Classify documents
After separating attachments from the email, we want to classify them. Classification will help the flow to understand which types of documents are being processed and treat them according to your requirements.
To classify our documents, we’ll have to go back to the Prompt Builder and add prompts for invoices and packing lists:
- Click +New Prompt
- Name it (e.g., “Classification”)
- Click Create
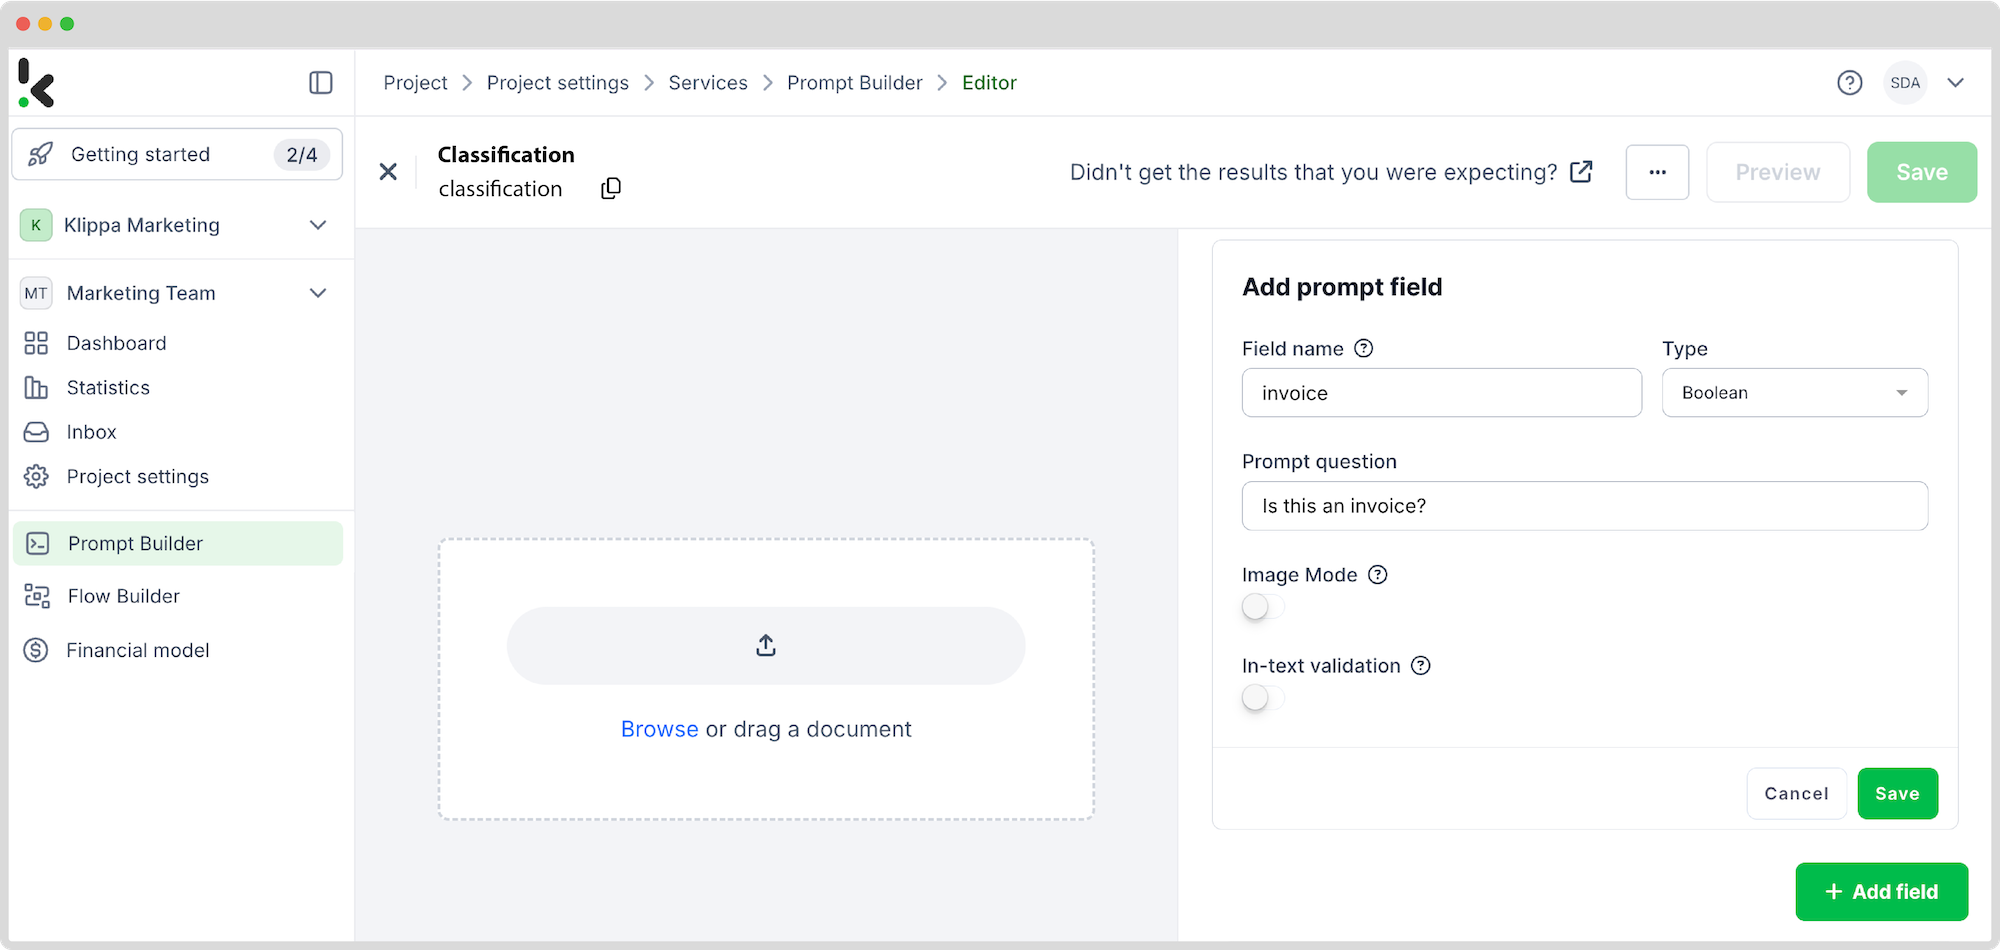
Now, we want to “+Start from scratch” and configure the following:
- Add prompt instructions (e.g., “Analyse different kinds of documents and determine which kind it is”)
- Click on the +Add field
- Field name: invoices
- Prompt type: Boolean (True / False)
- Prompt question: This should be a closed question, with only two possible responses: Yes or No (e.g., “Is this an invoice?”)
- Click Save
Following the same steps, “+Add field” for packing lists or other documents to the same prompt. Upload an example document to test your prompt – “Preview” the results.
If the prompt classifies the document correctly, save it.
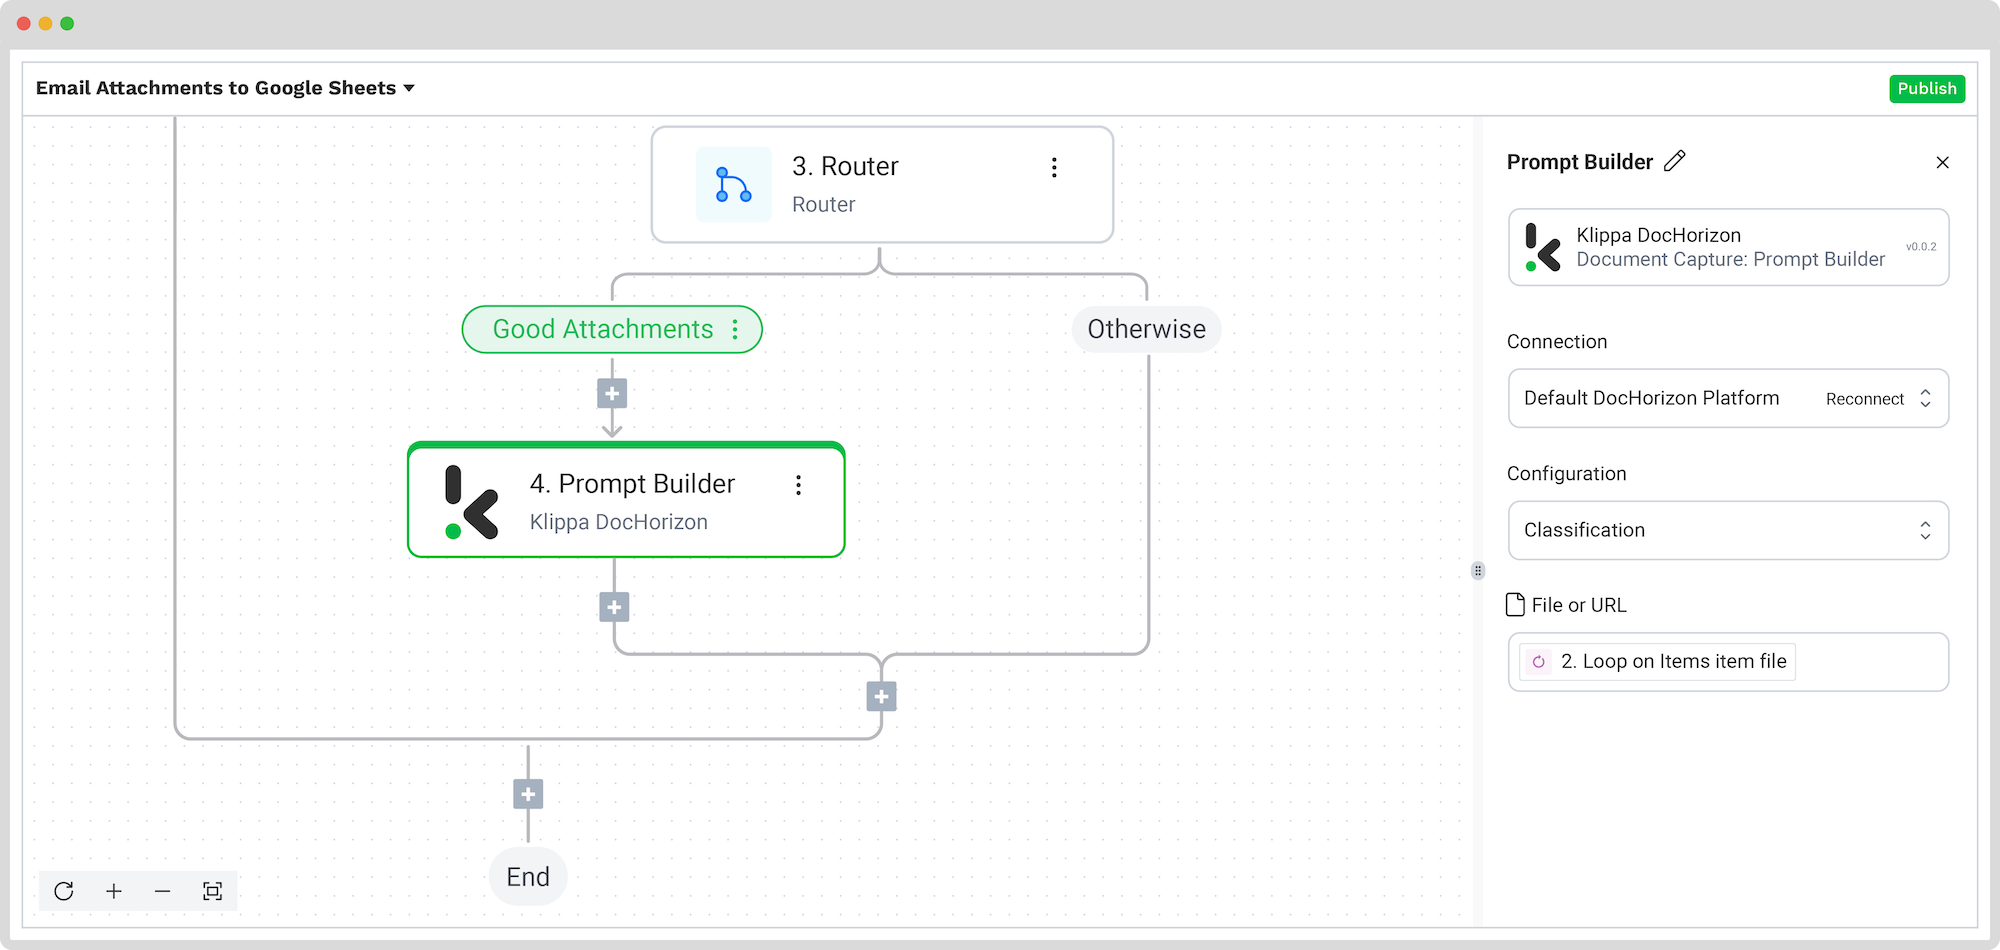
Go back to the Flow Builder. Add Document Capture: Prompt Builder step to the left branch and configure the following:
- Connection: Default DocHorizon Platform
- Configuration: The name of our prompt – “Classification”
- File or URL: Loop on items -> item -> file
Test this step.
Step 7: Add filters for document types
Remember how in Steps 2 and 3 we created a Preset and a Prompt? We want to ensure that after classification, the process will apply our preset and prompt to correct documents.
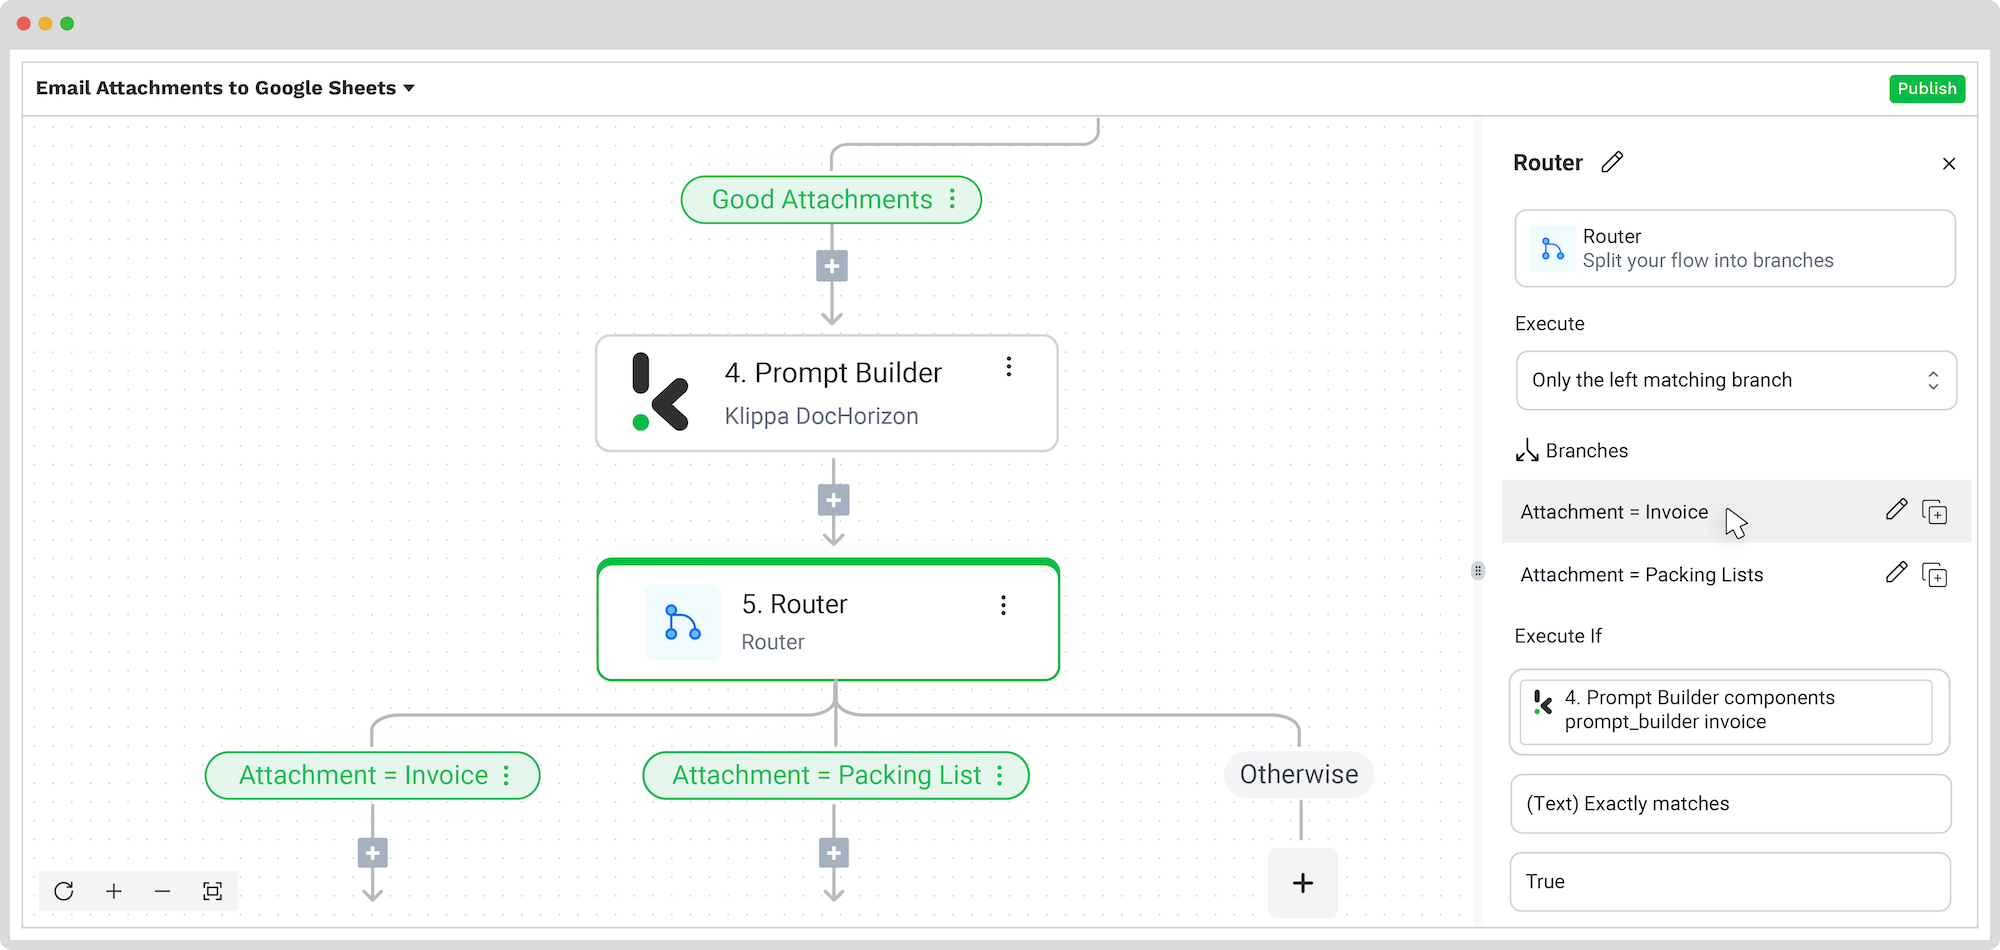
For that, we need to add the Router step and configure the following:
- Click on the Execute field -> Only the first (left) matching branch
- Click on +Add Branch and name it (e.g., “Attachment = Invoice”)
- Execute if: Document Capture: Prompt Builder -> components -> prompt_builder -> invoice -> true
- (Text) Exactly matches
Add a branch for packing lists based on the same steps.
Test this step.
Step 8: Process and extract data
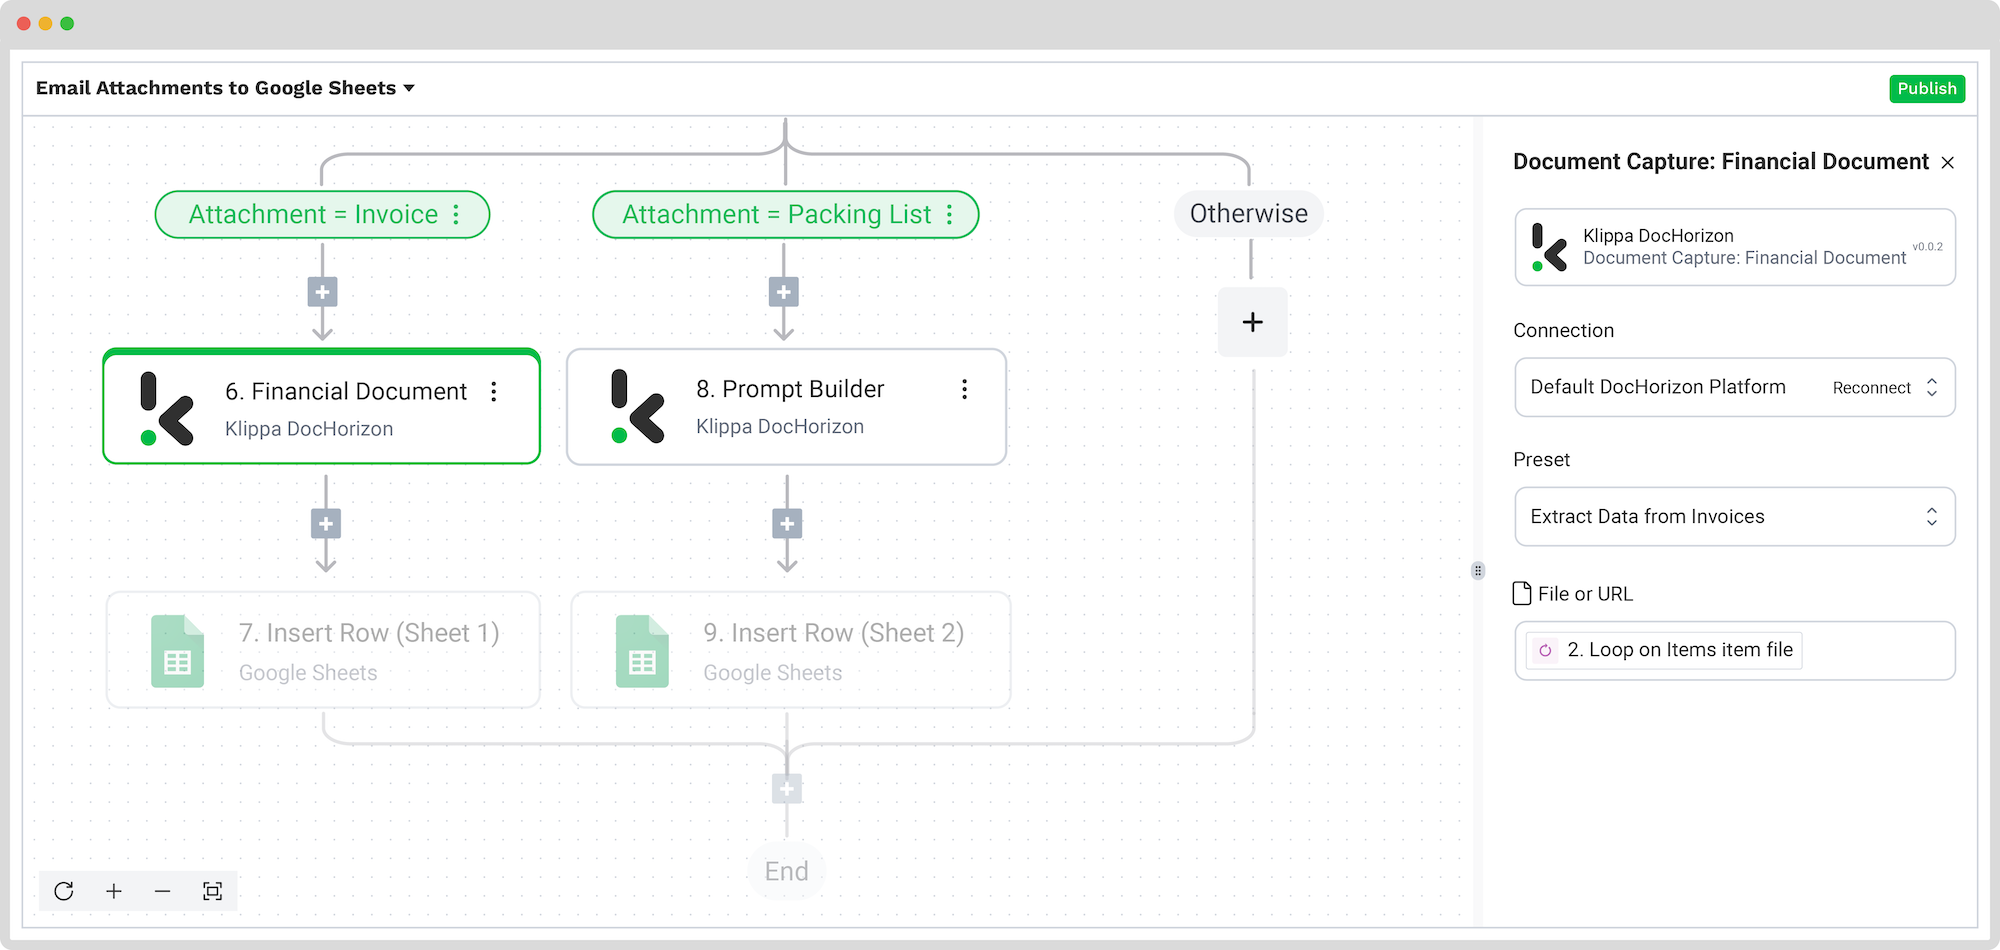
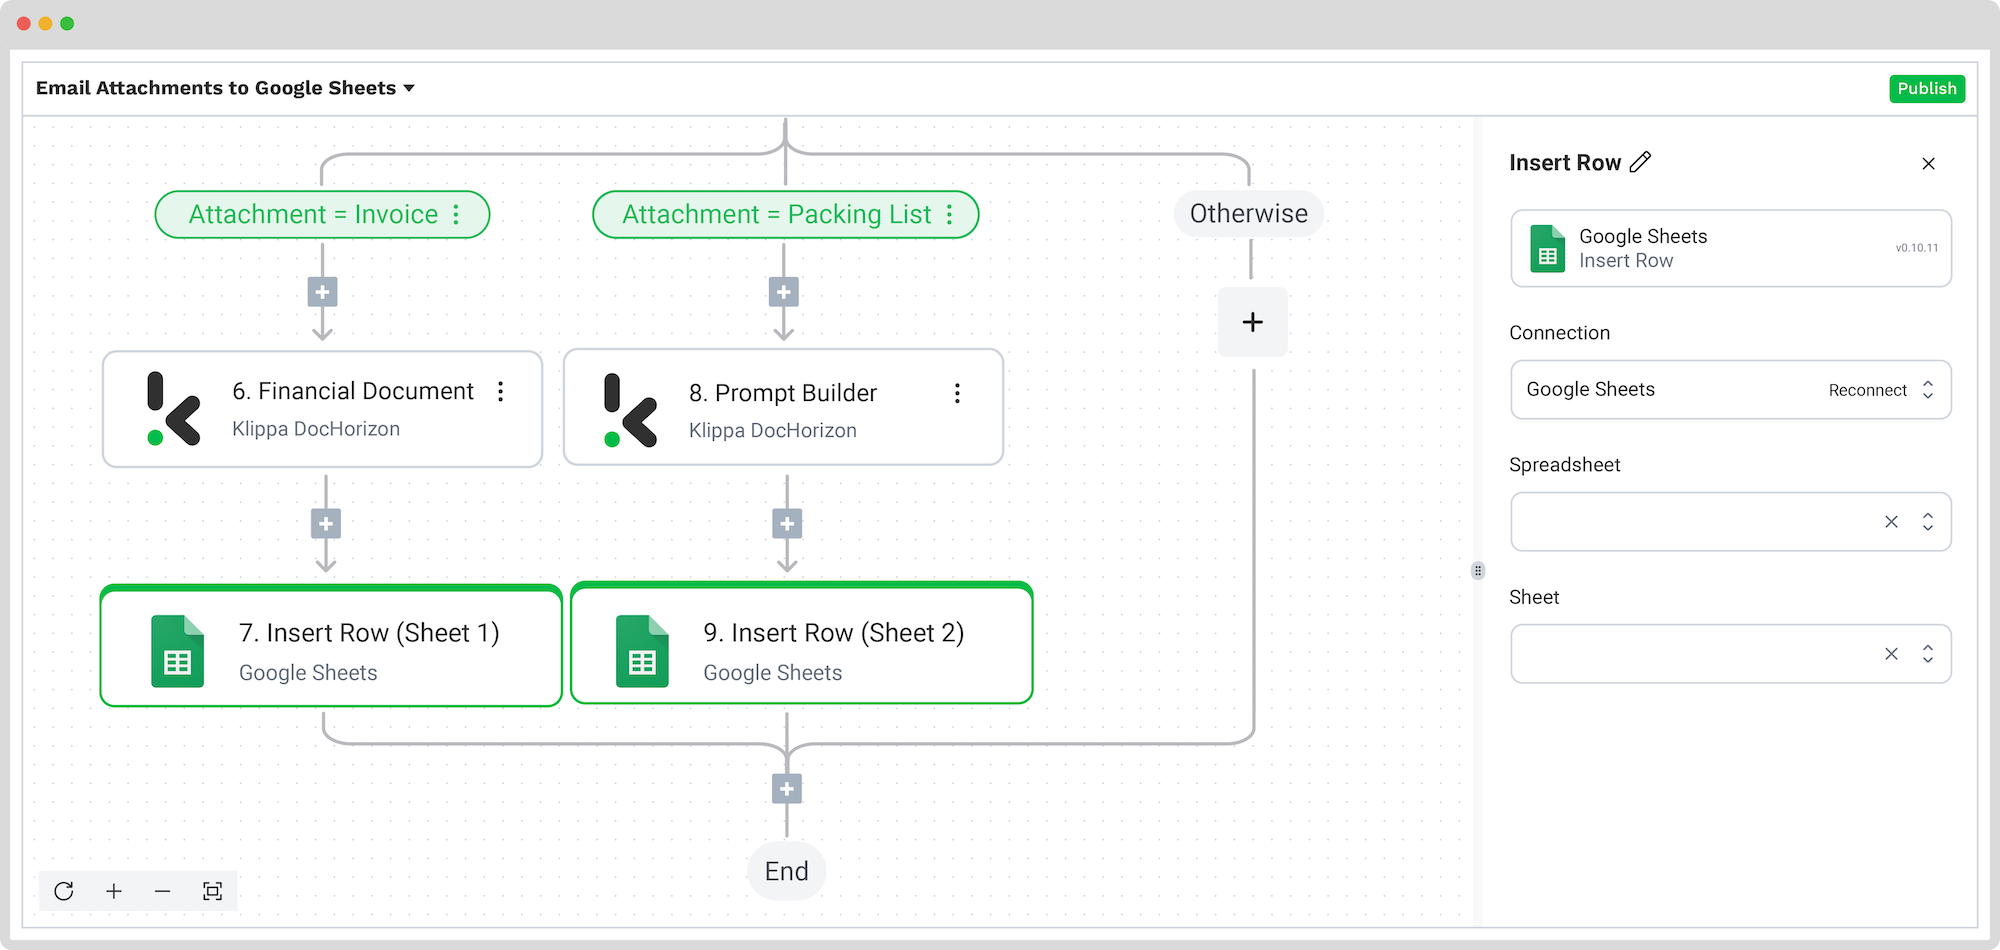
If everything has been done correctly, our process should be divided into three branches: one for invoices, one for packing lists, and one for “Otherwise”. These branches will help us extract data from our documents based on different requirements for each document type.
For the invoice branch:
Add Document Capture: Financial Document step and configure the following:
- Connection: Default DocHorizon Platform
- Preset: The name of your preset, in our example “Extract Data from Invoices”
- File or URL: Loop on items -> item -> file
Test this step.
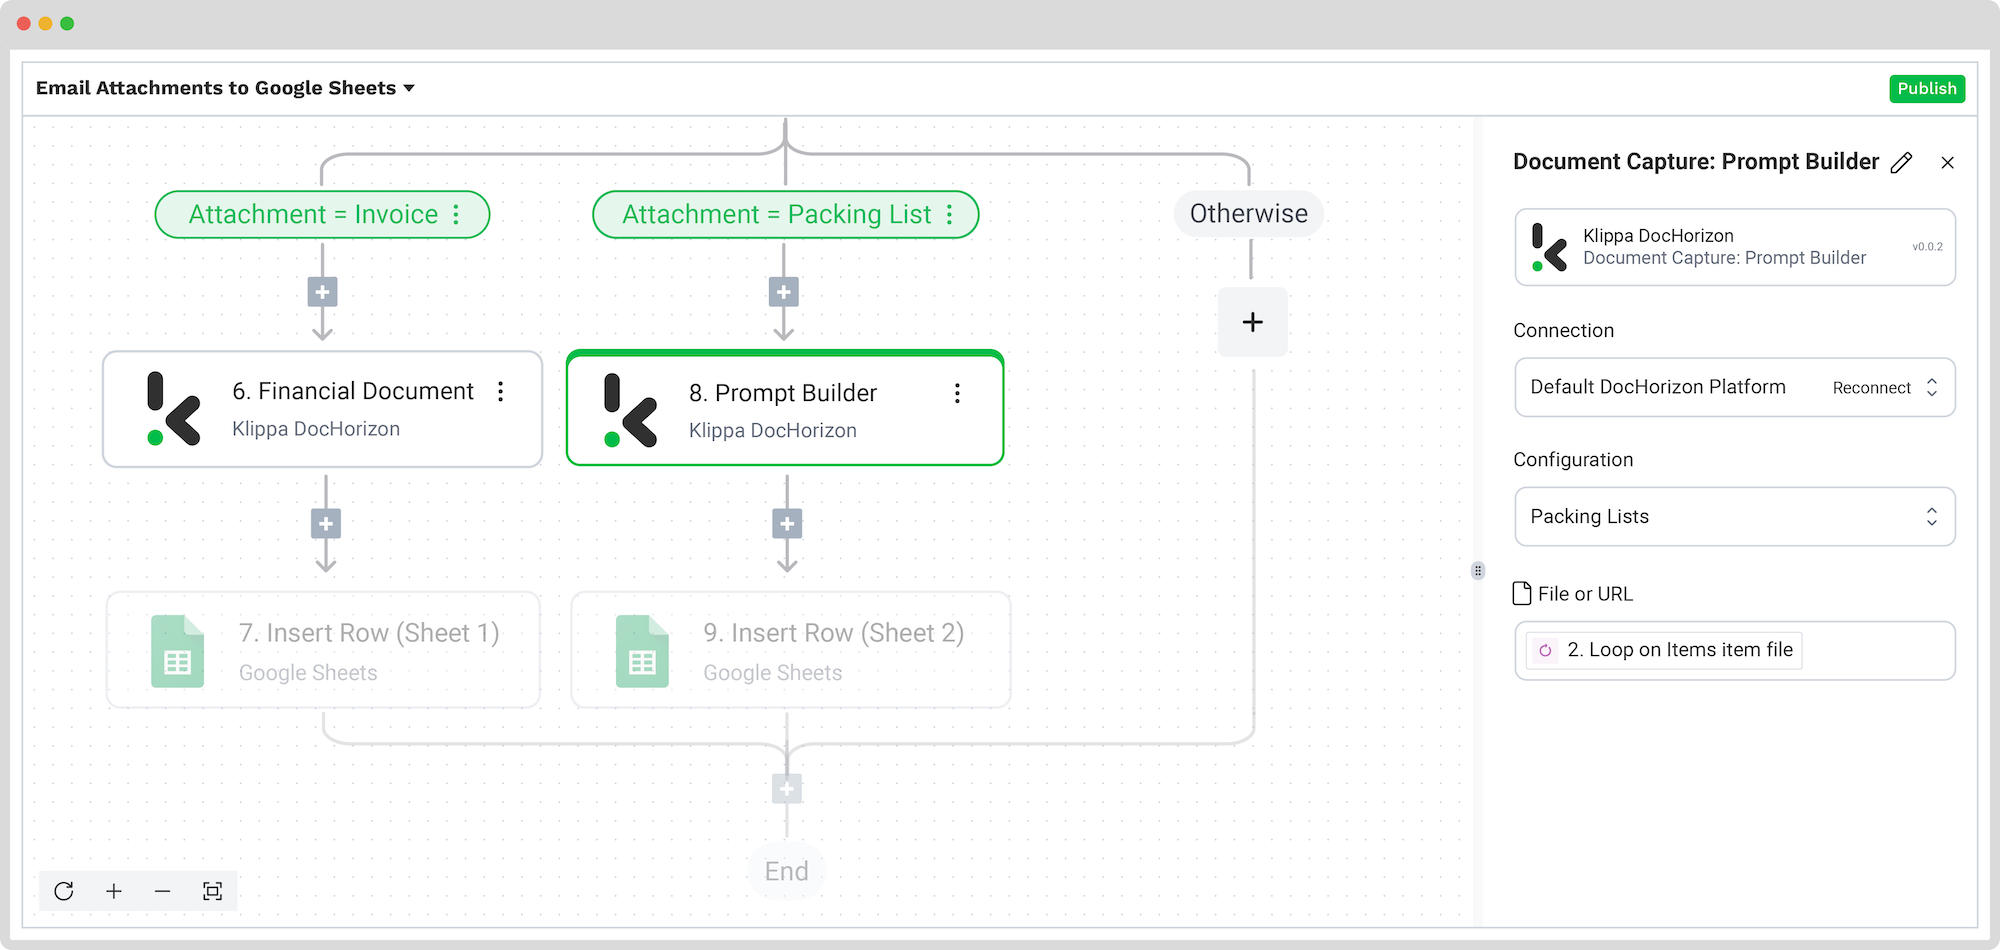
For the packing lists branch:
Add Document Capture: Prompt Builder step and configure the following:
- Connection: Default DocHorizon Platform
- Preset: The name of your prompt, in our example, “Packing Lists”
- File or URL: Loop on items -> item -> file
Test this step.
Step 9: Choose your output source
This is the last step of our flow – choosing a destination for the final output. Depending on your workflow, the destination can be your database, ERP system, accounting software, or any other platform.
For our goal, we’ll set a Google Sheets spreadsheet as the final output for our processed attachments and organize extracted data in different sheets.
Add Google Sheets: Insert Row to both branches and configure the following in both steps:
- Connection: Google Sheets (log in to your account)
- Spreadsheet: The name of the spreadsheet
- Sheet: The name of the sheet (e.g., for invoices “Sheet 1”, for packing lists “Sheet 2”)
Test this step and you’re all set!
Congratulations! All the attachment data is now available in your Google Sheets file. With this setup in place, you can publish the flow, and any new emails with attachments forwarded to the DocHorizon address will be processed automatically. That’s how you can save time while ensuring accuracy in your workflows.
And remember: if you’re processing a high volume of documents, you don’t have to set up the flow yourself. We’d love to hear about your use case and help you get started!
Automate Email Conversion to Google Sheets with Klippa
Looking to convert your email attachments to Google Sheets? We’ve got you covered! With Klippa DocHorizon, an advanced intelligent document processing platform, you can easily automate any document workflows. By using Klippa’s advanced module, you can set up a seamless workflow tailored specifically to your needs:
- Data extraction OCR: Automatically extract data from any type of document.
- Human-in-the-loop: Ensure almost 100% accuracy with our human-in-the-loop feature, allowing internal verification or support from Klippa’s data annotation team.
- Document conversion: Convert documents in any format – such as PDF, scanned images, or Word documents – into various business-ready data formats, including JSON, XLSX, CSV, TXT, XML, and more.
- Data anonymization: Protect sensitive information and ensure regulatory compliance by redacting privacy-sensitive data, such as personal information or contact details.
- Document verification: Authenticate documents automatically and identify fraudulent activity to reduce the risk of fraud.
At Klippa, we value privacy – all of our document workflows are HIPAA, GDPR, and ISO compliant, ensuring secure data processing. With peace of mind about data safety, take the next step and streamline your document workflows.
If you want to automate your workflow with Klippa’s intelligent document processing solution, don’t hesitate to contact our experts for additional information or book a free demo!
FAQ
You can connect emails to Google Sheets using Klippa DocHorizon. Set up a flow that extracts email attachments, parses the data, and automatically inserts it into your desired Google Sheets file.
Yes, you can. Either forward emails to a unique DocHorizon email address or link your Gmail or other inbox directly to the flow. DocHorizon supports over 100 input sources.
Use DocHorizon’s Flow Builder to add filters that identify and process specific attachments (e.g., PDFs) from emails. Then, send the extracted data to predefined sheets in Google Sheets.
Connect your Gmail account to our platform, set up document classification and extraction steps (using Presets and Prompts), and route the structured data directly into Google Sheets – all fully automated.
Yes. Klippa offers a free trial with €25 in credits, allowing you to explore the platform’s features and capabilities before deciding.
Absolutely. Klippa complies with global data privacy standards, including GDPR. Your data is encrypted, securely processed, and never shared with third parties without your consent.