In 2024, the average data breach cost reached $4.88 million, marking a 10% increase compared to 2023 and the highest total ever recorded. As more data moves to cloud-based systems, protecting sensitive information is more critical than ever.
Organizations should remove as much sensitive information as possible when sharing or storing data to reduce the risks. Every piece you redact lowers the chance of a breach. Manually checking documents isn’t practical, but intelligent solutions can now automatically detect and remove sensitive information.
In this blog, we’ll explain what counts as sensitive information, how redaction works, and how automated tools can simplify and strengthen your data protection.
Key Takeaways
- Redacting sensitive data reduces breach risks – Removing unnecessary personal, financial, and health information from documents is a key strategy to strengthen data security.
- Automated redaction is easy – Platforms like Doxis AI.dp detect and remove sensitive information like PII, health data, and payment info without manual work.
- Covers all major document types and use cases – From ID cards and patient records to invoices, AI.dp can redact data across 100+ document types and sources.
- Secure, compliant, and scalable – Fully GDPR, HIPAA, and ISO certified, AI.dp lets you automate document workflows safely and grow with full support and flexibility.
What is Sensitive Information?
Sensitive information is confidential or private data that should only be accessible to specific individuals. What qualifies as sensitive depends on the audience, organization, and legal context.
In Europe, sensitive information is mainly defined by GDPR, while in the U.S., the California Consumer Privacy Act (CCPA) often applies. It can appear in both physical and digital documents – for example, a photo and name on a CV. In this blog, we’ll focus on sensitive information stored digitally.
The process of removing sensitive information is often referred to as data masking, redaction, anonymization, or obfuscation, depending on the method and goal.
Which Data Must Be Removed to Protect Privacy?
In order to start the process of finding and deleting sensitive data, an organization needs to define which types of information clients and employees usually share, which of those are actually needed, and which need to be removed.
Generally, four types of data require anonymization:
- Personally identifiable information (PII): This covers any data that could be used to identify a particular person. Information like the full name, social security number, driver’s license number, or passport number.
- Protected health information: This information includes medical history, demographic information, test and laboratory results, mental health conditions, insurance information, and other personal health data.
- Payment card information: Every organization needs to follow the information security standard that applies when handling credit cards. Here, sensitive information is described as the credit card number, cardholder name or expiration data. This can specifically be relevant for PCI/DSS compliance obligations.
- Intellectual property: Information of intellectual property refers to creations such as inventions, designs, literary and artistic works, or names and images used in business. In this case, information is usually not redacted, but the work is watermarked to indicate the owner of the property.
Of course, not all the above-mentioned information applies to your organization, as this differs for each industry. But now that you have an overview of the information you should be looking for, you have a great basis for the following steps.
How To Automatically Remove Sensitive Data
We will show you how to easily automate removing sensitive information from a document using Doxis AI.dp – a powerful Intelligent Document Processing (IDP) platform that automates document workflows and offers flexibility for various use cases by supporting over 100 document types and formats.
Let’s walk you through a step-by-step process of removing sensitive data from a document using our platform. Remember: All you have to do is configure your workflow once, and from then on, AI.dp will completely automate the process for you.
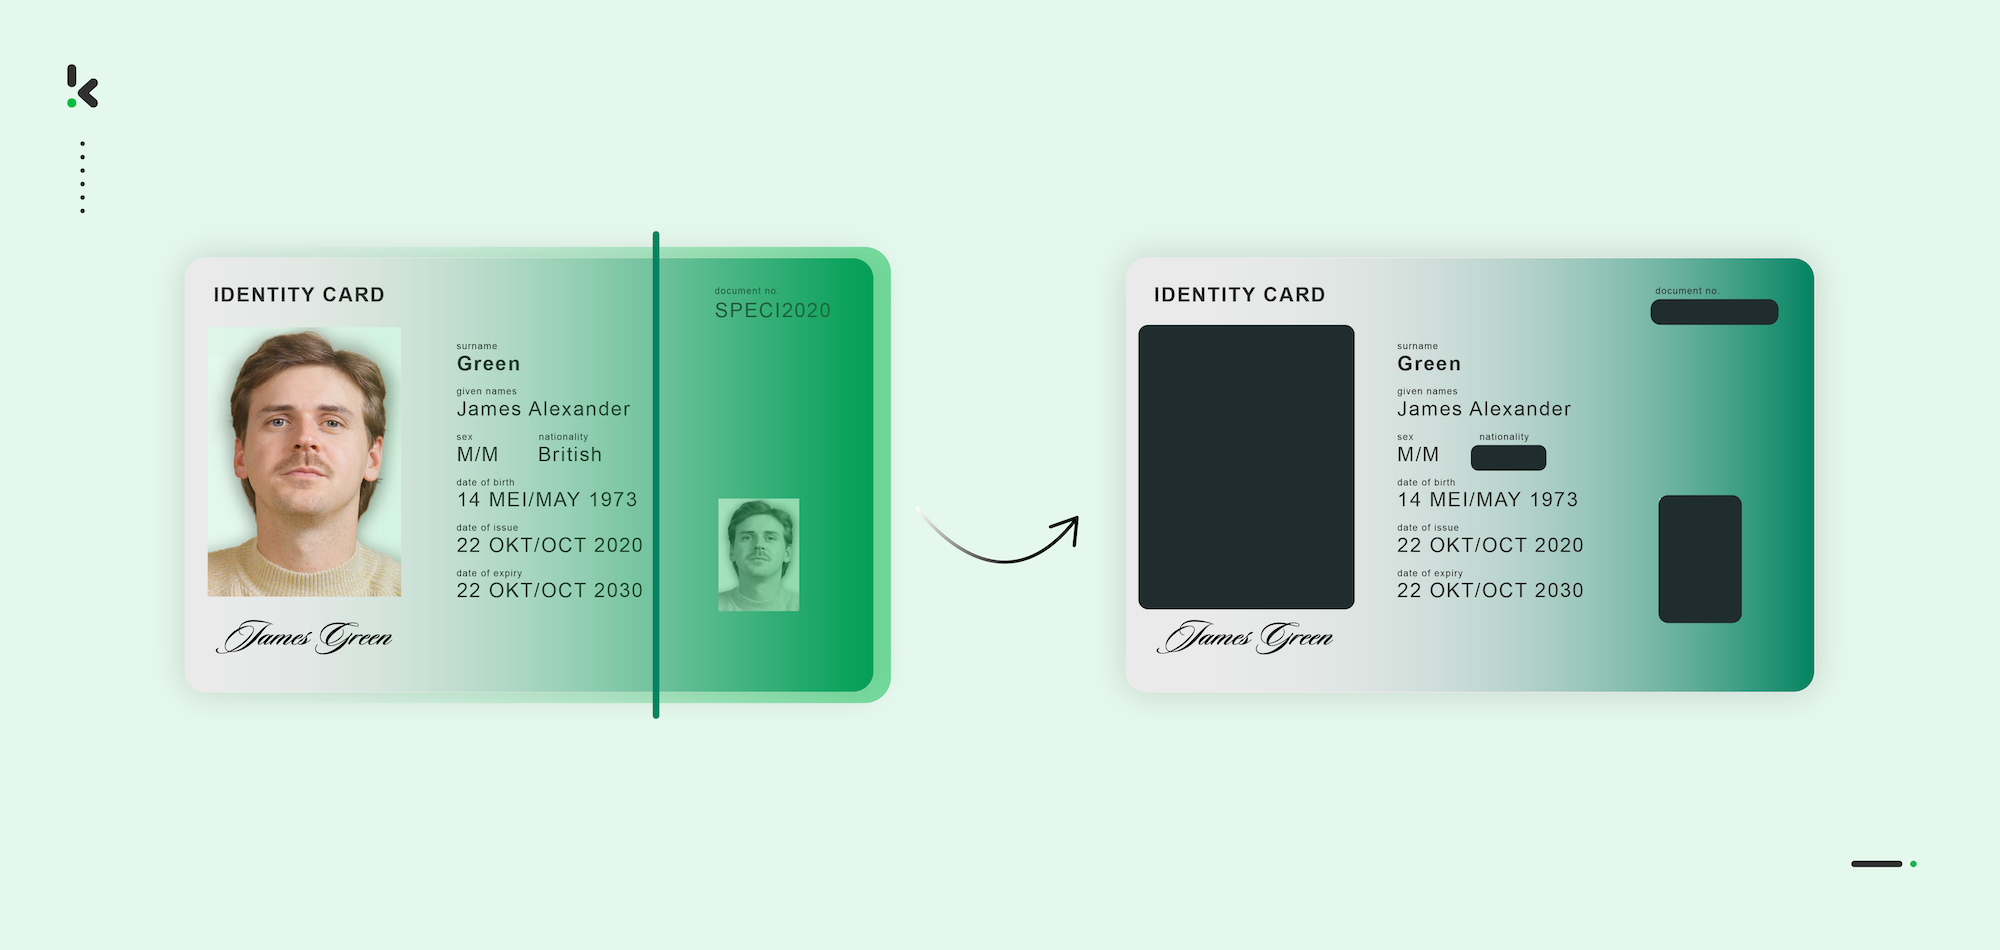
In this example flow, we will process a JPEG ID as our example document. We will fetch the document from the Google Drive folder, anonymize the data and export the redacted ID to another Google Drive folder.
And the best part? You can try it for free!
Step 1: Sign up on the platform
Start by signing up for free on the AI.dp Platform. After that, you’ll receive a free credit of €25 to explore all the platform’s features and capabilities.
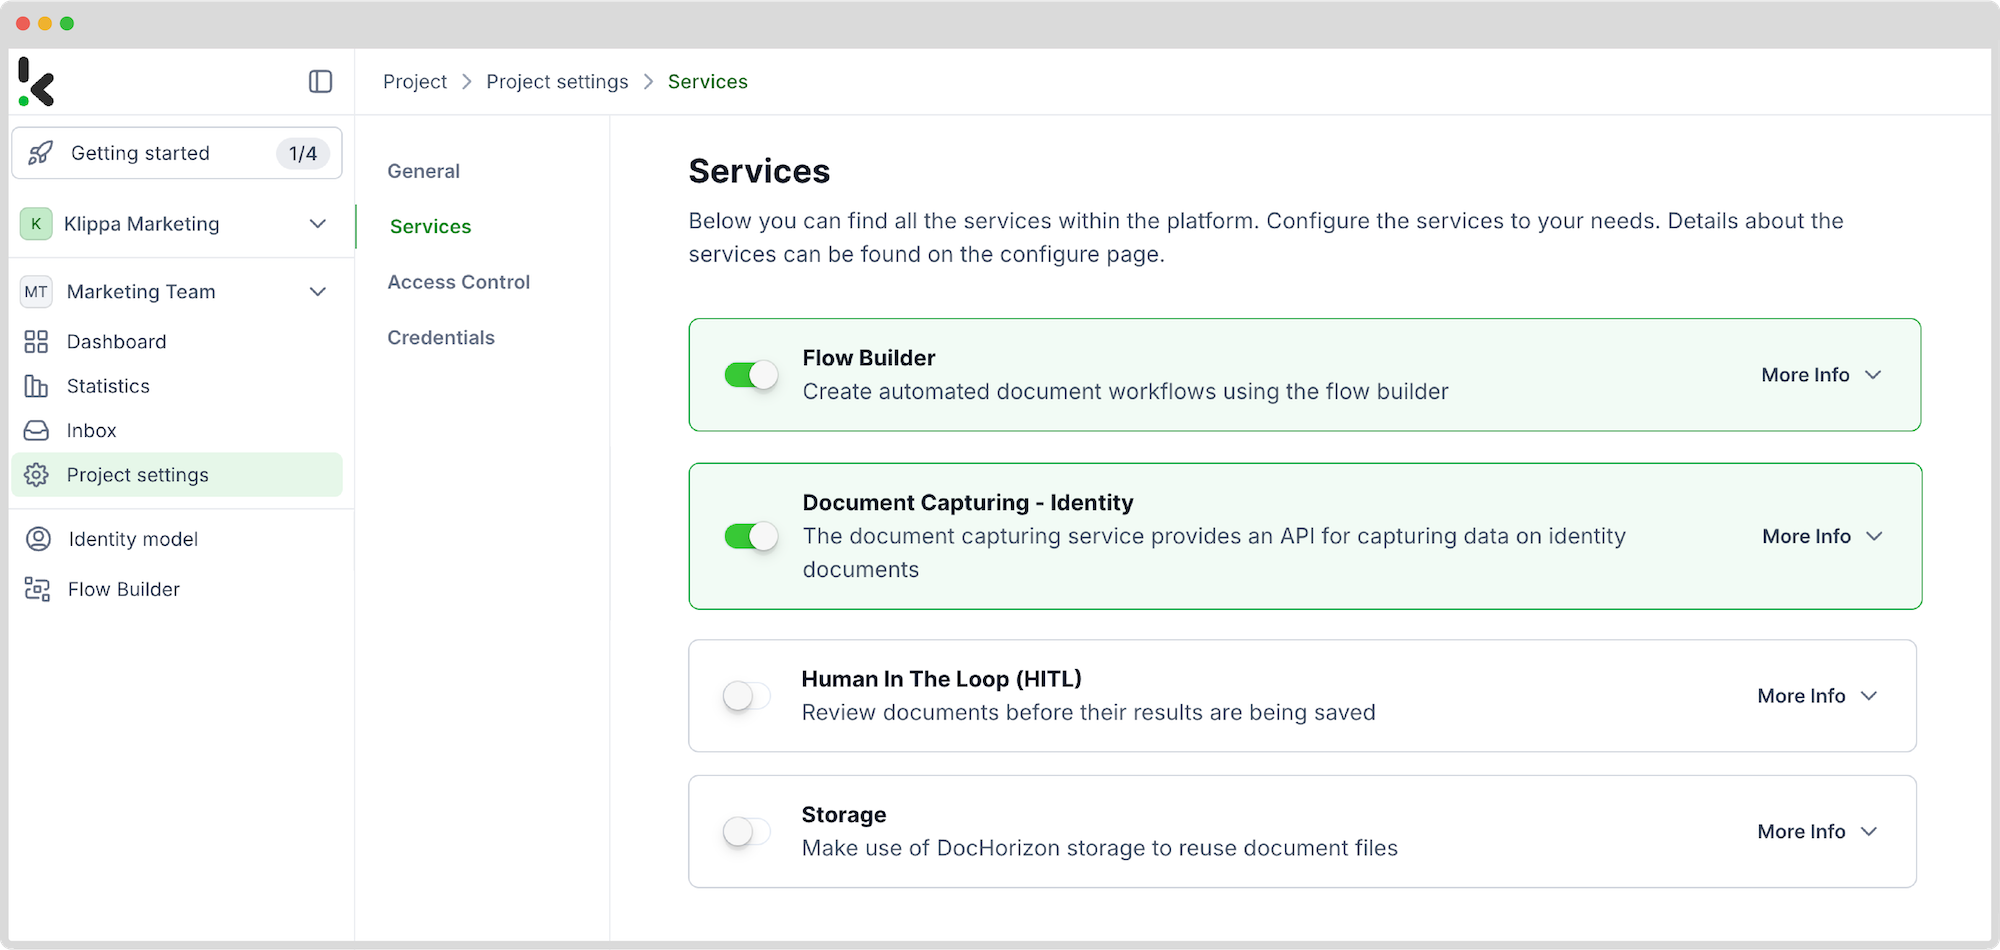
After logging in, create an organization and set up a project to access our services. Here, we will activate platform components that will allow us to anonymize ID documents and export them to Google Drive.
Go to Project Settings → Services and enable:
- Flow Builder
- Document Capturing: Identity
This setup ensures you have everything you need right from the start! In the next steps, we will explain each service in detail.
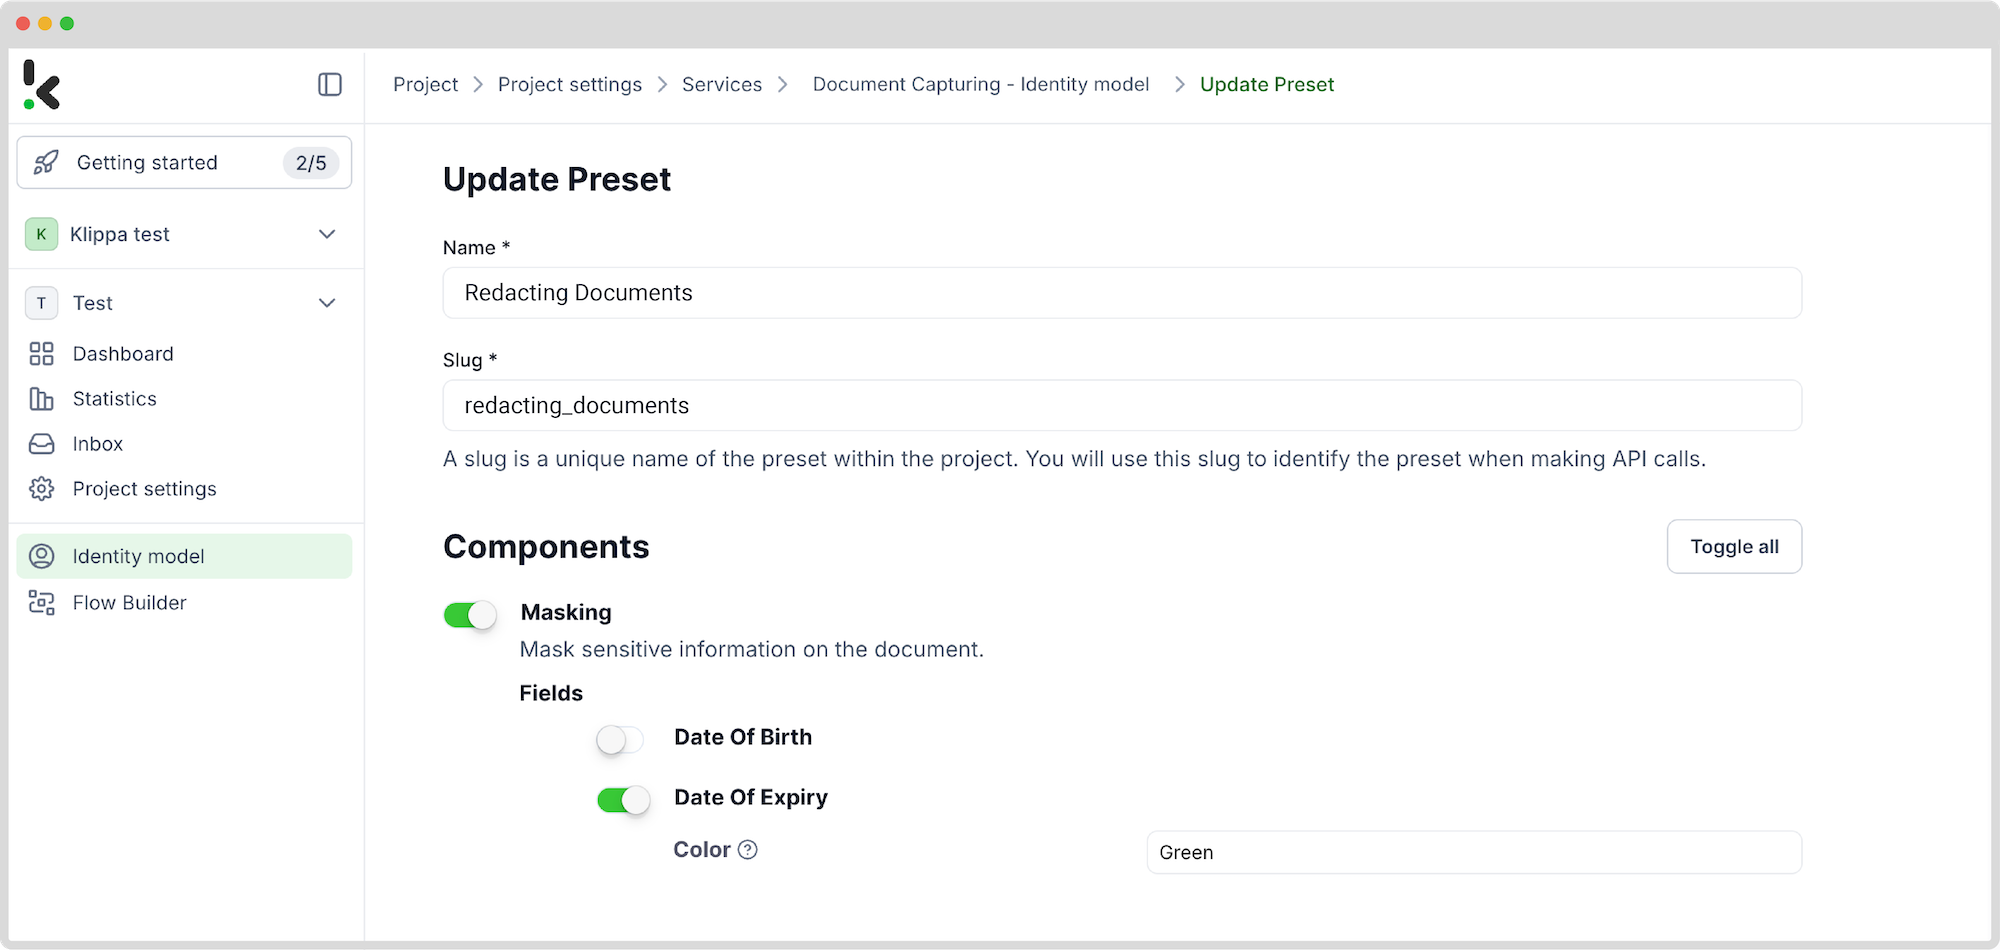
Step 2: Create a preset
Earlier, we enabled Document Capturing: Identity service. This model is designed to simplify the automation of data extraction, analysis, validation, and classification of identity documents, like ID cards and passports, by creating presets for your specific use case.
In your service area, click on Identity Model and follow these steps:
- Click +New Preset
- Name it (e.g.,“Redact Data from ID”)
- Toggle the Masking component
- Choose the document fields you want to remove
Click “Save” to finalize your settings.
You can test your prompt by going back to the Identity Model page and clicking on “Try Service”. Simply select your prompt, upload an example document, and verify if the correct fields are anonymized.
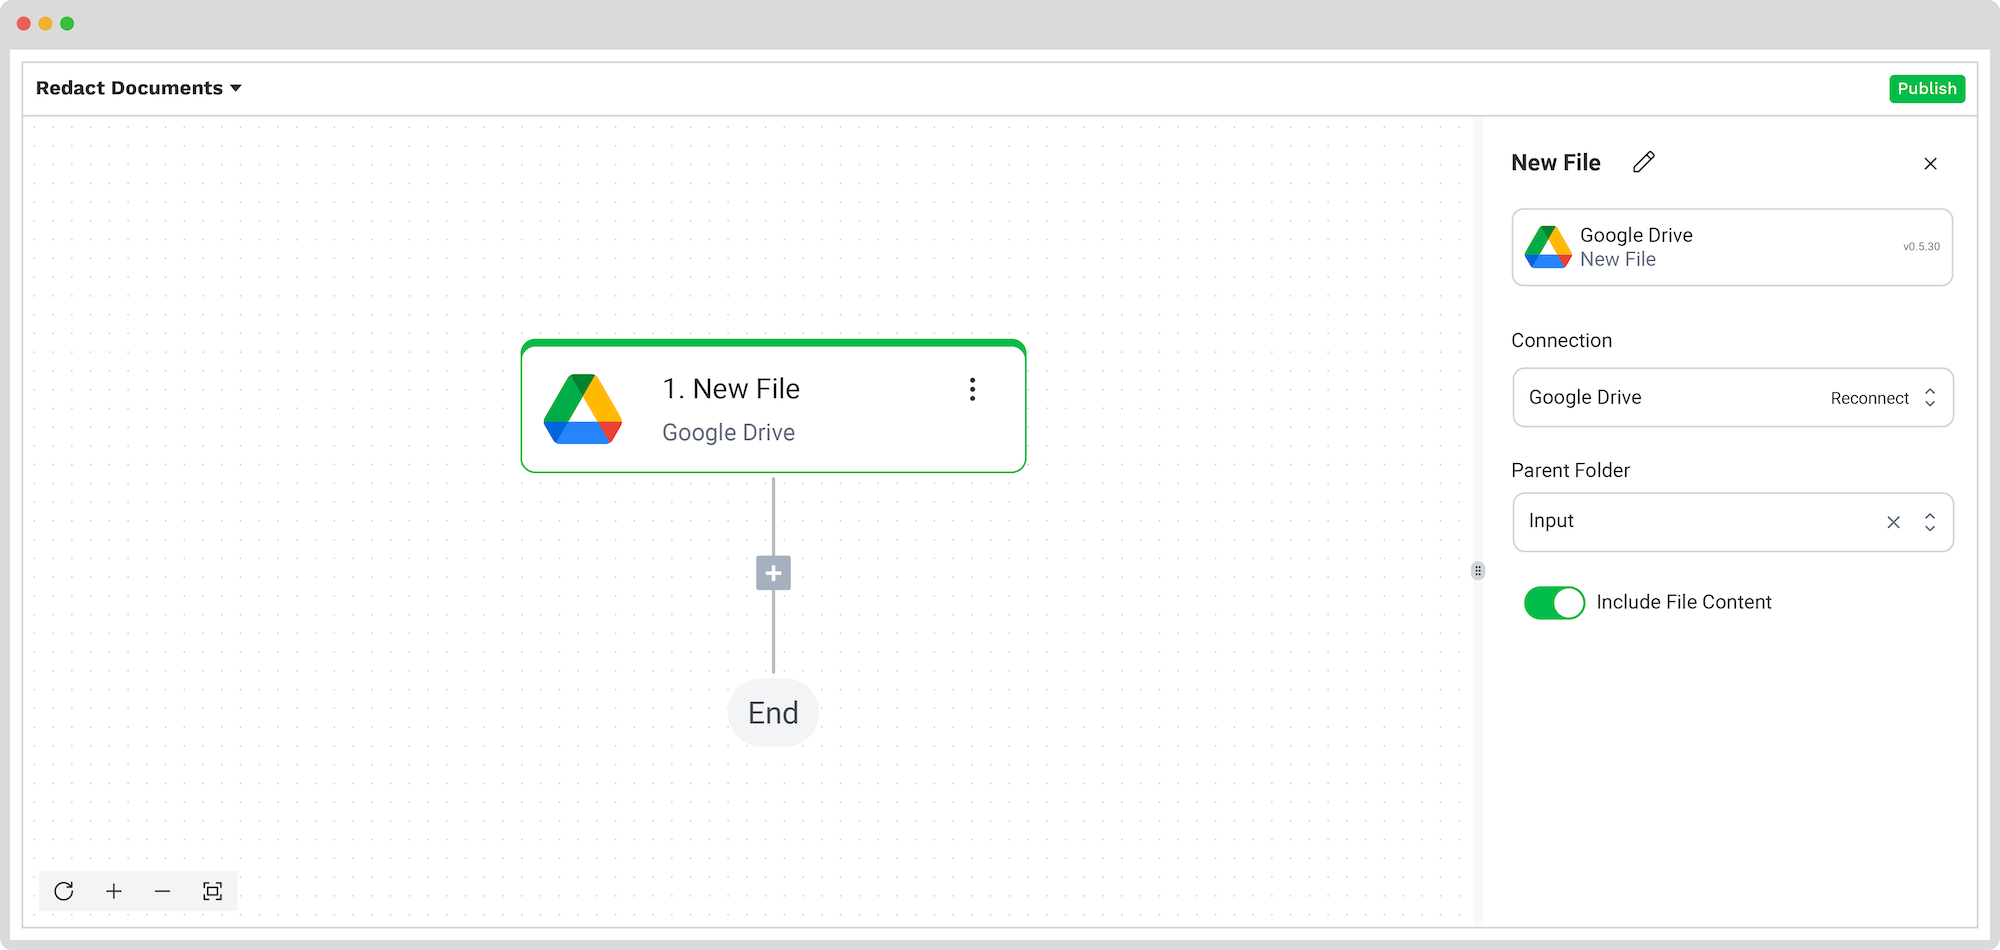
Step 3: Choose your input source
Now it’s time to design your flow. A flow is a sequence of steps that define how your documents are going to be extracted to a chosen output.
In your service area, click on Flow Builder and follow these steps:
- Click on New Flow -> +From Scratch
The first step in building your flow is selecting your input source. For our example, we will choose a Google Drive folder:
- Click on Select Trigger -> Google Drive (New File)
- Connection: Google Drive (log in to your account)
- Parent folder: The name of the folder where your forms are located
- Toggle “Include File Content”
Upload a file into the Google Drive folder and test this step.
Here’s a tip: For the input source, you can upload files directly from your device or connect to over 100 external sources, including Dropbox, Outlook, Salesforce, Zapier, OneDrive, your company’s database, or cloud storage solutions like Amazon S3 and iCloud.
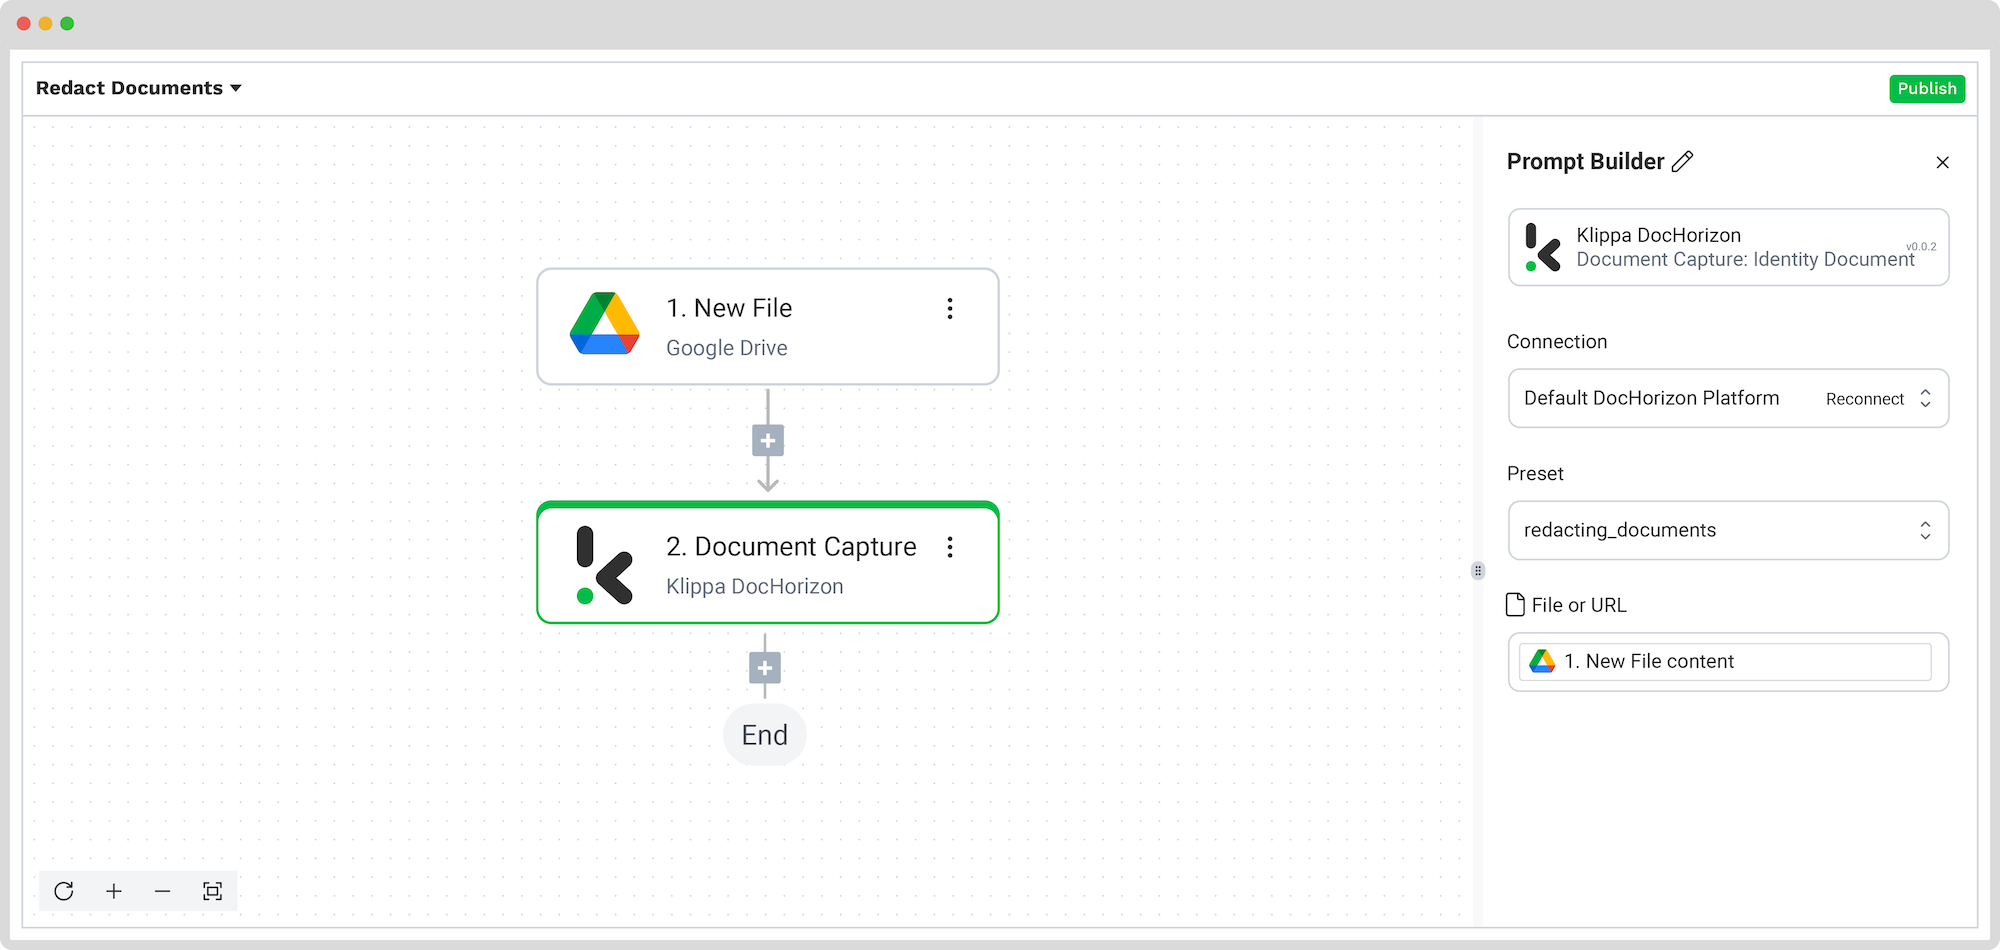
Step 4: Remove sensitive data
Now, it’s time to remove sensitive data fields by using the previously created preset.
In the Flow Builder, add Document Capture: Identity Document step and configure the following:
- Connection: Default AI.dp Platform
- Preset: The name of your preset, in our example “Redact Data from ID”
- File or URL: New File -> content
Test this step.
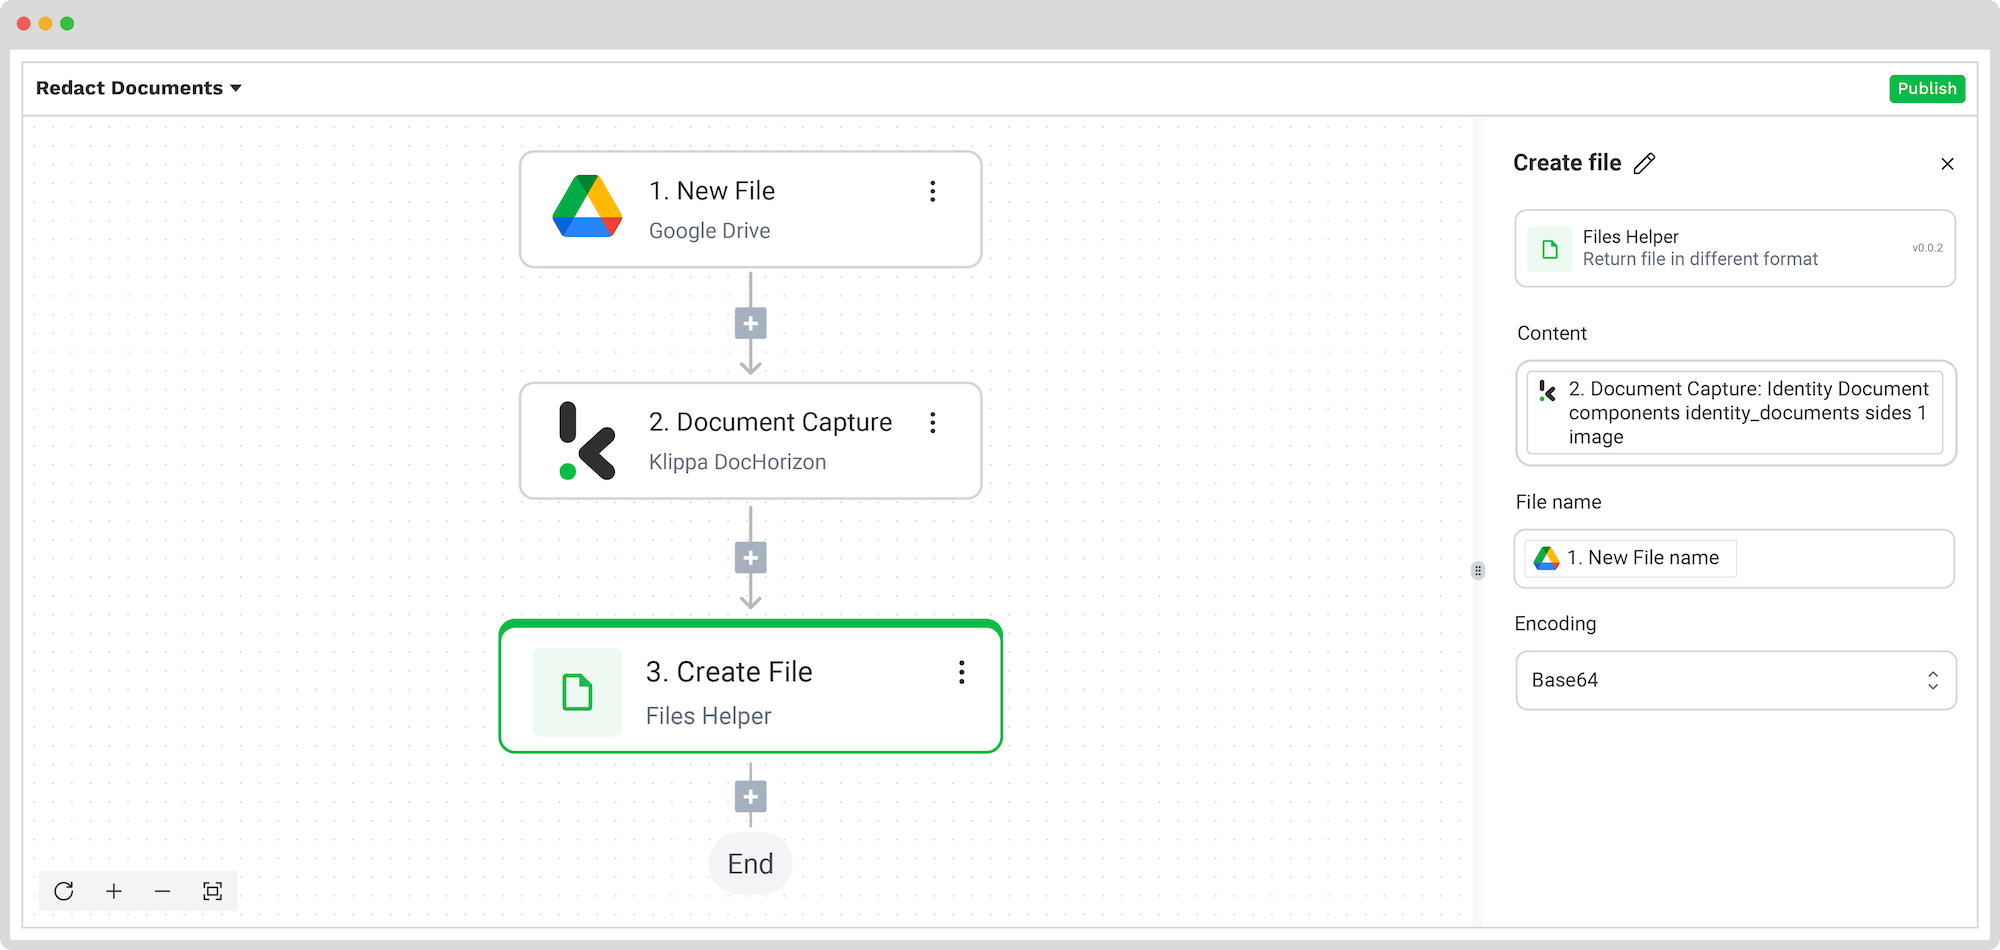
Step 5: Create a file
The previous step captured and processed data from our ID card, preparing it for the final output. Now, you can export that data into your preferred system or compile it into a tangible file (e.g., an image of an ID with redacted fields). For our example, we will create an ID file with redacted fields.
Add the Files Helper: Create File step and configure the following:
- Content: Document Capture: Identity Document -> components -> identity_documents -> sides [1] -> image
- File name: New file -> name
- Encoding: Base64
Test this step.
Step 5: Choose your output source
This is the last step of our flow – choosing a destination for the final output. Depending on your workflow, the destination can be your database, ERP system, accounting software, or any other platform.
For this example, we’ll upload our redacted document to the Google Drive folder. Add Google Drive: Upload File and configure the following:
- Connection: Google Drive
- File Name: Create file -> fileName
- File: Create file -> URL
- Parent Folder: The name of the Google Drive folder
Test this step and you’re all set!
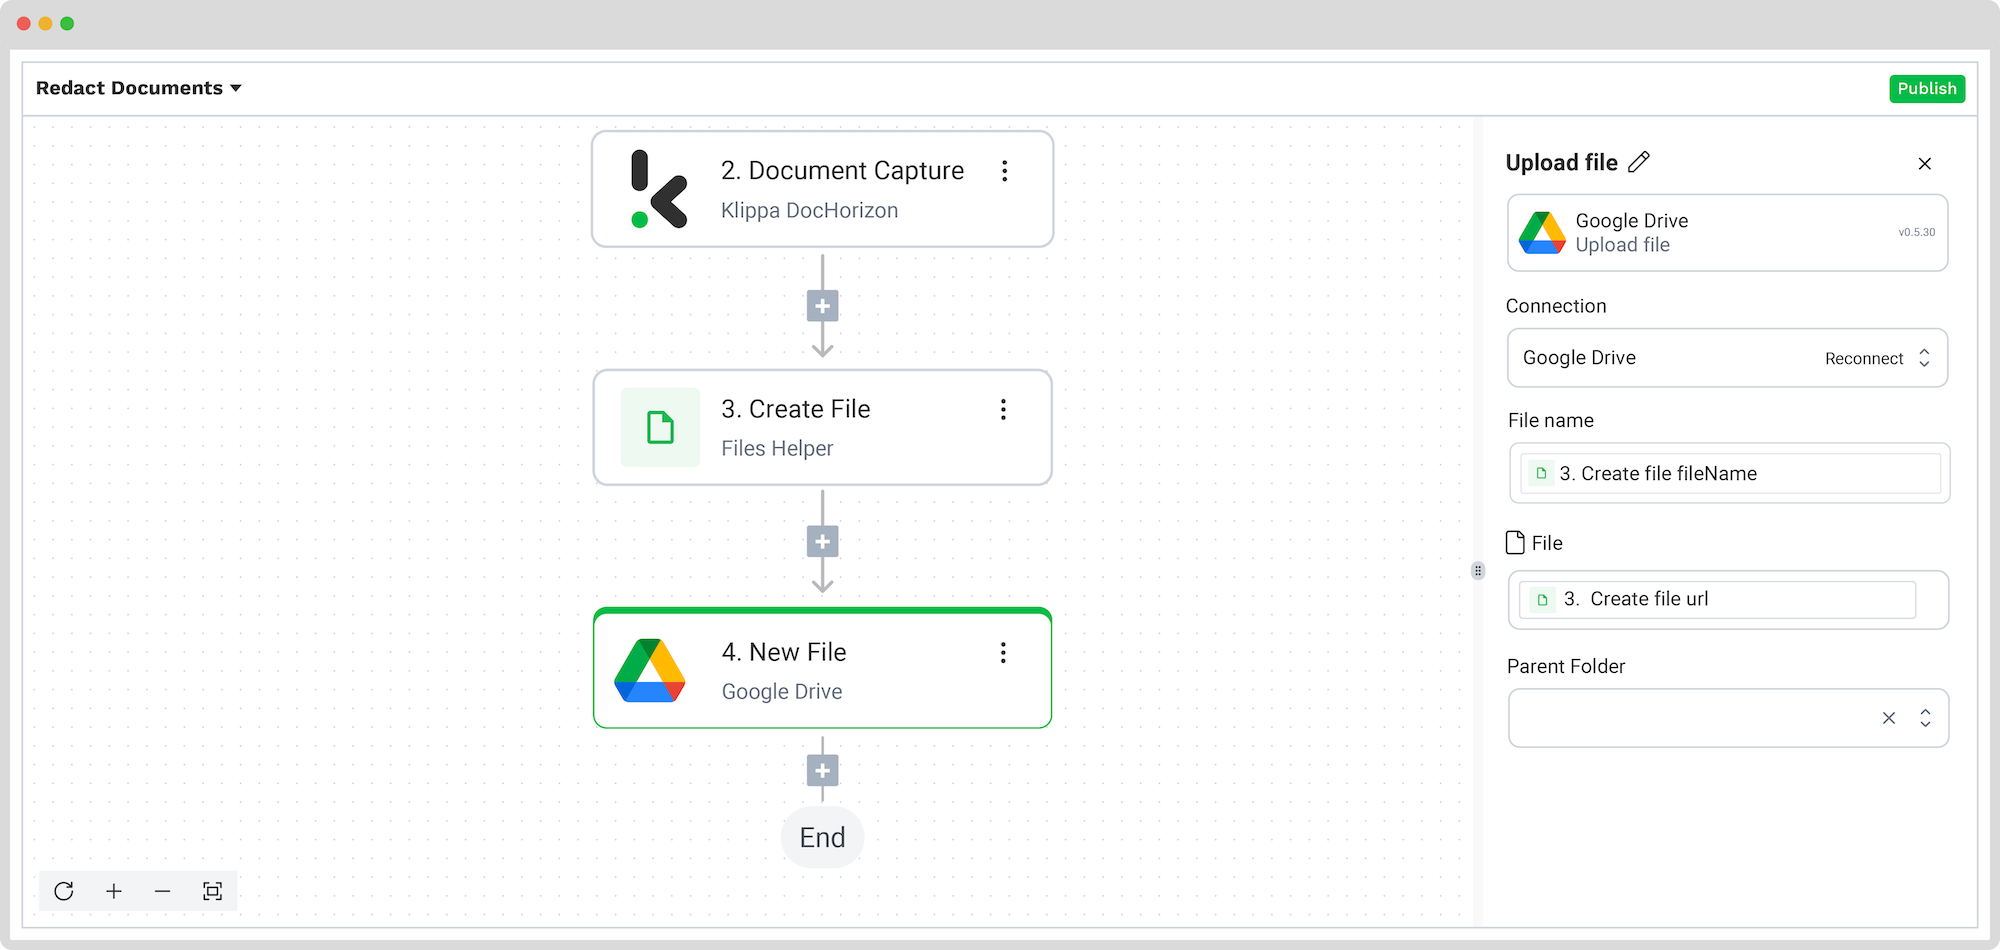
Congratulations! The redacted document is now available in your Google Drive folder. With this setup in place, you can publish the flow, and any ID added to the input Google Drive folder will be processed automatically. That’s how you can save time while ensuring accuracy in your workflows.
And remember: if you’re processing a high volume of documents, you don’t have to set up the flow yourself. We’d love to hear about your use case and help you get started!
Common Data Redaction Use Cases
In the next paragraphs, we will discuss three different kinds of use cases:
- Identity documents
- Patient medical records
- Financial documents
Blacklining Identity Documents
One of the most common use cases is the anonymization of copies of identity documents. Information such as the Social Security number (SSN) on a passport or ID is very sensitive and is often not allowed to be stored in a database.
An SSN belongs to “special categories of personal data” and falls under strict rules according to the GDPR requirements. Usually, only government institutions have permission to store SSNS in their database, which means that other organizations need to find ways to remove this data.
One way of redacting SSNS is to automatically blackline the necessary information on the copy of the document with intelligent software.
Blacklining Patient Medical Records
Personal health information is sensitive and needs to be protected. If healthcare providers and other organizations that use, handle or transmit patient information don’t comply with the earlier-mentioned GDPR requirements, penalties and fines will be the result.
A healthcare provider has to process thousands of documents, and it would be impossible to go through all of them manually. Here, it is crucial to have software in place that can automatically find and remove sensitive information from e.g. patient medical records, in order to work effectively and efficiently.
Patient medical records entail information like the street address, social security number, and insurance number of the patient. Not everyone is authorized to see this information, which makes it important to mask the data. Blacklining information with software is a possible way to redact data automatically and protect patients from fraud and data breaches.
Blacklining Financial Documents
Invoices, copies of credit cards, and contracts are all financial documents processed daily. They contain sensitive information which should be protected from unauthorized people.
The financial service industry should have the intention to prevent fraud and ensure compliance. As soon as a financial institution doesn’t ensure compliance, severe reputation damage, lawsuits, or government fines could be the result.
If we take an invoice as an example, information such as the name and address of a client is data that should be blacklined. By using this technique, fraud through duplicated or falsely created invoices could be prevented.
Going through all documents manually would be an impossible task. That’s why smart document solutions, like Doxis, have been developed that help you to automate the process.
We just described three different use cases, but the same applies to basically any document type or image. If we didn’t cover your specific case here, and you are wondering if we can help you as well, you can gladly contact us to ask questions and receive more information.
Automatically Remove Sensitive Data with Doxis
Are you looking for a way to remove information from your documents? We’ve got you covered! With Doxis AI.dp, you can easily automate any document workflows. By using Doxis’ advanced module, you can set up a seamless workflow tailored specifically to your needs:
- Data extraction OCR: Automatically extract data from any type of document.
- Human-in-the-loop: Ensure almost 100% accuracy with our human-in-the-loop feature, allowing internal verification or support from Doxis’ data annotation team.
- Document conversion: Convert documents in any format – such as PDF, scanned images, or Word documents – into various business-ready data formats, including JSON, XLSX, CSV, TXT, XML, and more.
- Data anonymization: Protect sensitive information and ensure regulatory compliance by redacting privacy-sensitive data, such as personal information or contact details.
- Document verification: Authenticate documents automatically and identify fraudulent activity to reduce the risk of fraud.
At Doxis, we value privacy – all of our document workflows are HIPAA, GDPR, and ISO compliant, ensuring secure data processing. With peace of mind about data safety, take the next step and streamline your document workflows.
If you want to automate your workflow with Doxis’ intelligent document processing solution, don’t hesitate to contact our experts for additional information or book a free demo!
FAQ
You can automatically remove sensitive information from documents by using an intelligent document processing platform like Doxis AI.dp. Simply set up a redaction workflow by selecting the sensitive fields you want to mask, and the system will detect and redact them from your documents without manual work.
With Doxis AI.dp, you can upload your PDF, configure a redaction preset to define which fields should be removed, and run the PDF through an automated workflow. The platform will extract, anonymize, and export the redacted PDF securely, ensuring sensitive information is properly masked.
Yes. Doxis offers a free trial with €25 in credits, allowing you to explore the platform’s features and capabilities before deciding.
Absolutely. Doxis complies with global data privacy standards, including GDPR. Your data is encrypted, securely processed, and never shared with third parties without your consent.