Converting PDF files to Excel in bulk, especially without proper tools, presents its own difficulties, often leading to errors and consuming your valuable time. These errors can result in financial discrepancies and regulatory compliance issues, underscoring the urgent need for you to streamline this process.
If you want to know how you can automatically convert PDF invoices into Excel files, then you are in the right place.
Key Takeaways
- Converting PDF invoices to Excel makes the data editable, analyzable, and easier to integrate into your accounting tools.
- Simple conversion tools work well for standard, text-based PDFs; scanned or complex layouts often need Optical Character Recognition (OCR) to maintain accuracy.
- You can use online converters (upload → convert → download), desktop software (install → open PDF → export to XLSX), or built-in tools like Excel’s Get Data > From PDF feature.
- Choosing the right method depends on invoice volume, format complexity, and whether your workflow demands automation or manual processing.
- Even with conversion done, manual effort and error risk remain. This is where automatic, AI-driven conversion workflows become advantageous.
- Klippa DocHorizon offers the most efficient solution to automatically extract and convert invoice data from PDFs to Excel, ensuring speed, accuracy, and scalability.
Why Excel Is a Great Tool for Handling PDF Invoices
Excel is the preferred tool for efficient analysis. Its unmatched flexibility enables you to manipulate, sort, filter, and perform complex calculations on data, making it the ideal tool for managing invoice data.
More so, many accounting software solutions specifically require input files in Excel format, making it impossible to ignore. Given the benefits that Excel brings, it is an obvious choice for your business.
Fortunately, there are several reliable ways to convert PDF invoices into editable Excel files, ranging from quick online tools to more advanced software solutions.
Methods to Convert PDF Invoices to Excel
There are several ways to convert PDF invoices into Excel spreadsheets, depending on your needs, file complexity, and desired level of automation. Whether you’re working with structured digital PDFs or scanned documents, each method offers its own balance of convenience and control.
Online Converters
Web-based tools like Adobe, Smallpdf.com, or PDF24 make it easy to convert PDFs with just a few clicks.
- Visit a trusted conversion website.
- Upload your PDF invoice by dragging and dropping or selecting the file.
- The service automatically converts your document to an Excel (.xlsx) file.
- Download the converted file to your device.
Desktop Software
Dedicated applications such as Able2Extract Professional or Nitro PDF offer more flexibility and accuracy, especially for batch conversions or complex layouts.
- Open your PDF invoice within the software.
- Choose the option to convert the file to Excel.
- Adjust conversion settings if needed. For example, selecting specific tables or data fields.
- Save the new Excel file to your computer.
Microsoft Excel
Recent versions of Excel include a built-in import feature that can pull data directly from PDFs.
- Open Excel and navigate to the Data tab.
- Select Get Data > From File > From PDF.
- Choose your PDF invoice and review the tables in the Navigator window.
- Click Transform Data to clean up the import, or Load to insert it directly into your workbook.
While these methods are effective for one-off or small-scale conversions, they still require manual effort and may struggle with scanned or complex invoice layouts.
In the next section, we’ll explore how to automatically convert PDF invoices to Excel using intelligent automation.
How to Automatically Convert PDF Invoices to Excel
Manual conversion methods are fine for a few PDFs, but they do not scale. When working with hundreds or thousands of PDF files, they become slow, error‑prone, and hard to manage. An automated PDF to Excel conversion workflow converts large volumes quickly, keeps formatting consistent, and improves accuracy.
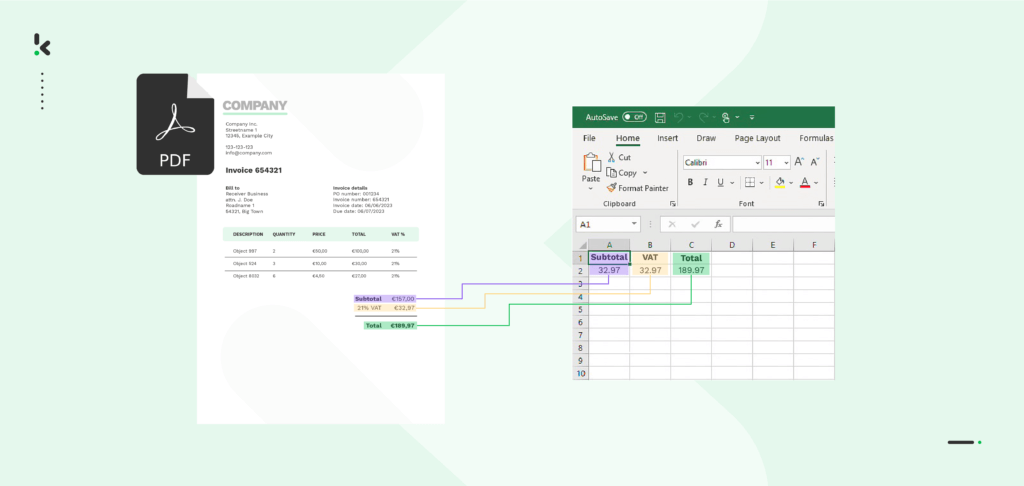
In this section, we will demonstrate how you can easily convert your PDF invoices to Excel with Klippa DocHorizon. Klippa DocHorizon is an Intelligent Document Processing (IDP) platform designed to effortlessly handle diverse document types and convert them into your desired output format.
Let’s walk you through a step-by-step process of converting PDF invoices into Excel files. For our example, we will process a PDF invoice from Google Drive as our input source and choose Excel as our output format.
Step 1: Sign up on the Platform
The first step includes signing up on the DocHorizon Platform. After signing up, you’ll receive a free credit of €25 to explore all the platform’s features and capabilities. This way, you can easily set up a step-by-step workflow without any commitment!
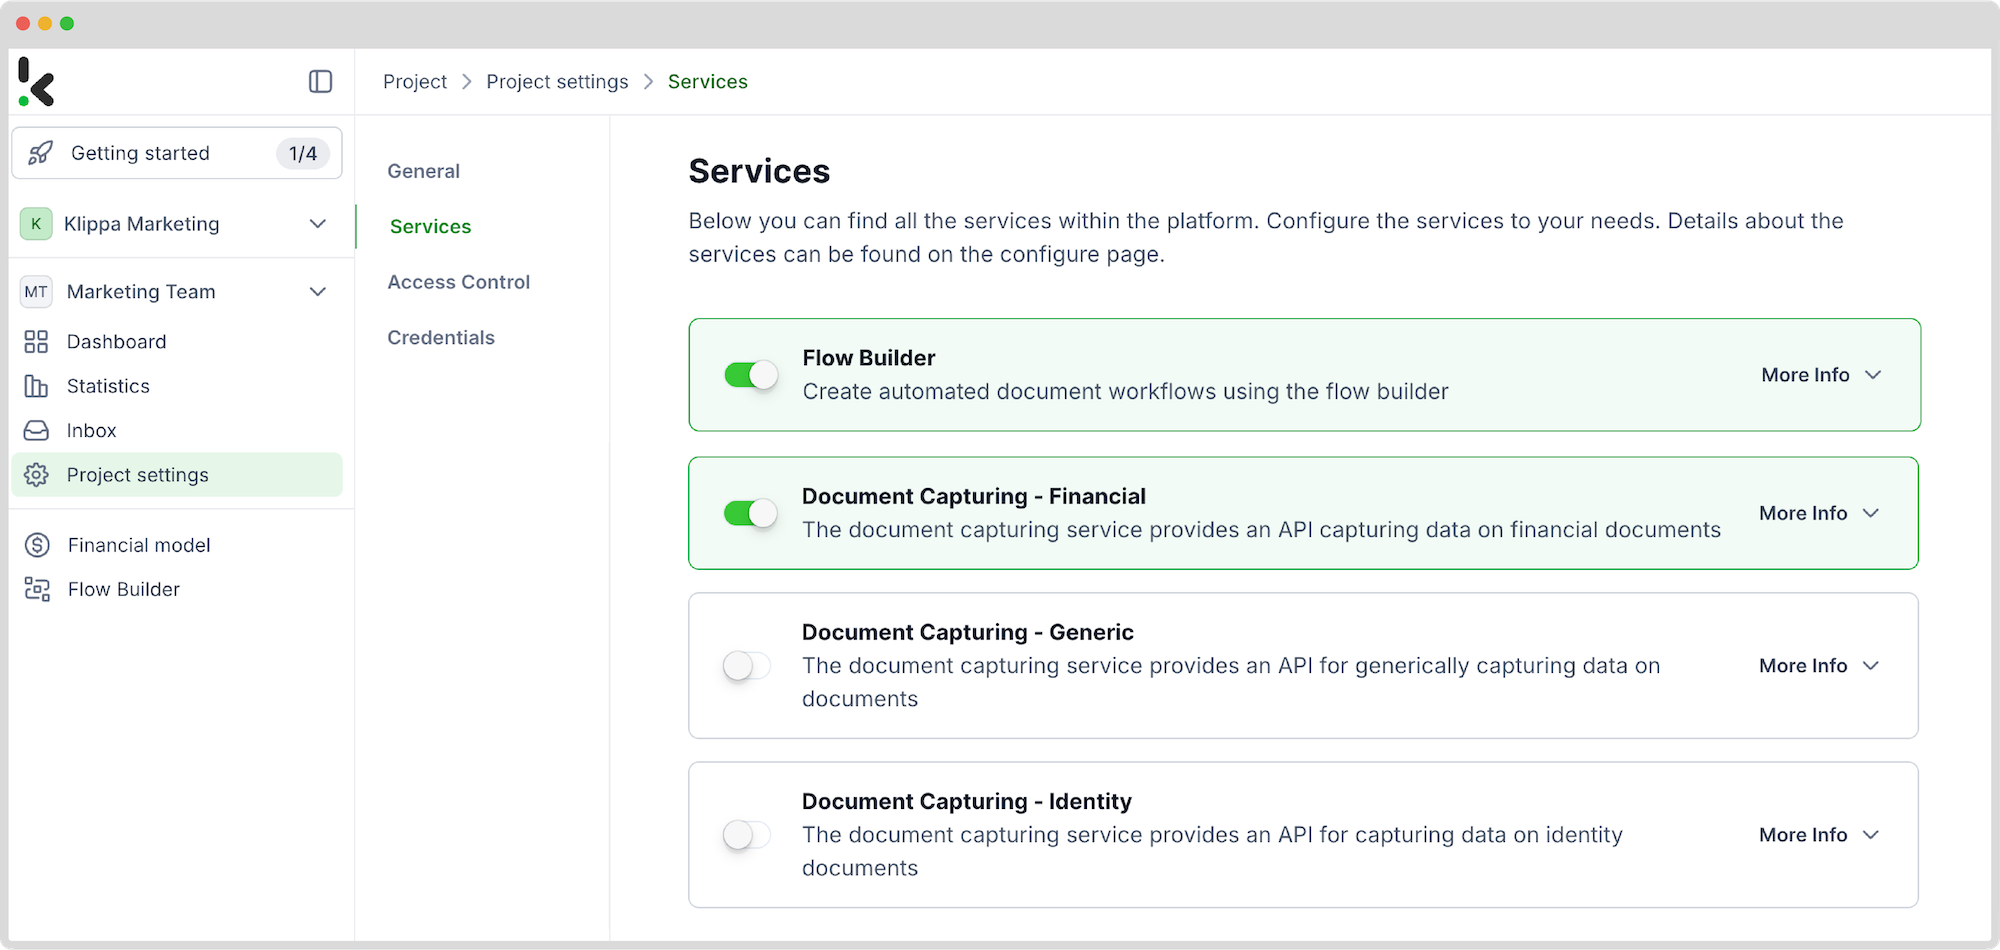
After logging in, create an organization and set up a project to access our services. Do this by going to Project Settings -> Services. To be able to extract data from PDF invoices and convert them to Excel, you need a specific setup: enable the Document Capturing – Financial model and Flow Builder to get started.
Why the Financial model, though? This model is designed to simplify your financial workflows by automating data extraction, analysis, validation, and classification. It efficiently processes a broad variety of financial documents, including receipts, purchase orders, bank statements, and many more.
Step 2: Create a preset
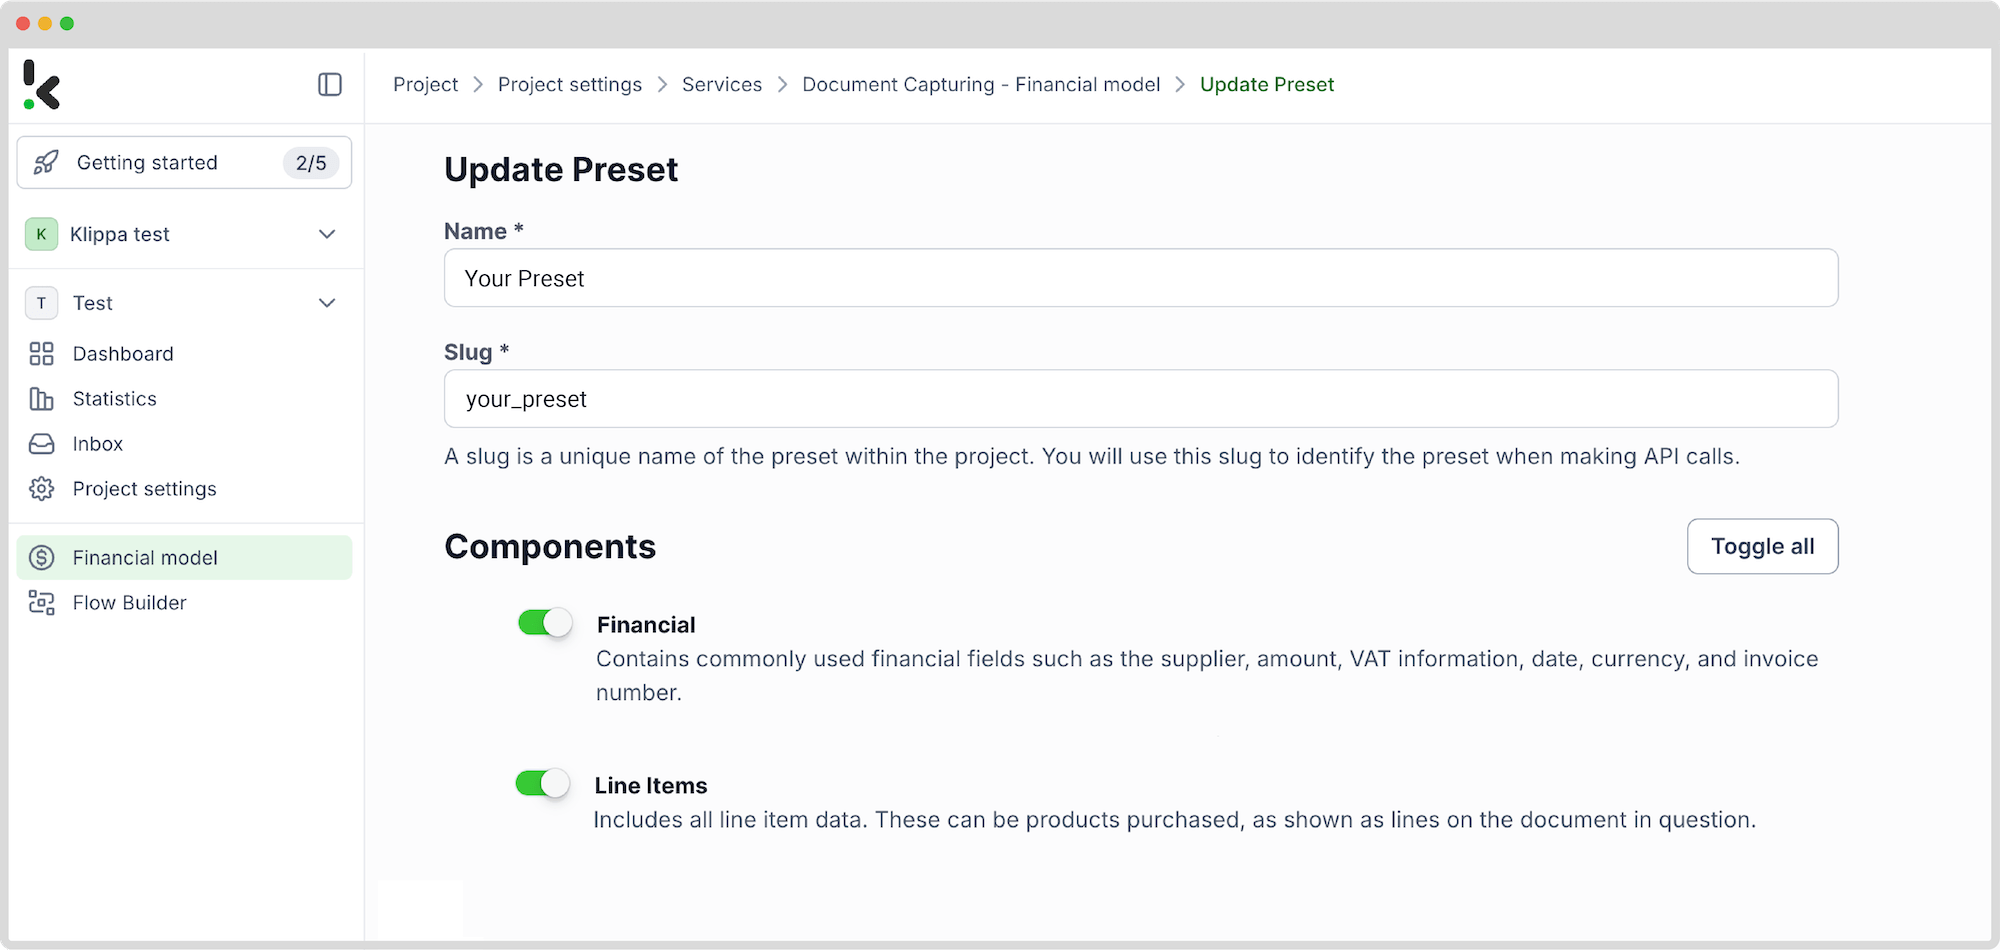
The next step is to activate the components you need for your specific use case. To do this, you need to create a preset.
In the left-hand menu, select Financial Model and then New Preset. Hit Create and give your preset a name, depending on what you’re working on.
When it comes to components, Financial and Line items are the go-to ones for this example, but you can also pick others that fit your specific case, such as Date Details, Reference Details, Amount Details, Document Language, Payment Details, etc.
Once you’ve selected what you need, click Save, and just like that, your preset is good to go!
Step 3: Select your input source
Next on the list is to start building the flow. A flow is a sequence of steps that define how your PDF data is extracted into Excel. Let’s do this by clicking New Flow -> + From scratch and assigning your flow a name.
After that, you can choose the source of the uploads, whether it is a Google Drive folder, an email attachment, or any other application used by your organization. Klippa DocHorizon supports all of these options.
For this example, we will use Google Drive as the input source. Make sure you’ve created a folder where you uploaded all of your PDF invoices. For us, it’s called Input.
In the Flow Builder, choose your input source by selecting Google Drive -> New File as your trigger. This is going to start your flow. On the right side, fill out the following sections:
- For Connection: Assign any name to your connection (e.g. “google-drive”) and authenticate with Google
- For Parent Folder: Input
- Include File Content: Check this box to ensure file content is processed
Test this step by clicking on Load Sample Data, and remember to have at least one sample document in your input folder while setting up your flow!

Step 4: Capture and extract data
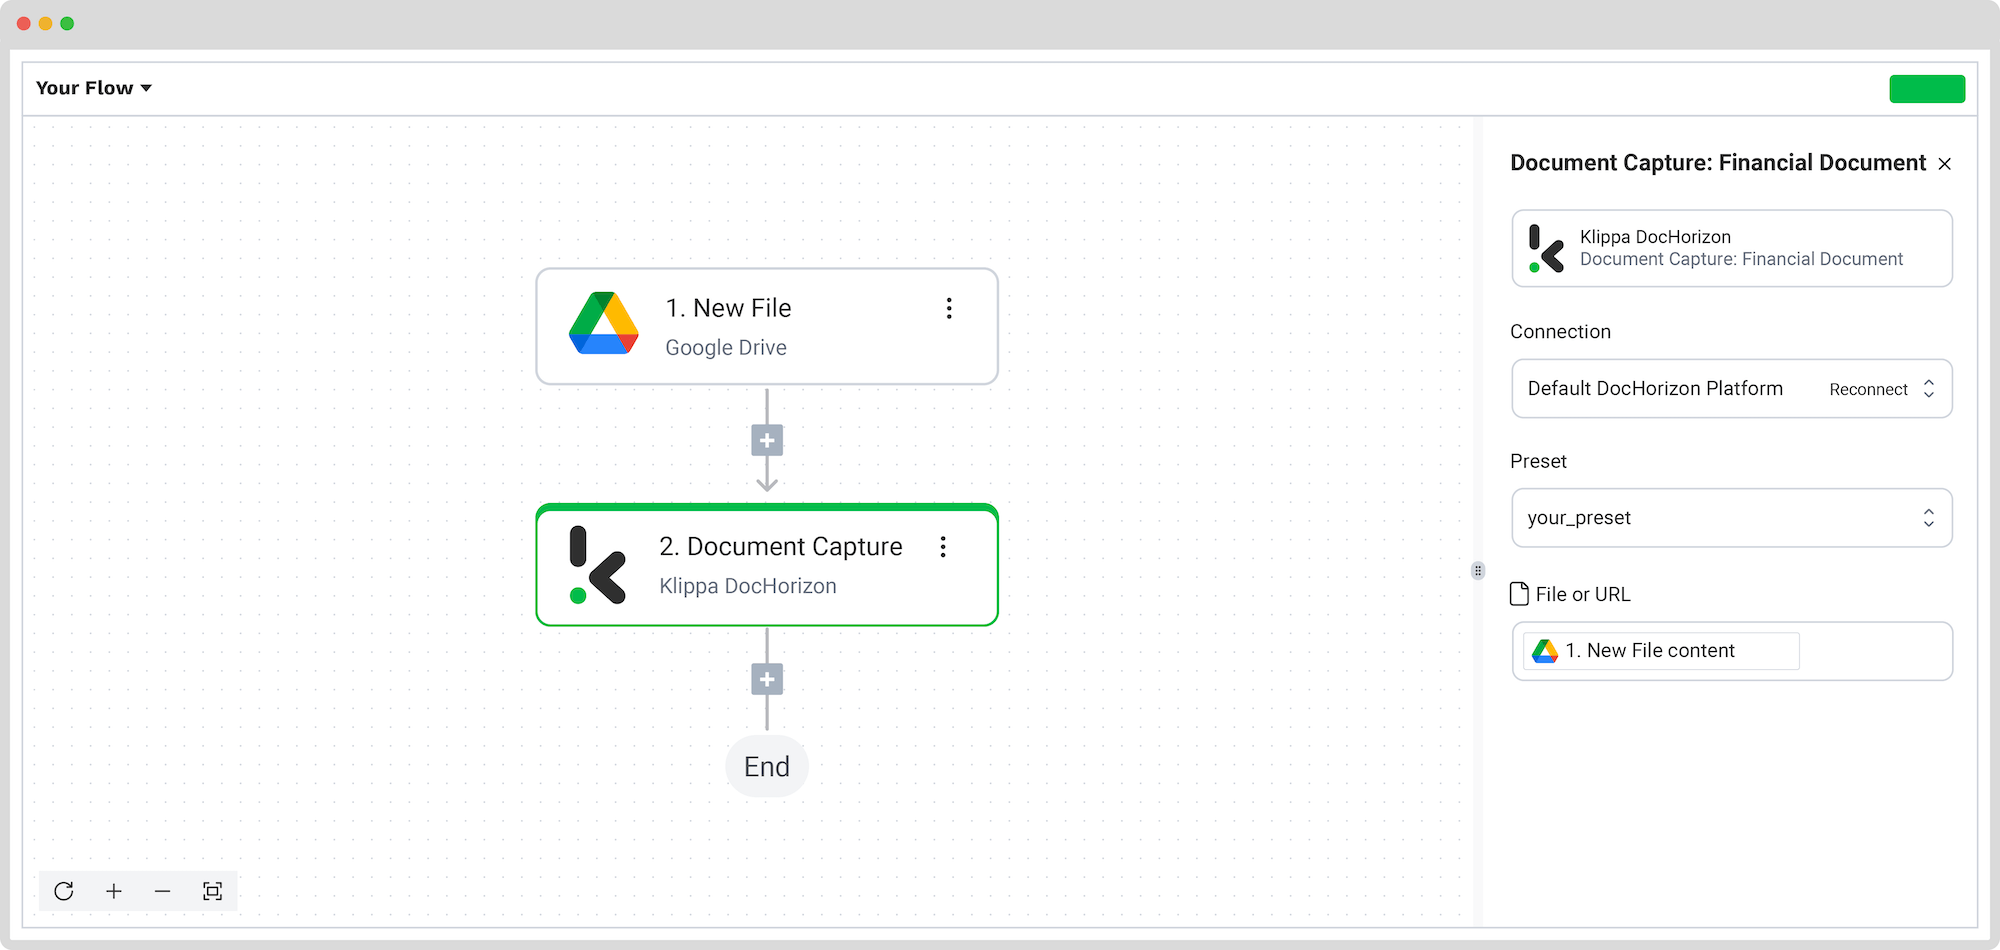
For the 4th step, you have to select the financial document capture mode and extract the necessary data using the preset from step 2. This mode efficiently reads, captures, and extracts data from your PDF invoice with precision. Additionally, it verifies the document’s authenticity, promptly detecting and flagging any indications of document fraud.
In the Flow Builder, press the + button and choose Document Capture: Financial Document, and configure the following:
- For Connection: Default DocHorizon Platform
- For Preset: The name of your preset
- For File or URL: New file -> Content
Then, test the step to ensure everything is working correctly. Once the test is successful, you’re ready to move on to the next step: saving your results!
Step 5: Save the file
After the data conversion process is complete, you can directly export it to your preferred destination to efficiently organize, analyze, and store your invoices in an Excel sheet. Or you can choose one of many available software integrations, such as QuickBooks, Xero, or Zoho.
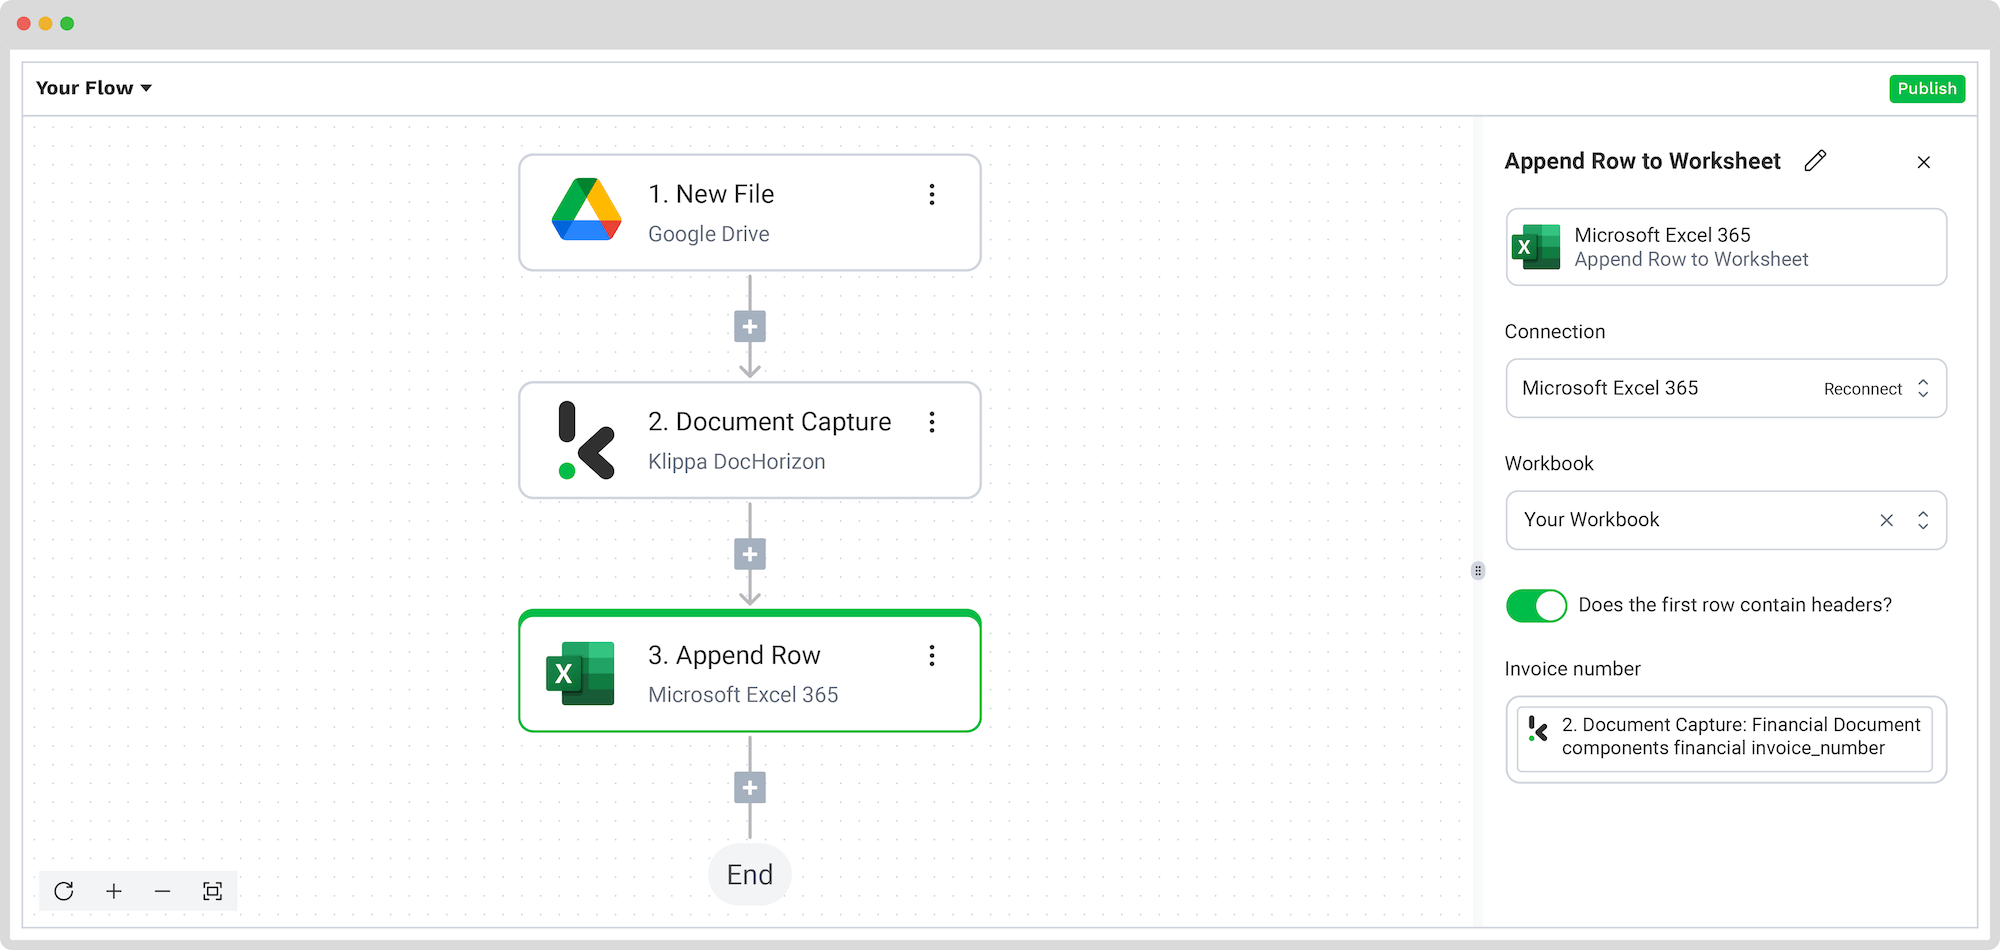
Select Excel from the search bar and choose Append Row to Worksheet, and follow these steps in the Platform:
- For Connection: Connect to your Microsoft account (Microsoft Excel 365)
- For Workbook: The name of the workbook you created for this workflow
- For Worksheet: Name of the sheet
If your worksheet contains headers, toggle the Does the first row contain headers button. This option will inform the platform that row 1 is occupied.
After, you’ll see another section with the headers’ names in your output file. For us, they are Invoice Number, Total Amount, and Date.
Let’s try it out with the Invoice Number: in the Data Selector menu, open Document Capture: Financial Document -> components -> financial -> invoice_number. Follow the same steps for the other two header sections.
Test this step by clicking the button at the bottom right, and you’re all set!
Congratulations! All the PDF invoice data is now available in your Excel Sheet. Now, you can publish the flow, and any new invoices added to the folder will be processed automatically.
And remember: if you’re processing a high volume of documents, you don’t have to set up the flow yourself! Feel free to reach out to us because we’d love to help you out!
You can also check out our detailed video tutorial below! It walks you through everything we’ve covered so far, making it easier to follow along.
Automate PDF Invoices to Excel Workflow with Klippa
Klippa DocHorizon is an advanced intelligent document processing platform that allows you to fully automate the workflow of converting PDF invoices to Excel or any other format that is important for your daily business processes.
By seamlessly integrating and mixing various Klippa DocHorizon modules with your favorite applications, you can set up a seamless workflow tailored to your needs:
- Data extraction: Automatically retrieve data from PDF invoices of any type.
- Human-in-the-Loop: With our human-in-the-loop functionality, you can ensure almost 100% accuracy by verifying output internally or by Klippa’s data annotation team.
- Document conversion: Transform PDF invoices into a range of business-ready data formats, including JSON, XLSX, CSV, TXT, XML, and more.
- Data anonymization: Ensure compliance with relevant regulations by anonymizing privacy-sensitive data, such as personal information or contact details.
- Document verification: Automatically authenticate documents and identify fraudulent activity to mitigate the risk of invoice fraud.
Regardless of your use case, all automated document workflows comply with the HIPAA, GDPR, and ISO standards when it comes to data processing. With Klippa, your data is secure, and you can easily start streamlining your PDF invoices to Excel workflows.
Contact our experts for more information or schedule a free demo below!
FAQ
Using an intelligent document processing (IDP) platform like Klippa DocHorizon is the most efficient and accurate way to automate PDF to Excel conversion. These tools read PDFs, extract structured data, and export it to Excel automatically, without any effort.
Not really. Manual conversion is highly error-prone and labor-intensive. Automated solutions like Klippa minimize these risks and offer much faster turnaround times.
Yes, Klippa DocHorizon allows you to bulk upload and process large batches of PDF invoices. It automates data extraction and conversion in a single workflow, making it ideal for companies with high document volumes.
Klippa DocHorizon uses intelligent document verification to check the authenticity of invoices. If any data inconsistencies or signs of document fraud are detected, the system will flag them for manual review, reducing the risk of invoice fraud.