No matter which industry you work in, receiving invoices, reports, contracts, or forms in PDF is the norm. However, this format is not that useful when it comes to editing, analyzing, and extracting data; it’s just too static. But you still need to use this information. What can be done?
It’d be best to convert the PDF files to Excel. This format offers structured data that can easily be sorted, filtered, and visualized. But if you’re a medium or big company that deals with large volumes of files, doing it manually or one at a time just doesn’t scale.
Bulk conversion offers a smarter, more efficient solution. By automating the process, you reduce manual work, speed up operations, and ensure greater accuracy.
Let’s explore 3 methods to convert PDF files to Excel in bulk, with their advantages and disadvantages.
Key Takeaways
This article explores three practical methods for converting PDFs to Excel in bulk:
- Manual Conversion: Best suited for a small number of PDF files, where you only need to import data into a spreadsheet.
- Using Free Online Tools: A quick, no-cost option for converting individual files. It can be helpful for light use, but it often comes with strict limits and slower processing.
- Automated Conversion with Klippa DocHorizon: A fast, scalable, and secure solution designed for businesses that need to convert large volumes of PDFs to structured Excel files.
Manually Converting PDFs to Excel in Bulk
Choosing to convert PDFs to Excel manually is a fast and easy solution. If you deal with a few documents, of course. When it comes to converting PDFs in bulk, things can change. It might take quite a while to convert, let’s say, 200 PDFs or even 1 PDF file having 200 pages.
Also, a manual solution is never a “direct” one, let’s say. There is also an extra step, for example, to import the file first and export it in the desired format only after that.
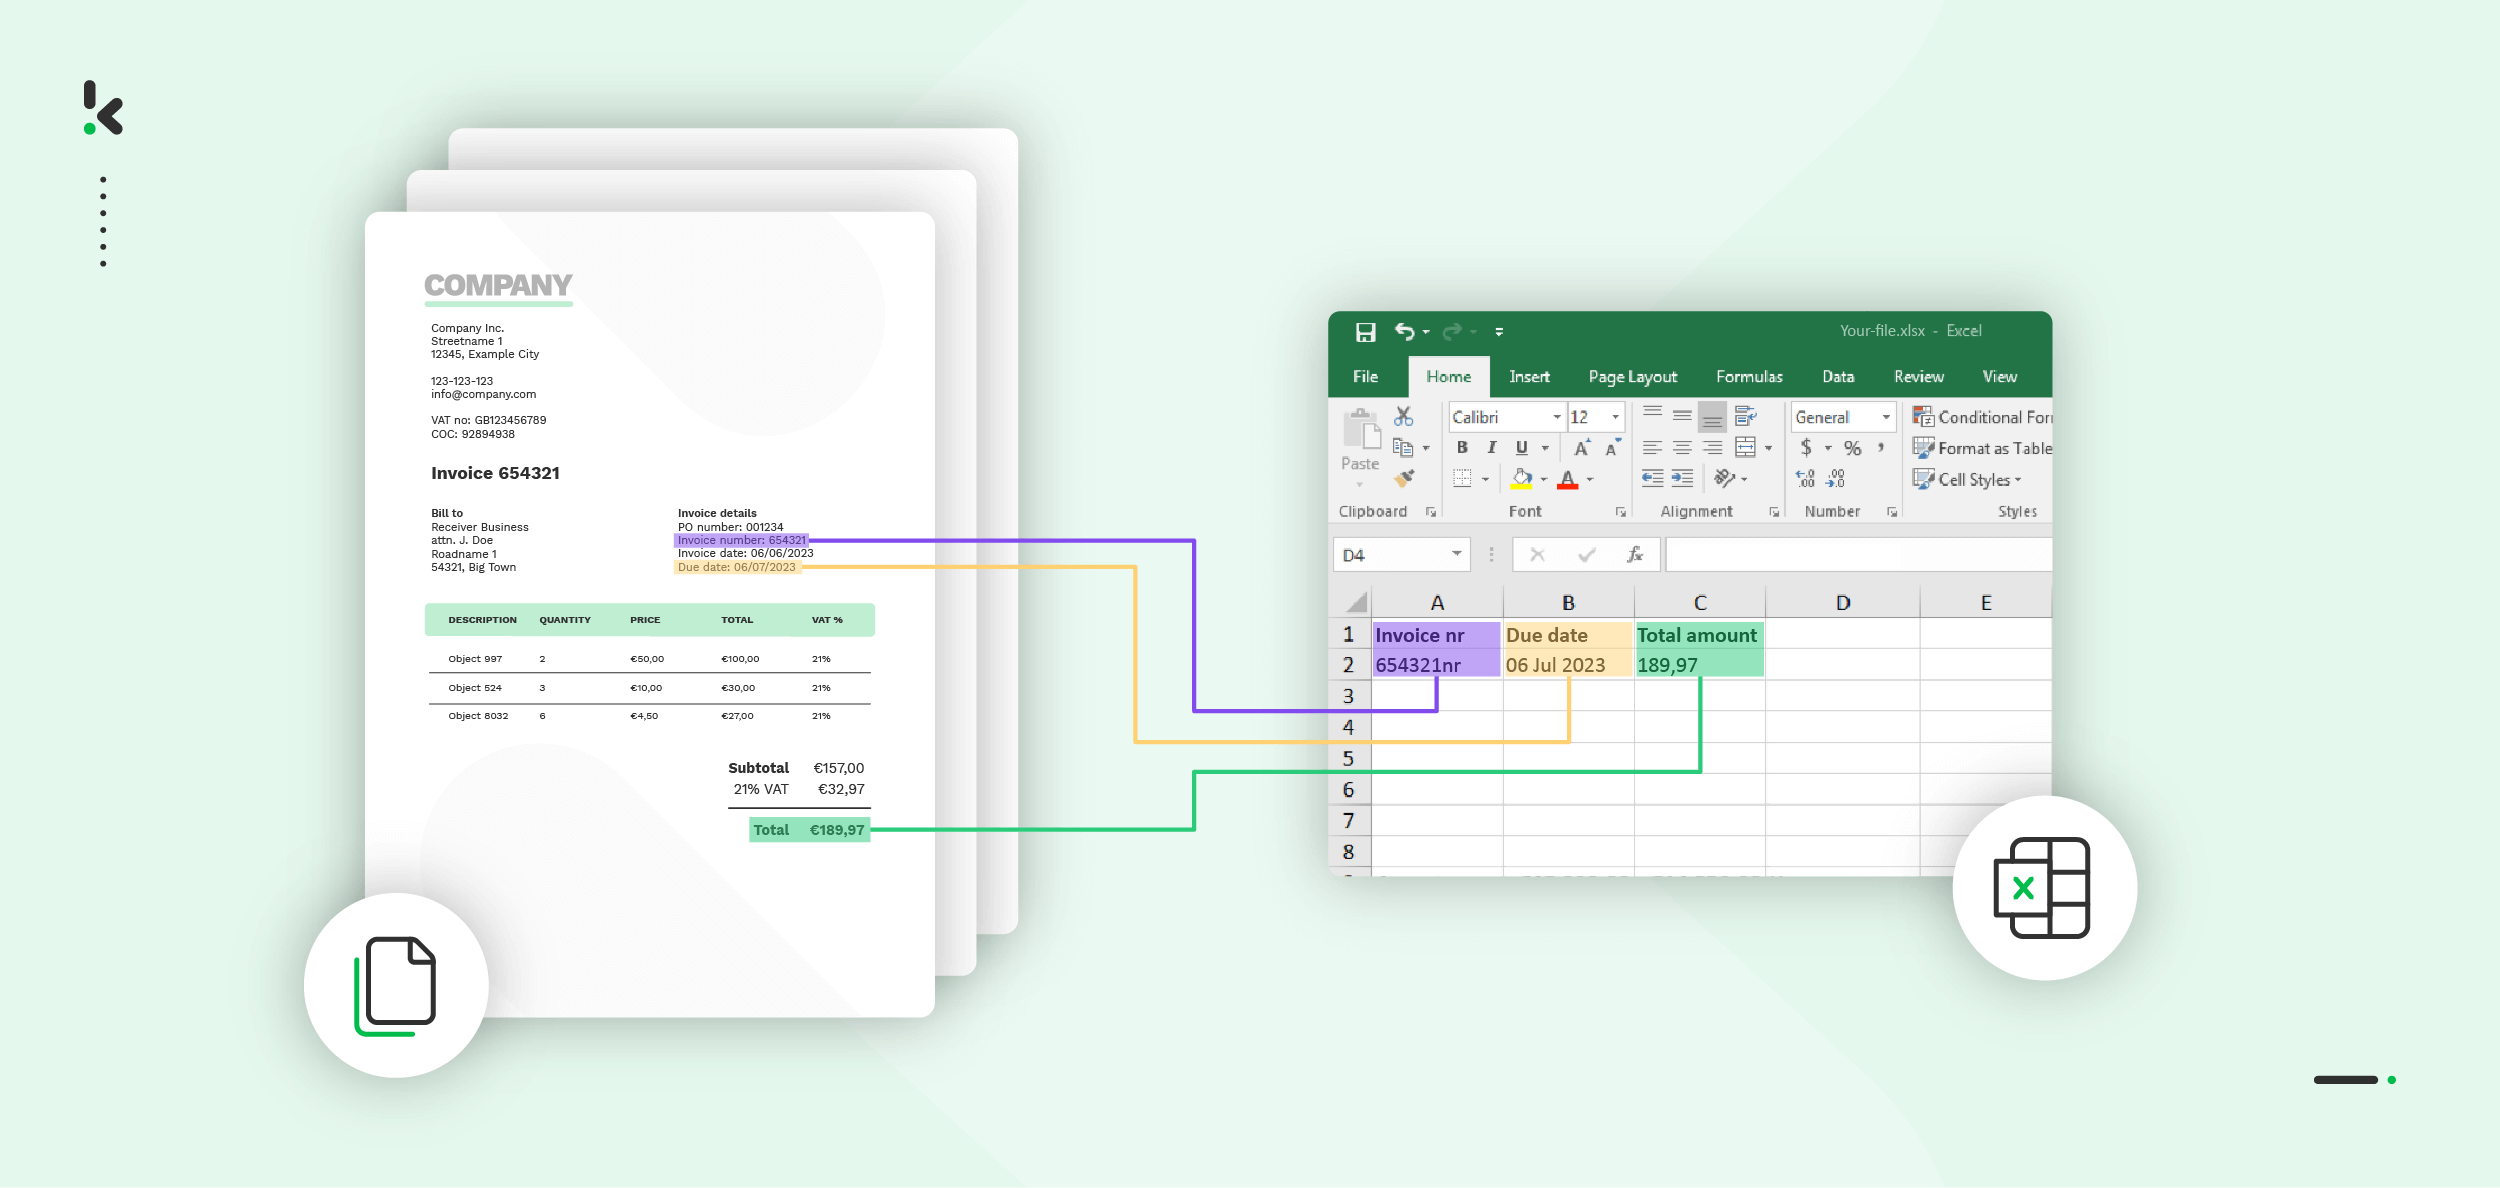
Nonetheless, if you want to use this method, you’ve got you covered! The following example is related to converting tables from PDF files. Based on what we found, the best way to convert the PDFs is to use Excel. These are the steps you need to follow.
Step 1: Open Excel and change to the Data tab.
Step 2: Choose Get Data -> From File -> From PDF.
Step 3: Select the file you wish to upload and click Import.
Step 4: A dialog box that lets you choose which data you want in the spreadsheet appears.
On the left side, choose which table you want to import. If you are happy with how the table looks, click Load.
Tip! If you want to change the data, for example, maybe you don’t want a certain column, just press Transform data before loading it.
Step 5: Now you can save the new file, and that was it!
These steps are only for one table, from one PDF file.
Using a Free Converting Tool
Tired already of manually converting PDF files to Excel one by one? You could consider using a smart, free tool that can take the pressure off.
With tools like The Best PDF, you can convert PDFs quickly, with no coding and no hassle. It’s a simple way to convert documents more accurately and at scale. Let’s see how exactly it works.
Step 1: Upload your PDF file.
Step 2: Choose a file format to download your file.
Step 3: Keep or modify the file’s name.
Step 4: Click Download.
Free tools sound great until you try to convert more than one PDF file. Most of the ones we tried let you upload a single file before hitting you with a paywall. Such a common and frustrating trick! Especially when you want to convert files in bulk, like we wanted.
On top of that, these tools are often slow, with limited accuracy and questionable data security. When you’re on a tight schedule or dealing with private data, that’s far from ideal. Security becomes a real concern, and suddenly “free” feels costly.
That’s where premium tools like Klippa DocHorizon prove their worth. They can handle larger volumes without slowing down, catch more errors, and keep your data safer. Plus, with helpful features and proper support, you won’t waste time troubleshooting. You just get what you need when you need it.
How to Convert PDF to Excel in Bulk with DocHorizon
The DocHorizon platform is a great tool to convert PDF files to Excel in bulk, as you only need to set up the flow once, and the platform will do the rest for you, over and over again.
These are the steps:
Step 1: Create your account and activate services
To start building your first workflow, sign up for a free account on the DocHorizon Platform. Just enter your name and email address, and you’ll immediately receive a €25 credit to explore the platform. A great way to get started, right?
After logging in, create an organization and set up a project to unlock access to the services. In your Project Settings, navigate to Services and enable both Document Capturing – Financial Model and Flow Builder. Now you have everything you need to dive right in!

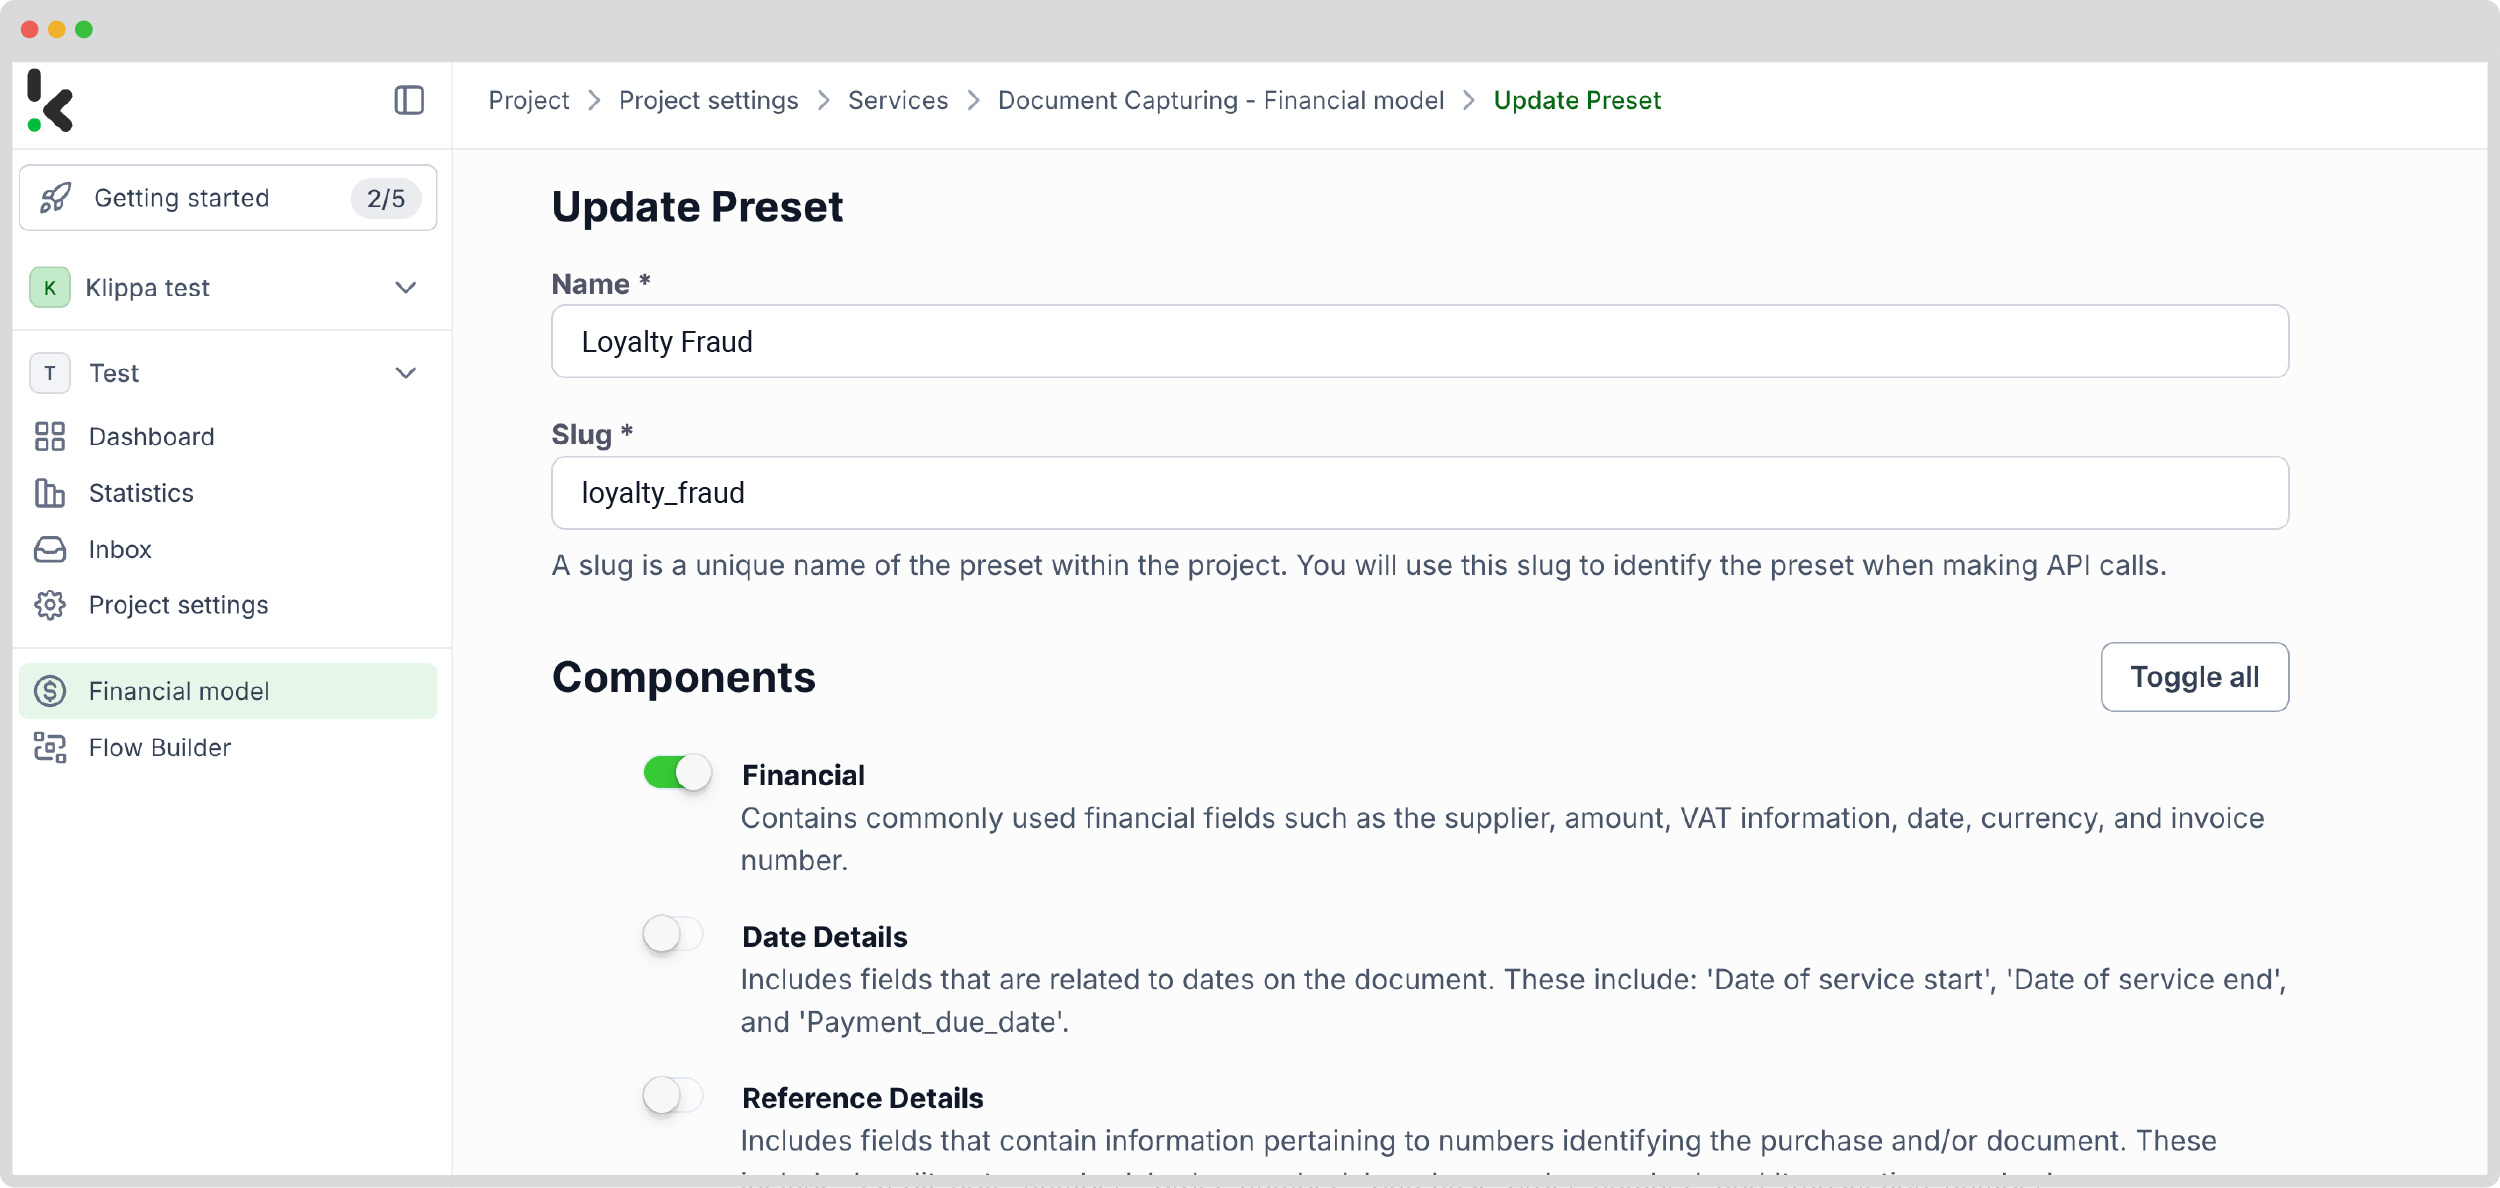
Step 2: Set up a preset to extract the data you need
Before building your workflow, you first need to create and configure a preset. This step is crucial as it tells the platform exactly which fields to extract from your documents, so you only get the data you really need.
The best part? Klippa’s presets are trained on thousands of real-world documents, meaning you’re getting high accuracy from the start.
Here’s how to set it up:
- In the left-hand menu, select Financial Model and then New Preset. Hit Create and give your preset a name, depending on what you’re working on. Ours is called “Extract PDF to Excel”.
- When it comes to components, Financial and Line items are the go-to ones for this example, but you can also pick others that fit your specific case.
Once you’ve selected what you need, click Save, and just like that, your preset is good to go!
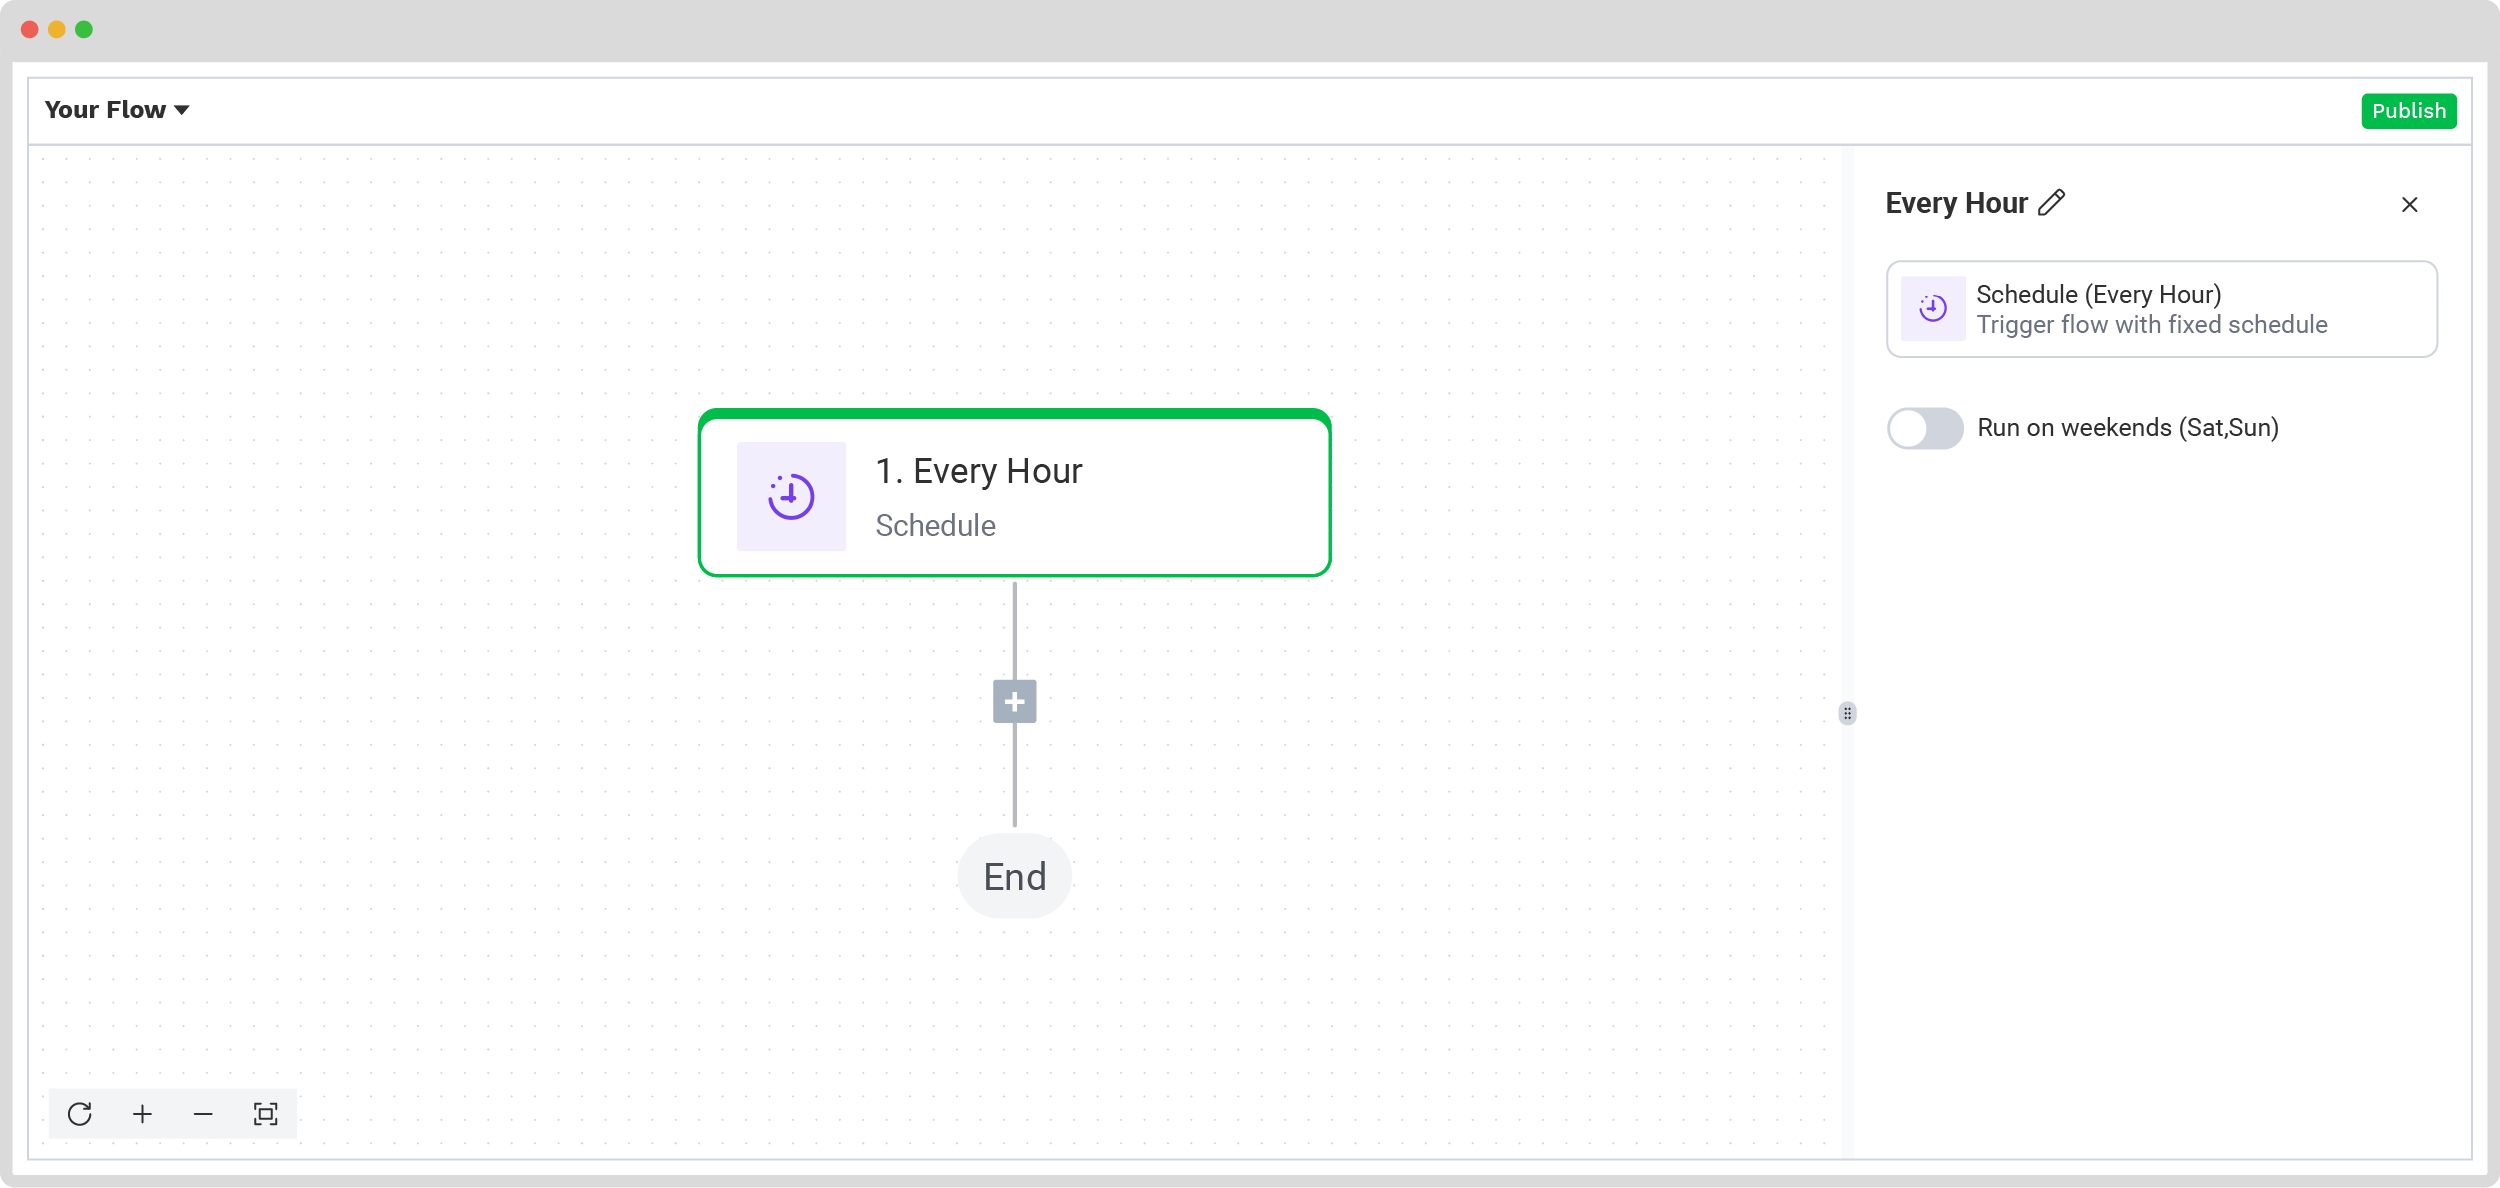
Step 3: Select the flow’s trigger
Because we’re dealing with PDF files that we want to convert in bulk, we thought it would be great for you just to upload multiple PDF files and have DocHorizon process them, wherever you might upload them.
This is why the trigger of the flow is called “Every hour”; it means that the platform will automatically check the input source for new files to process every hour. There is also the option to run it on weekends (Saturday and Sunday).
For testing the flow and being successful, please make sure to have loaded some sample data before proceeding.
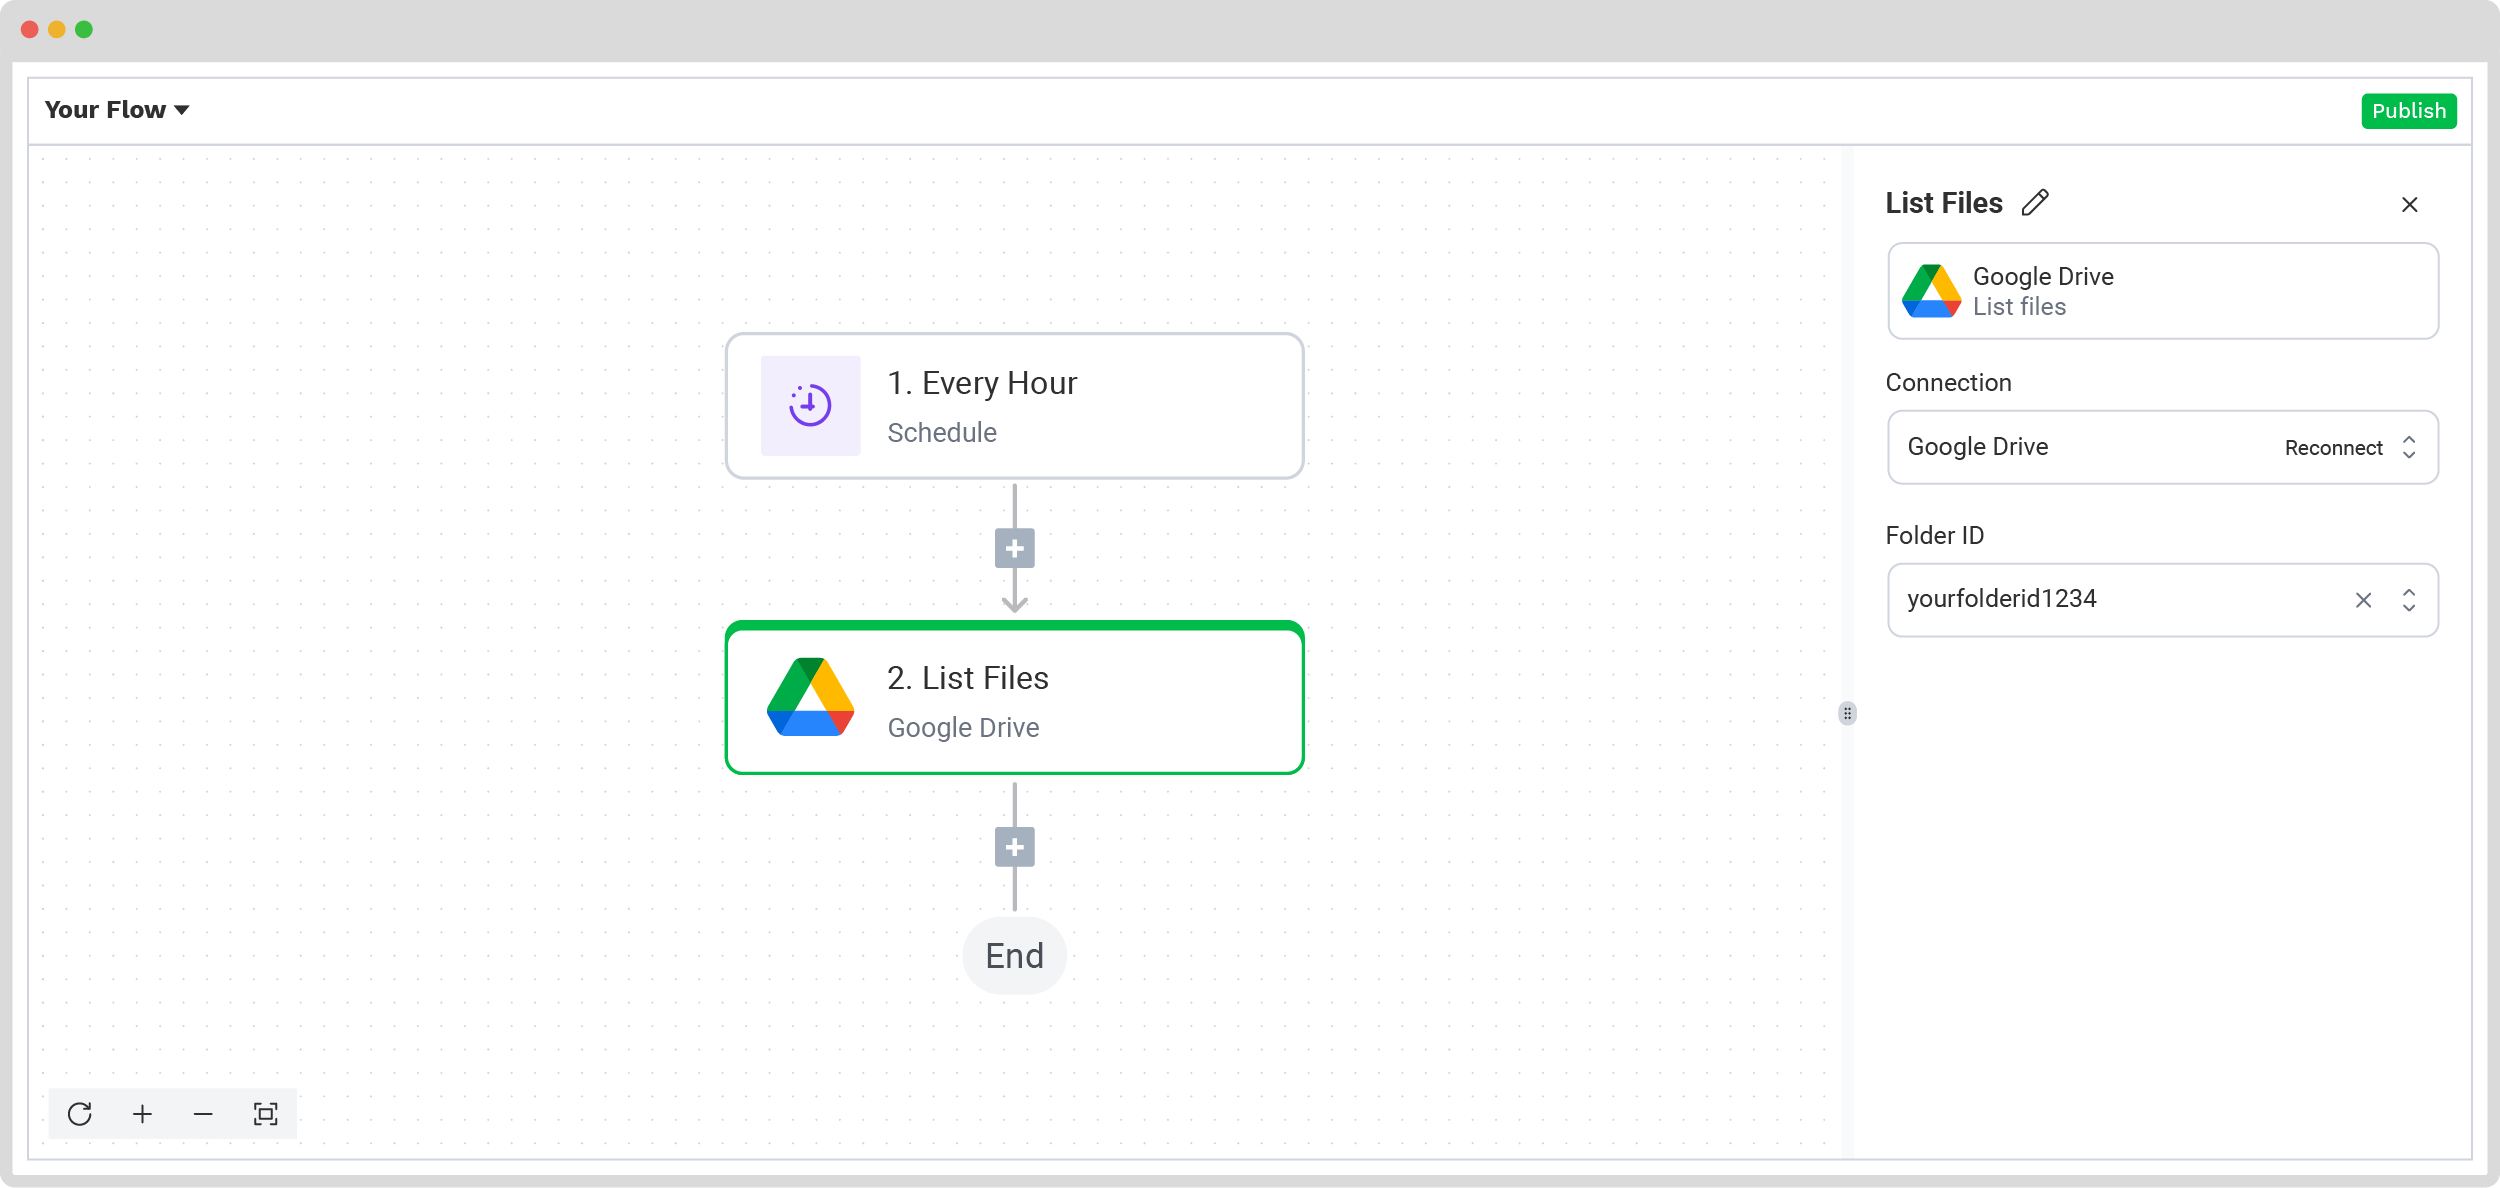
Step 4: List the files from your folder
Before moving forward, open a new browser tab and log in to your Google Drive. Create a new folder; we have called ours “Bulk PDF test”.
Now, switch back to the DocHorizon Flow Builder tab. Click the + button, search for Google Drive, and select List Files. This step lets the platform read the files you already have in your Drive (which will be handy later). Connect the platform with your Drive.
Head back to your Google Drive folder. You’ll notice the new folder’s URL has at the end a combination of letters and numbers. This is the folder’s identification name. Just copy and paste it into the Folder ID field of the DocHorizon Flow Builder tab.
Step 5: Select the files to be looped in and read files
To tell the platform which files in your folder to work with, you’ll use the Loop on items function. Click the + button below the input source, search for it, and add it to your flow. Configure it by going to the Items section and clicking on the box. From the data selector menu, select List files -> files.
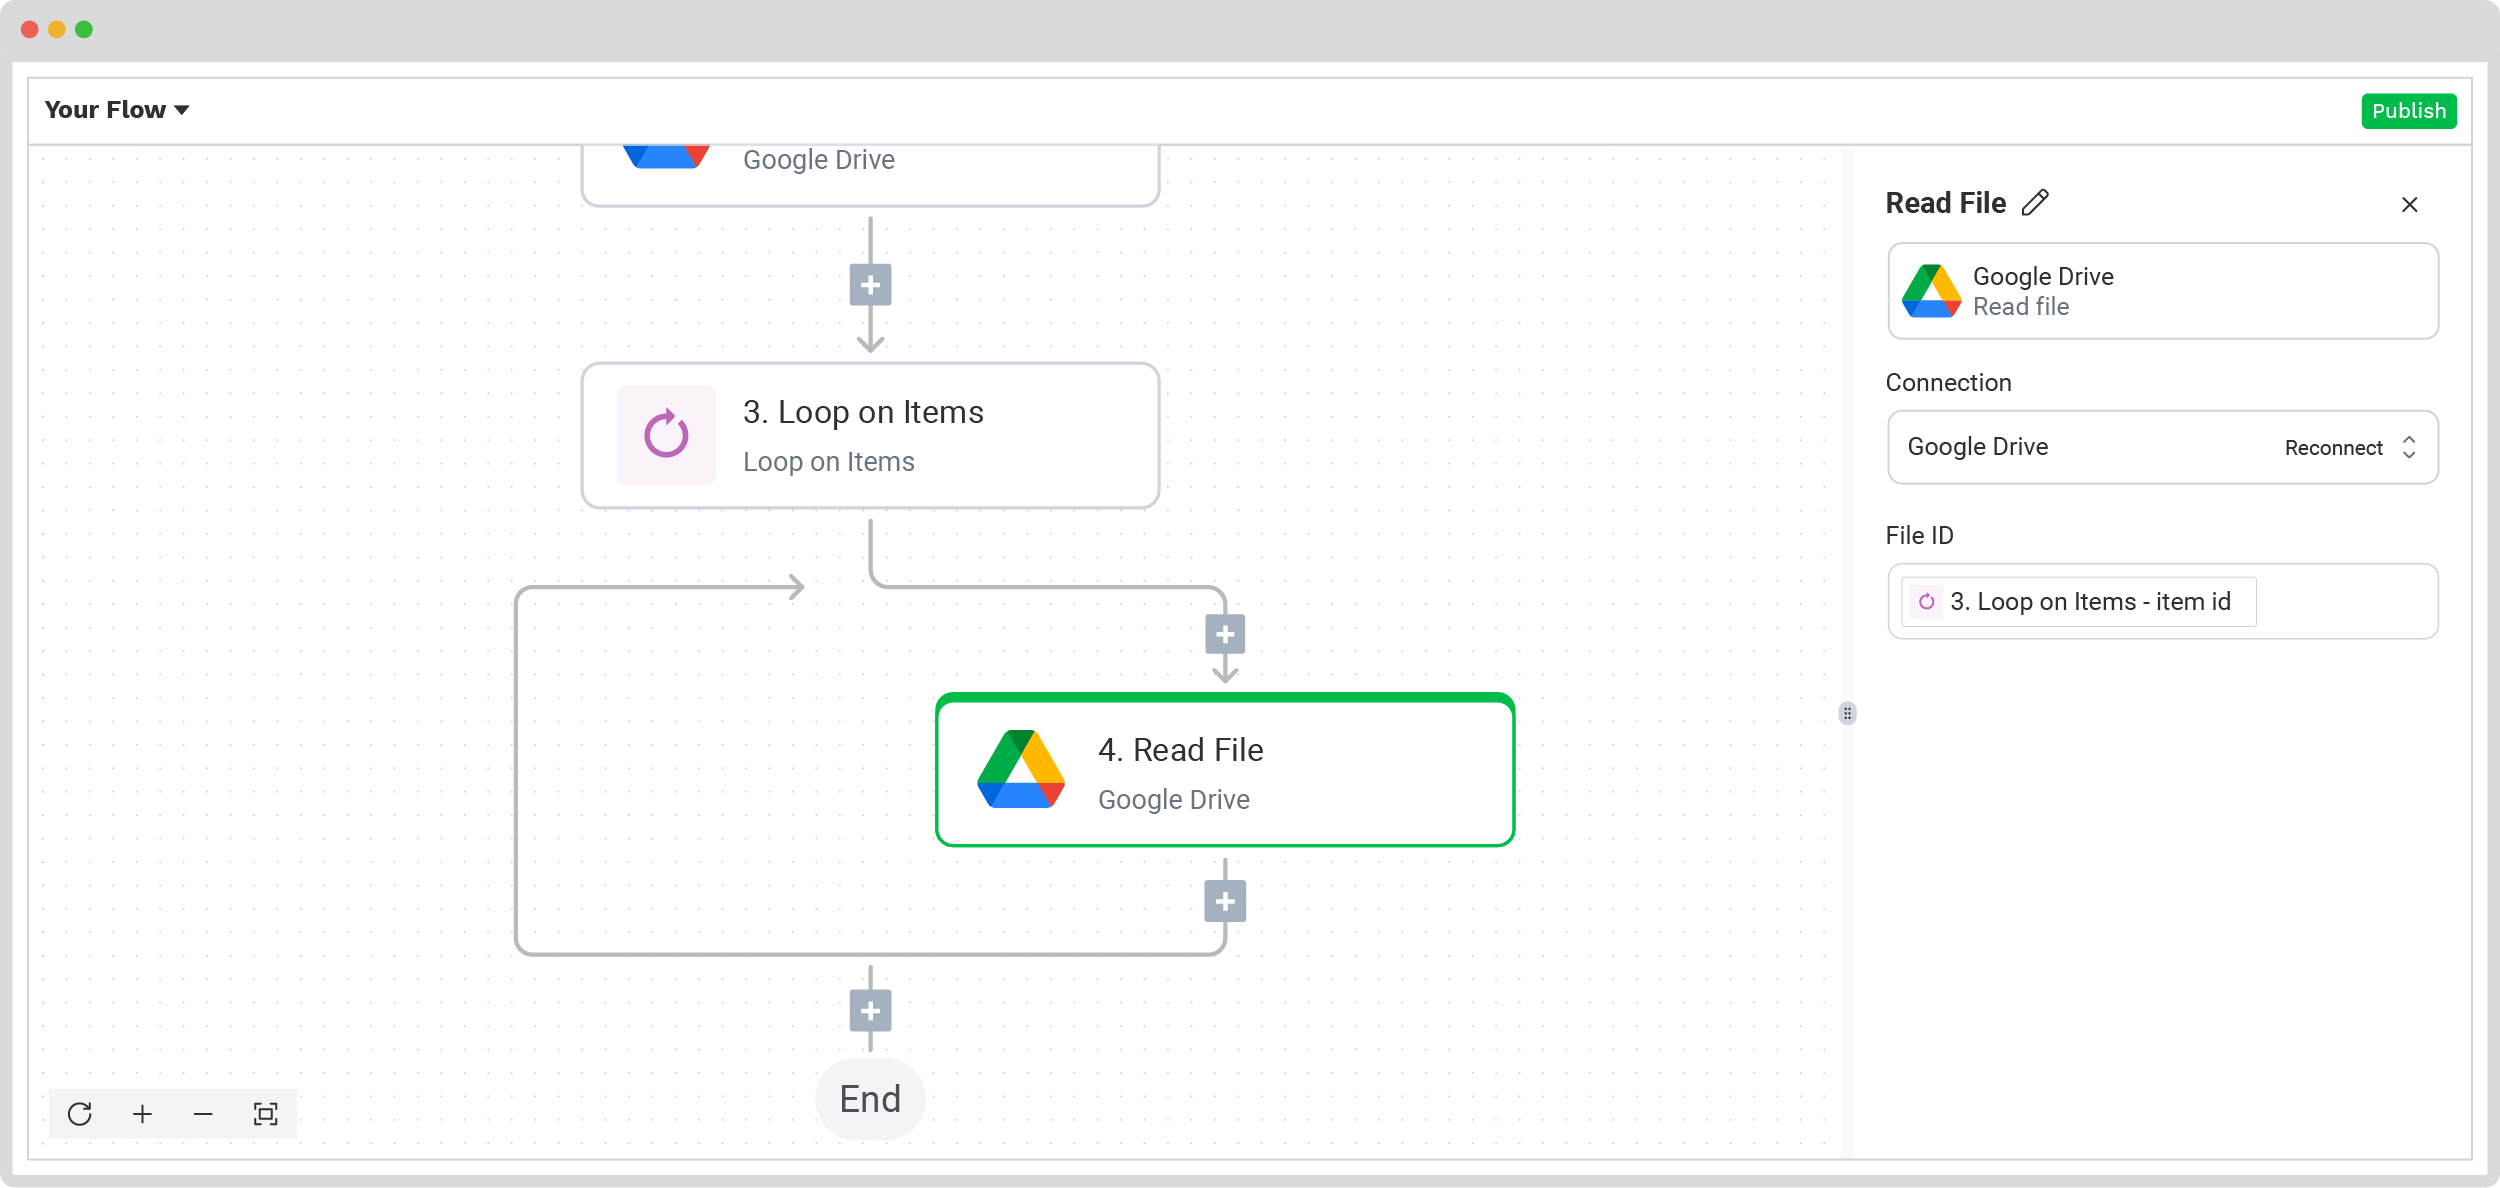
The next step is to instruct the platform to read the files that are in the folder. To do this, select Google Drive -> Read file and configure it by connecting it to the DocHorizon platform, and selecting the path of Loop on items -> item -> id for the File ID section. This means that the file ID will be coming from the new file’s ID.
Step 6: Select the document capture model
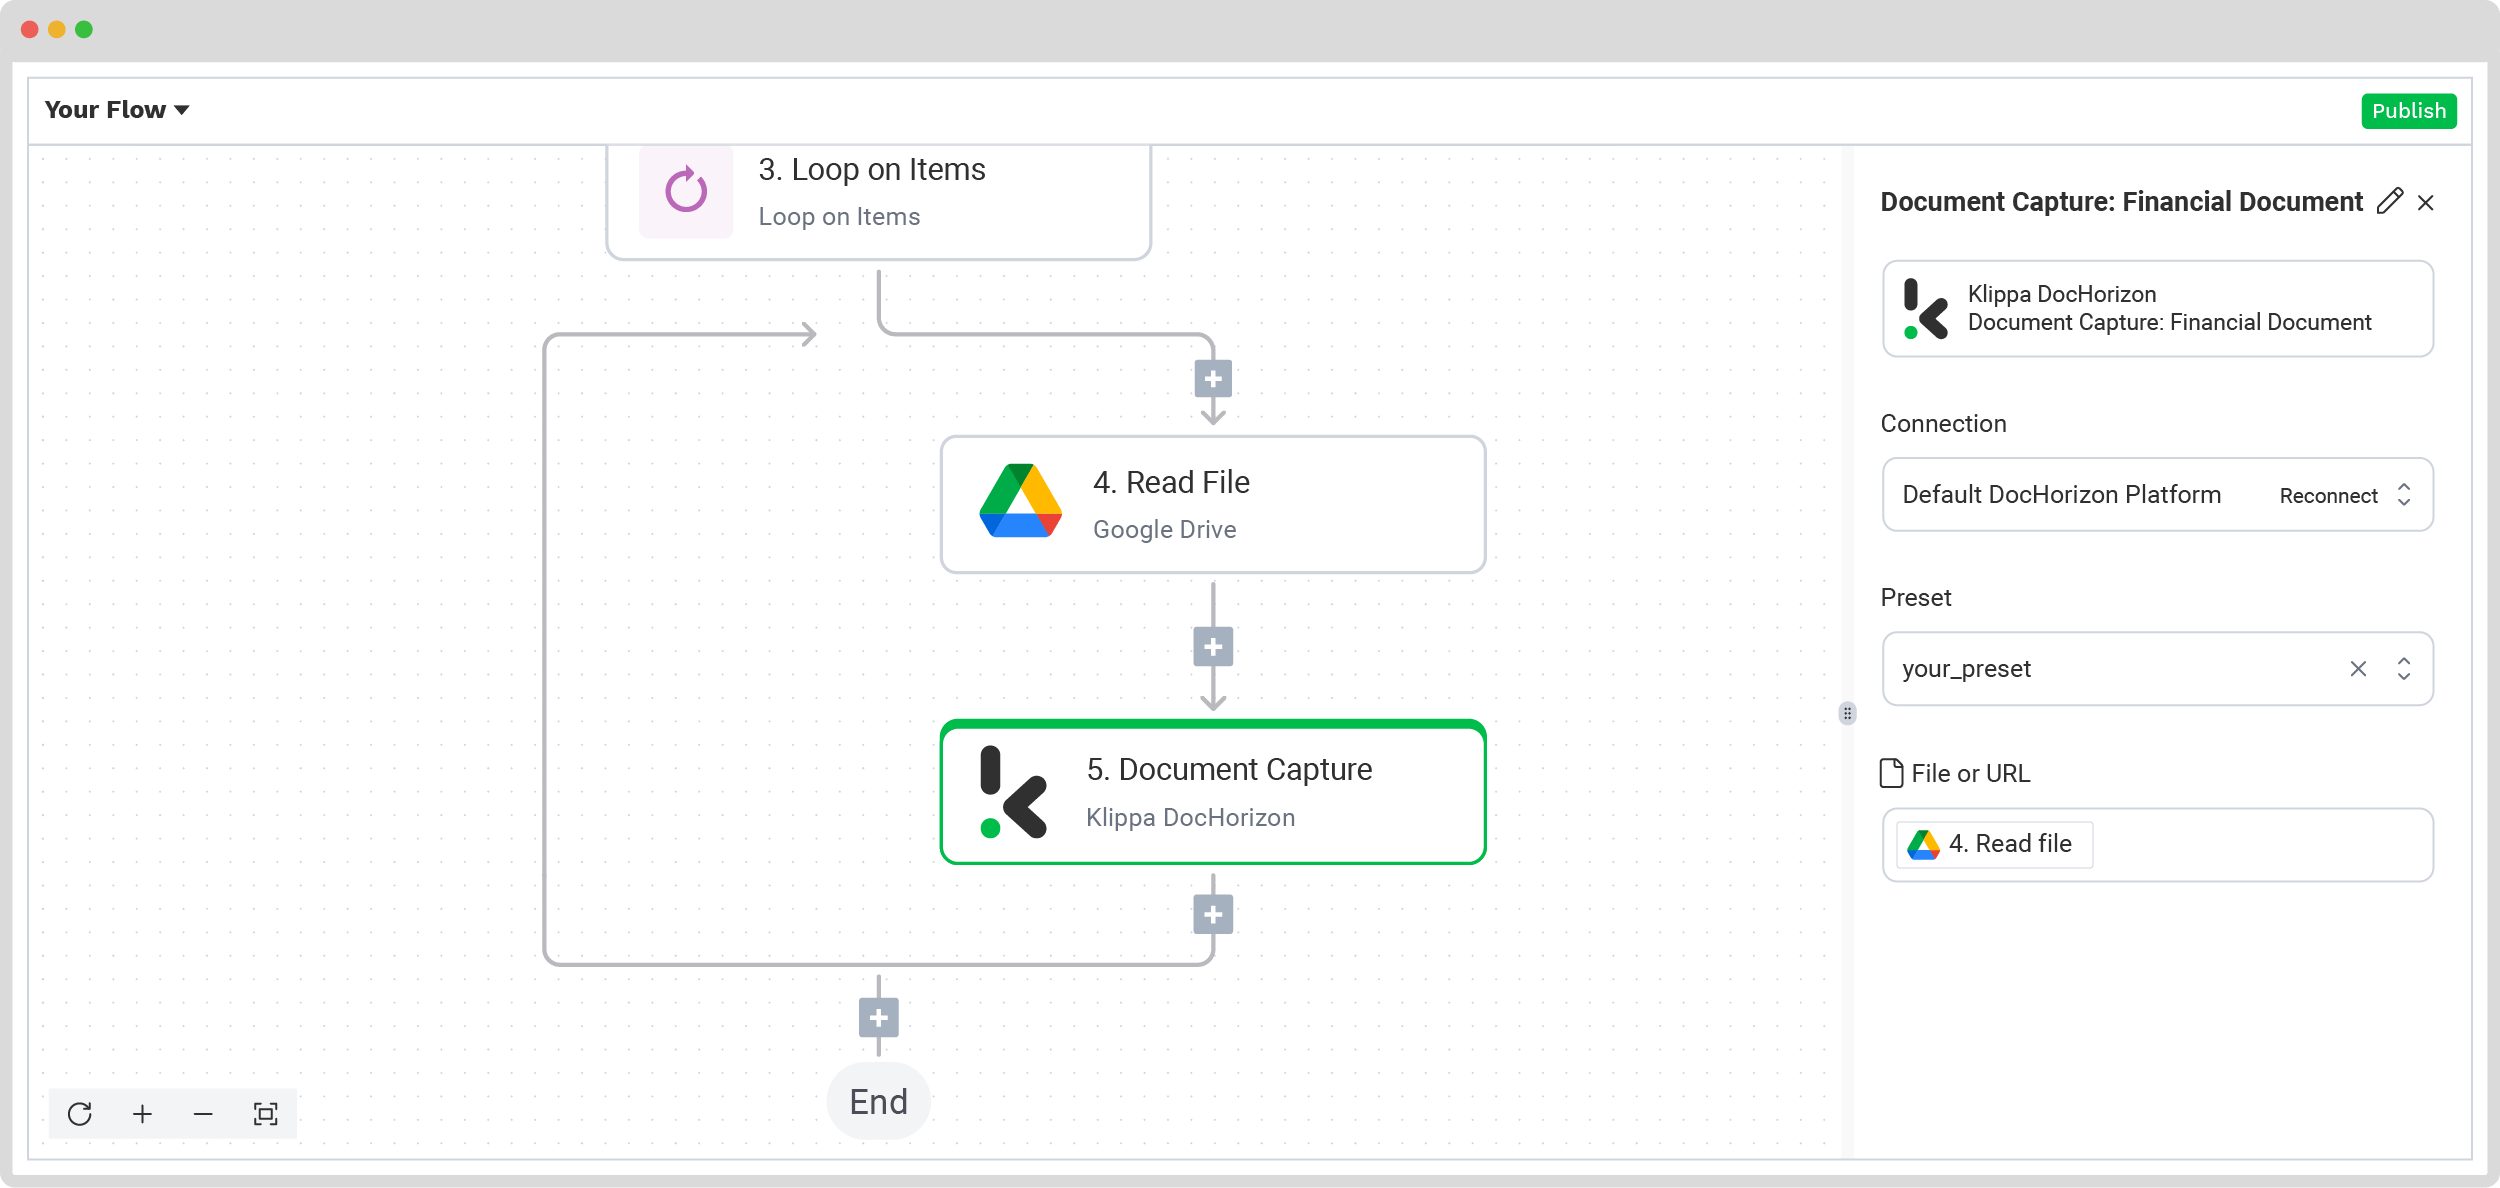
To extract the necessary fields from your files, click the + button, search for Document capture: Financial Model, and select it from the list. Create a new connection with the Default DocHorizon Platform. Once connected, select the preset you created earlier (“Extract PDF to Excel), and specify which files the platform should process. In the File or URL field, click inside the box and select 4. Read File. This ensures that the files read in your Google Drive folder will be sent directly to the document capture module for processing.
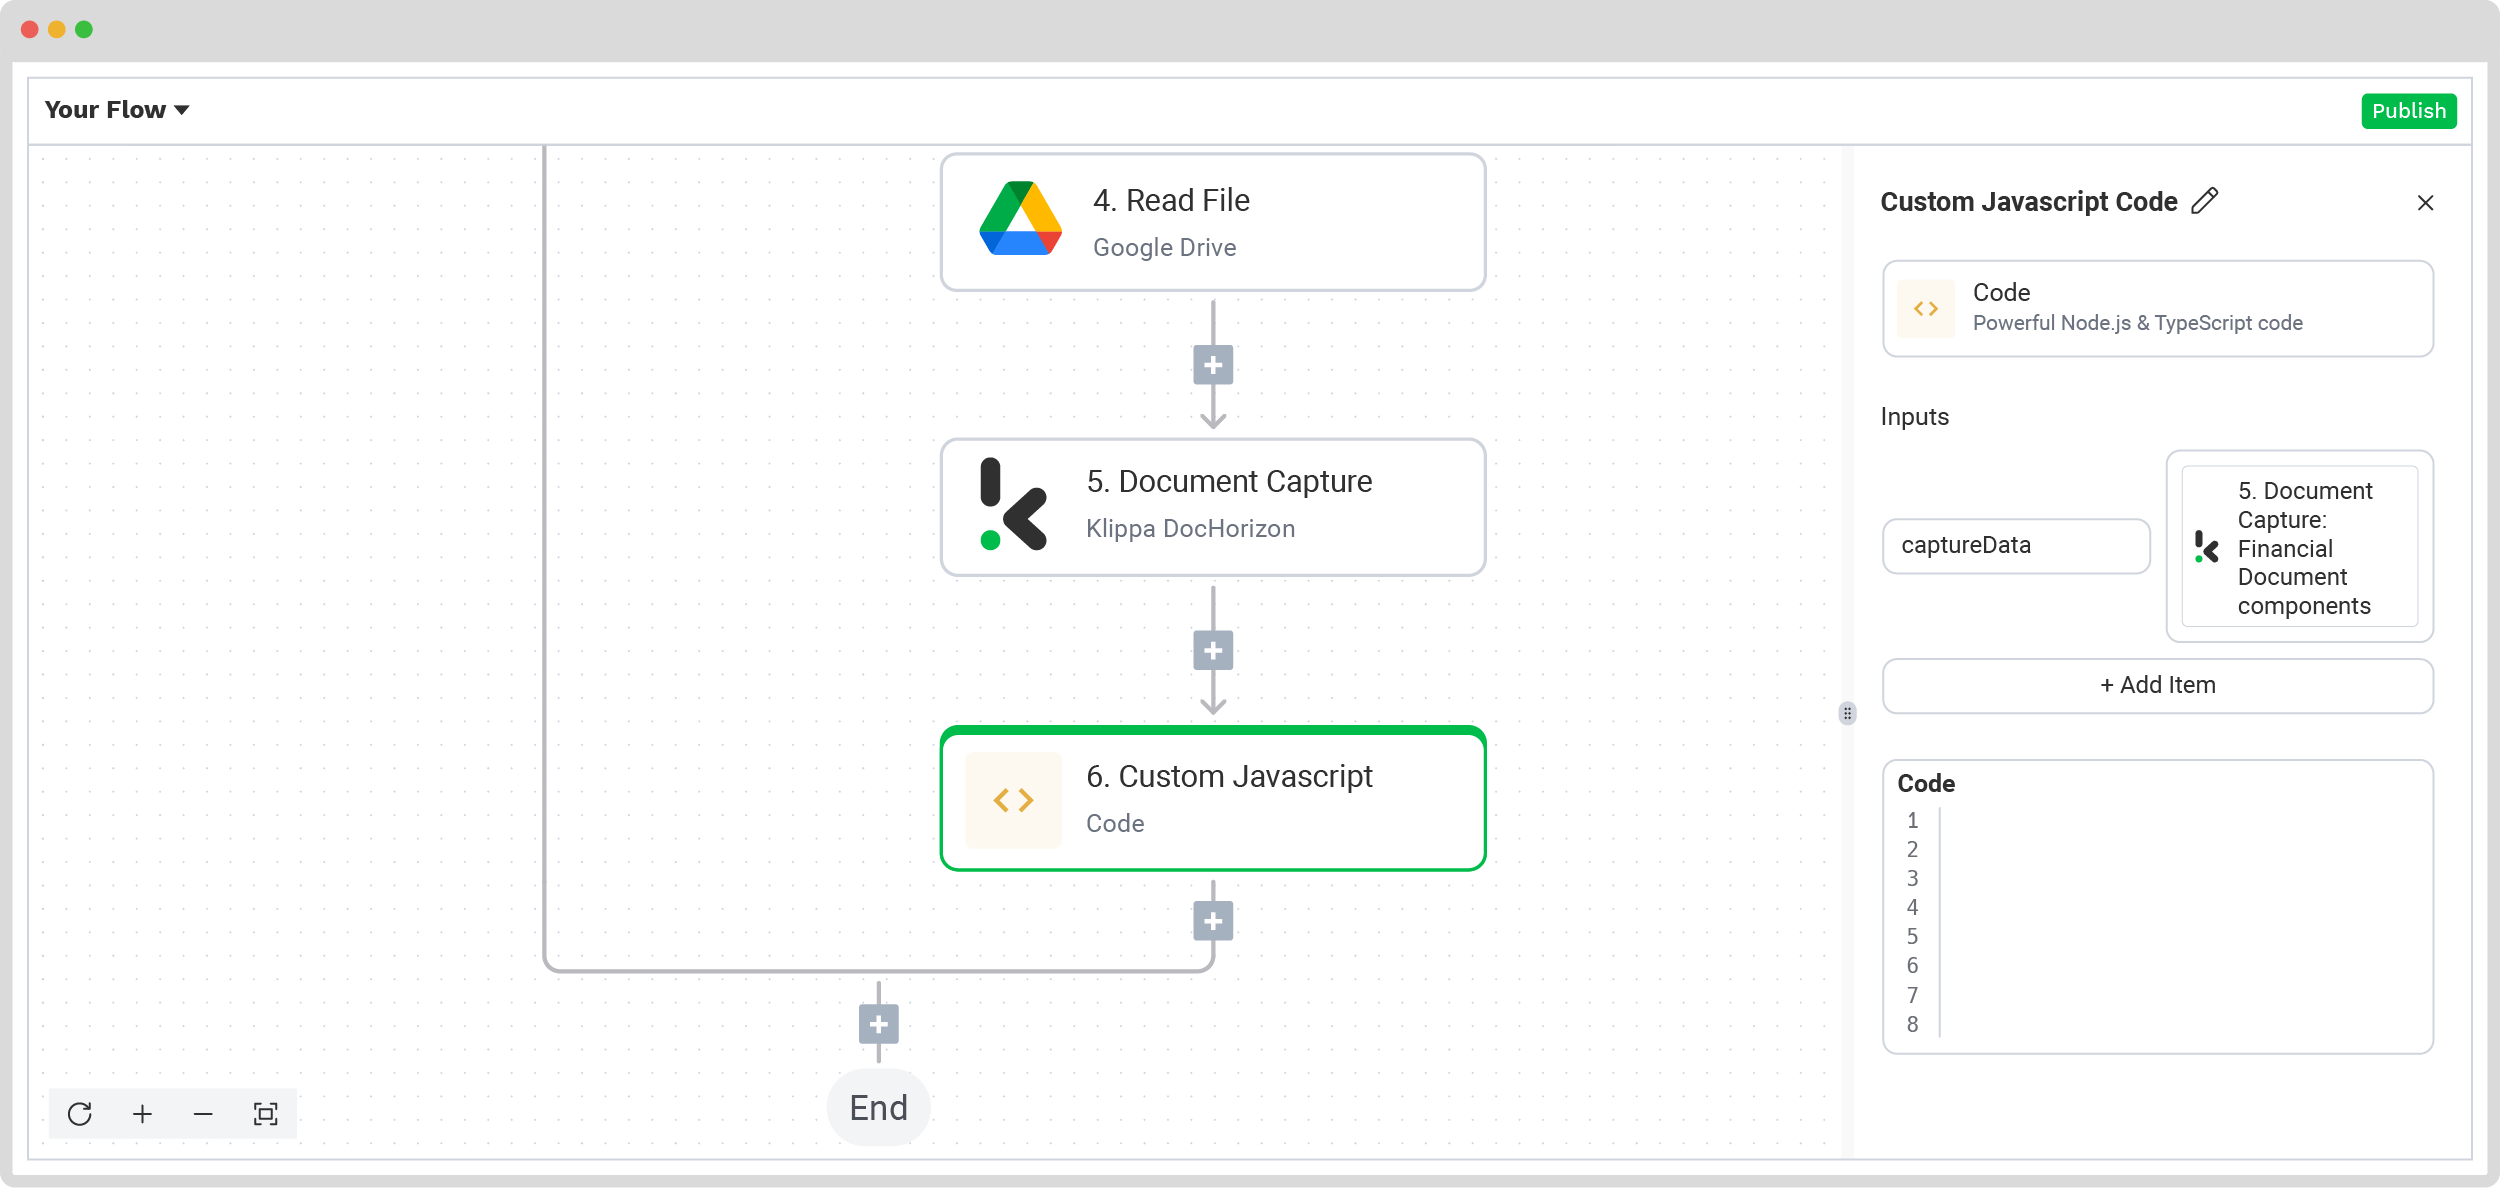
Step 7: Apply custom code block
For the conversion to be readable, you need to use a custom code block. The configurations are quite easy, as there are only 2 sections to customize:
For the Inputs section, write in the first box captureData, and in the second one select Document Capture: Financial Document -> components.
For the Code section, reach out to us so we can help you with the code block!
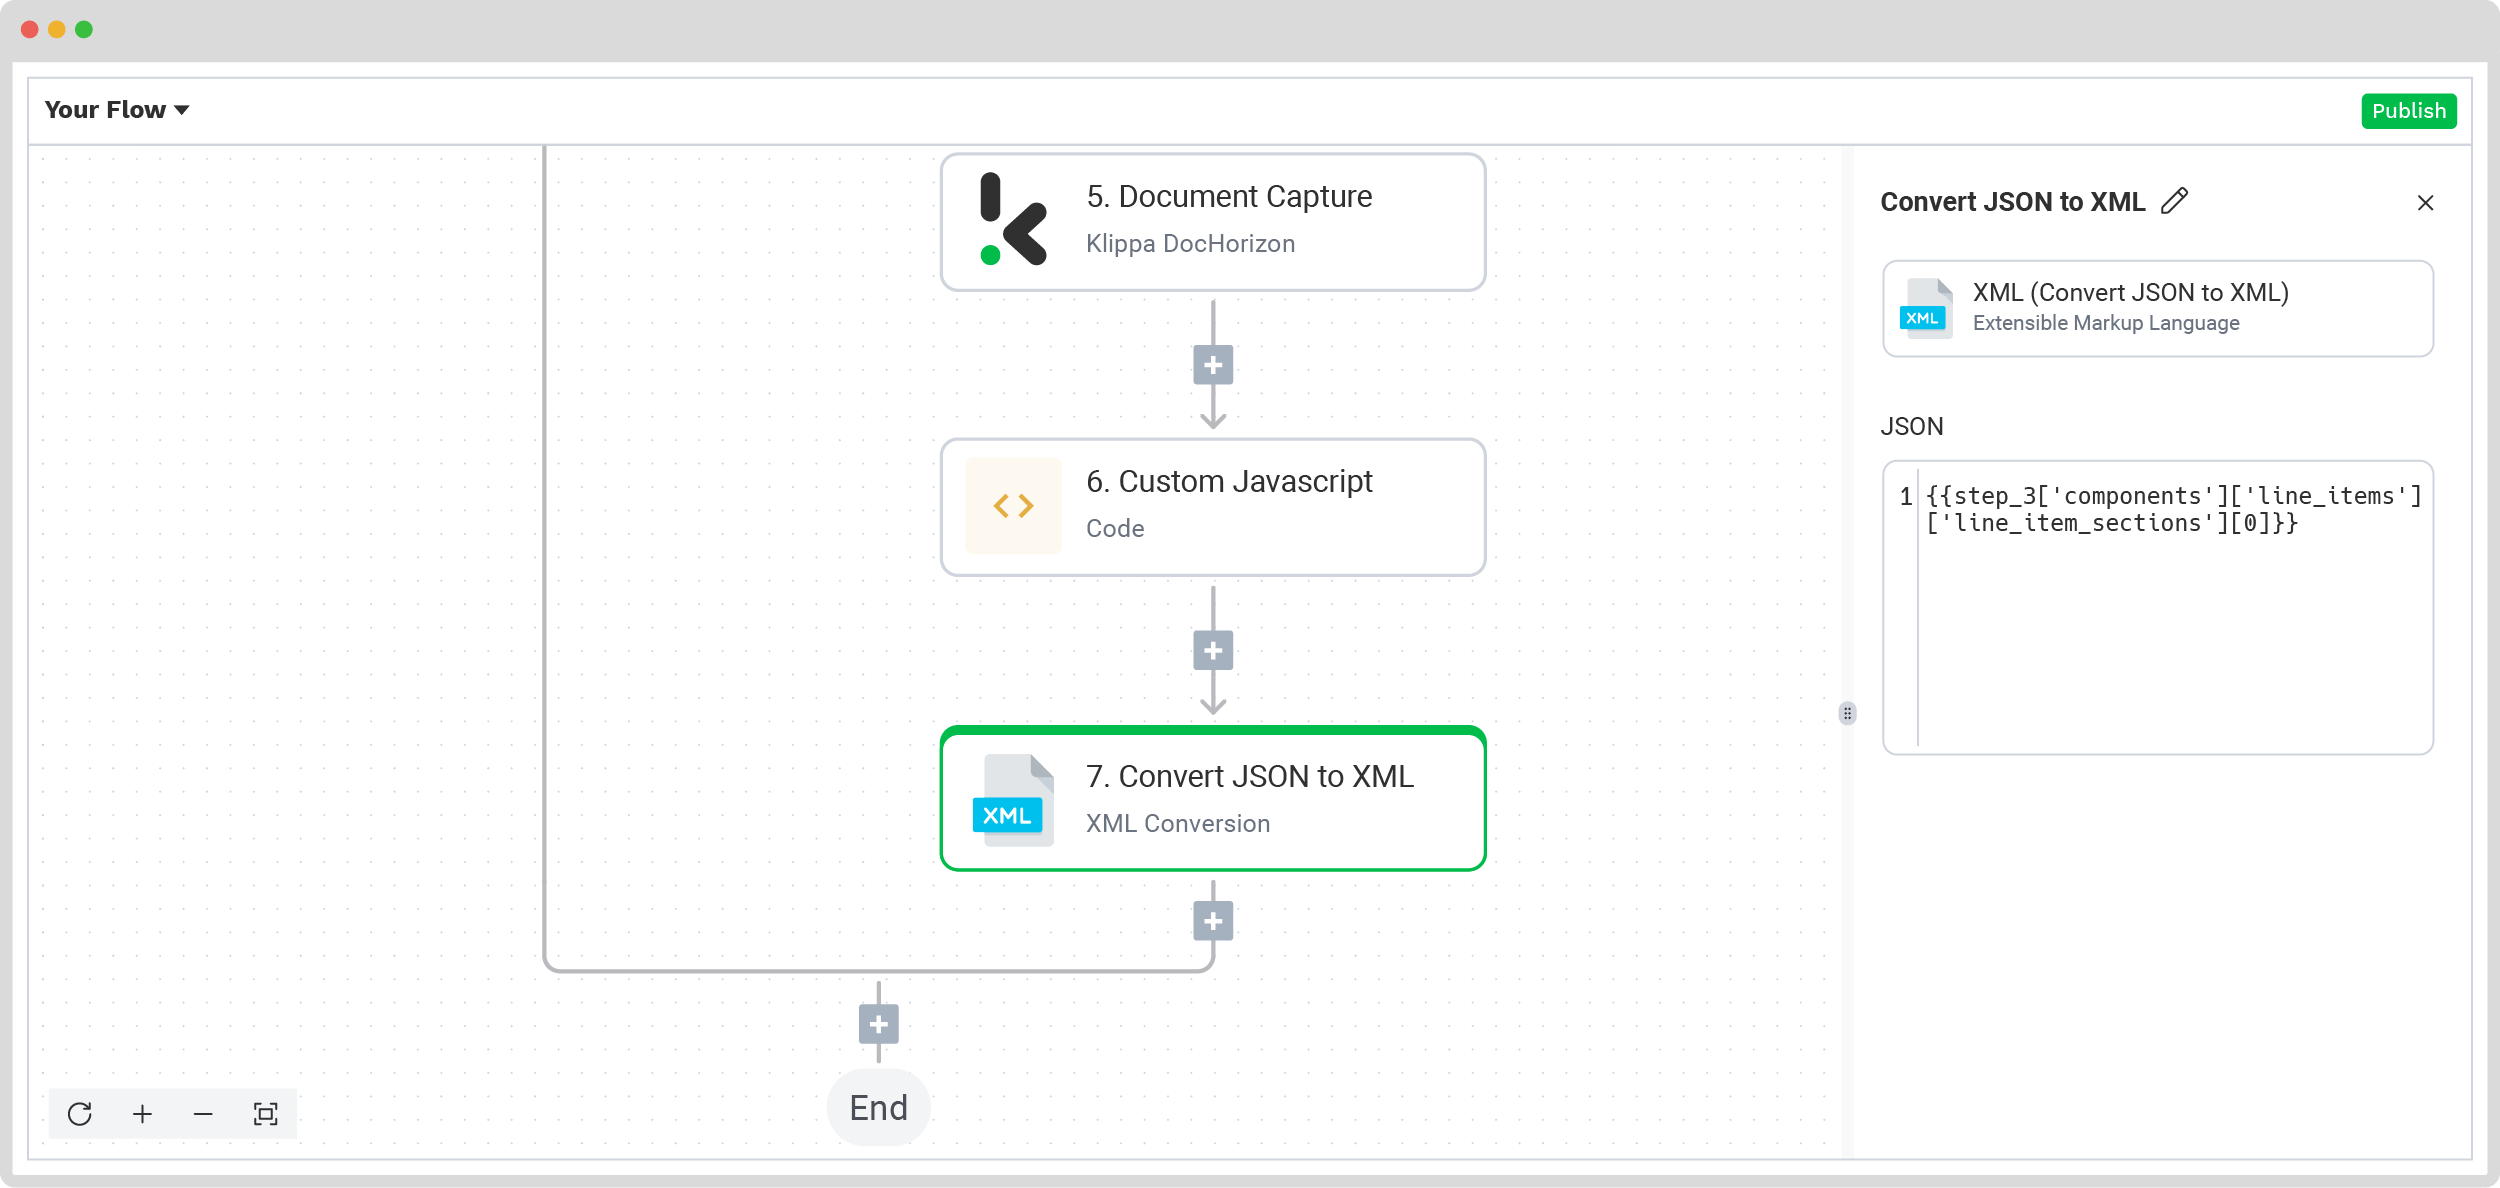
Step 8: Convert JSON to XML
Because you want to convert the PDF files to a format other than the standard JSON one, you need to convert the extracted data. You can do this by adding another step, namely, Convert JSON to XML. This can be easily found in the list.
On the right side, for the JSON section, insert Custom JavaScript code.
It’s recommended to have the Add XML header toggled so you don’t get unexpected results and errors.
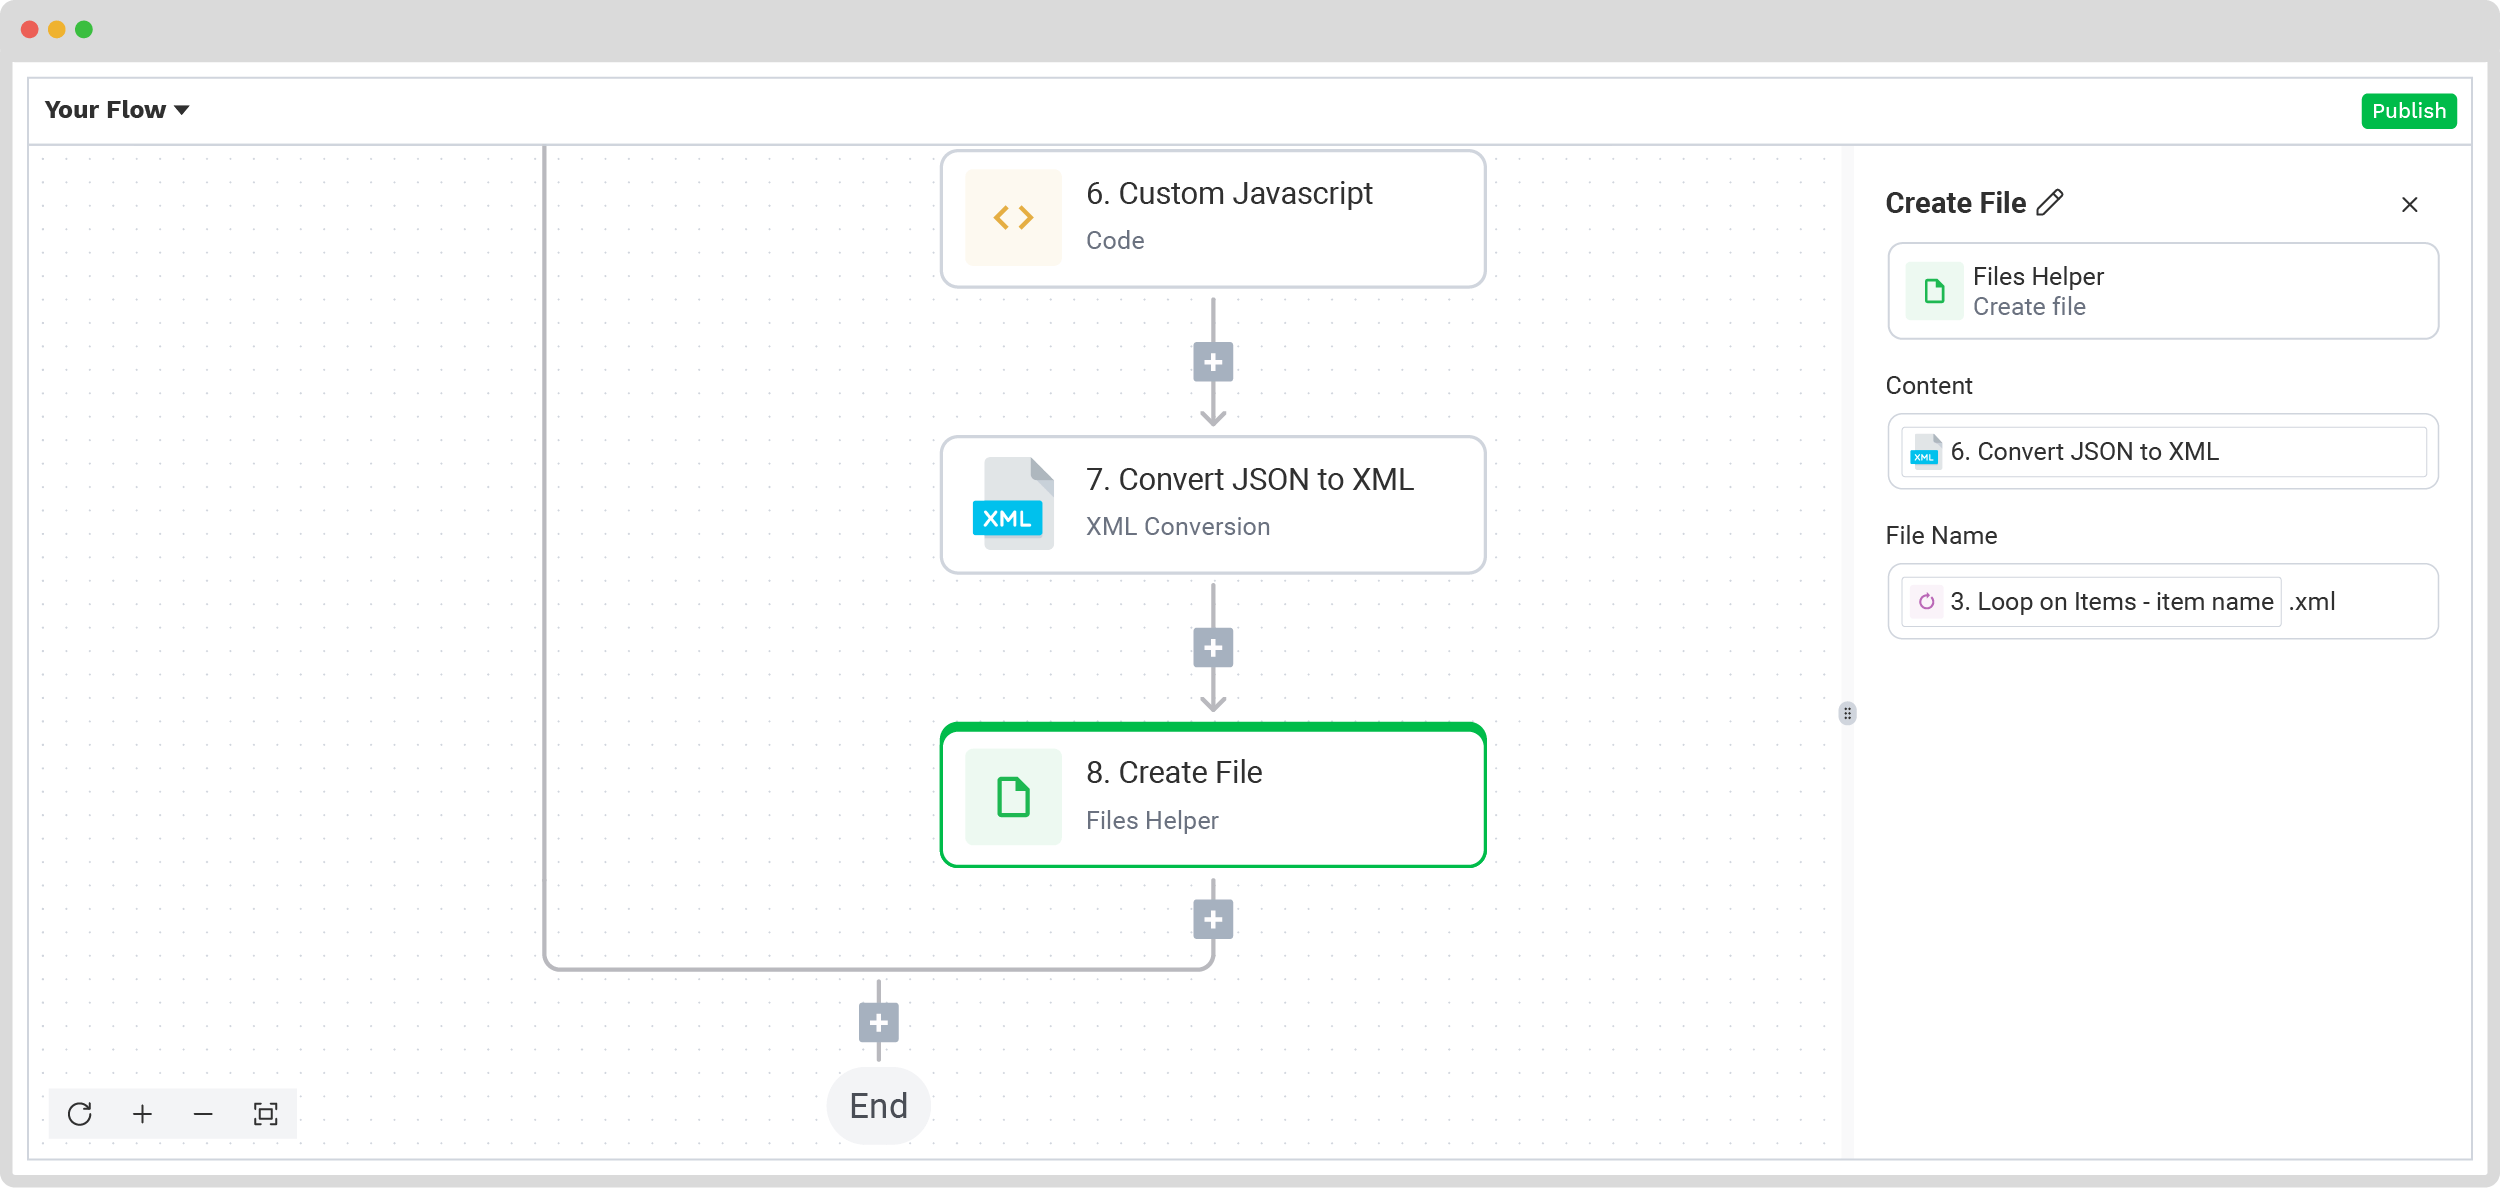
Step 9: Create an XML file
After the conversion, the next step is to create a file with the XML extension by choosing Create file as the next step and filling in the next sections on the right side:
- For Content: Select Convert JSON to XML from the Data Selector menu.
- For File Name: Any name will do, such as output.xml.
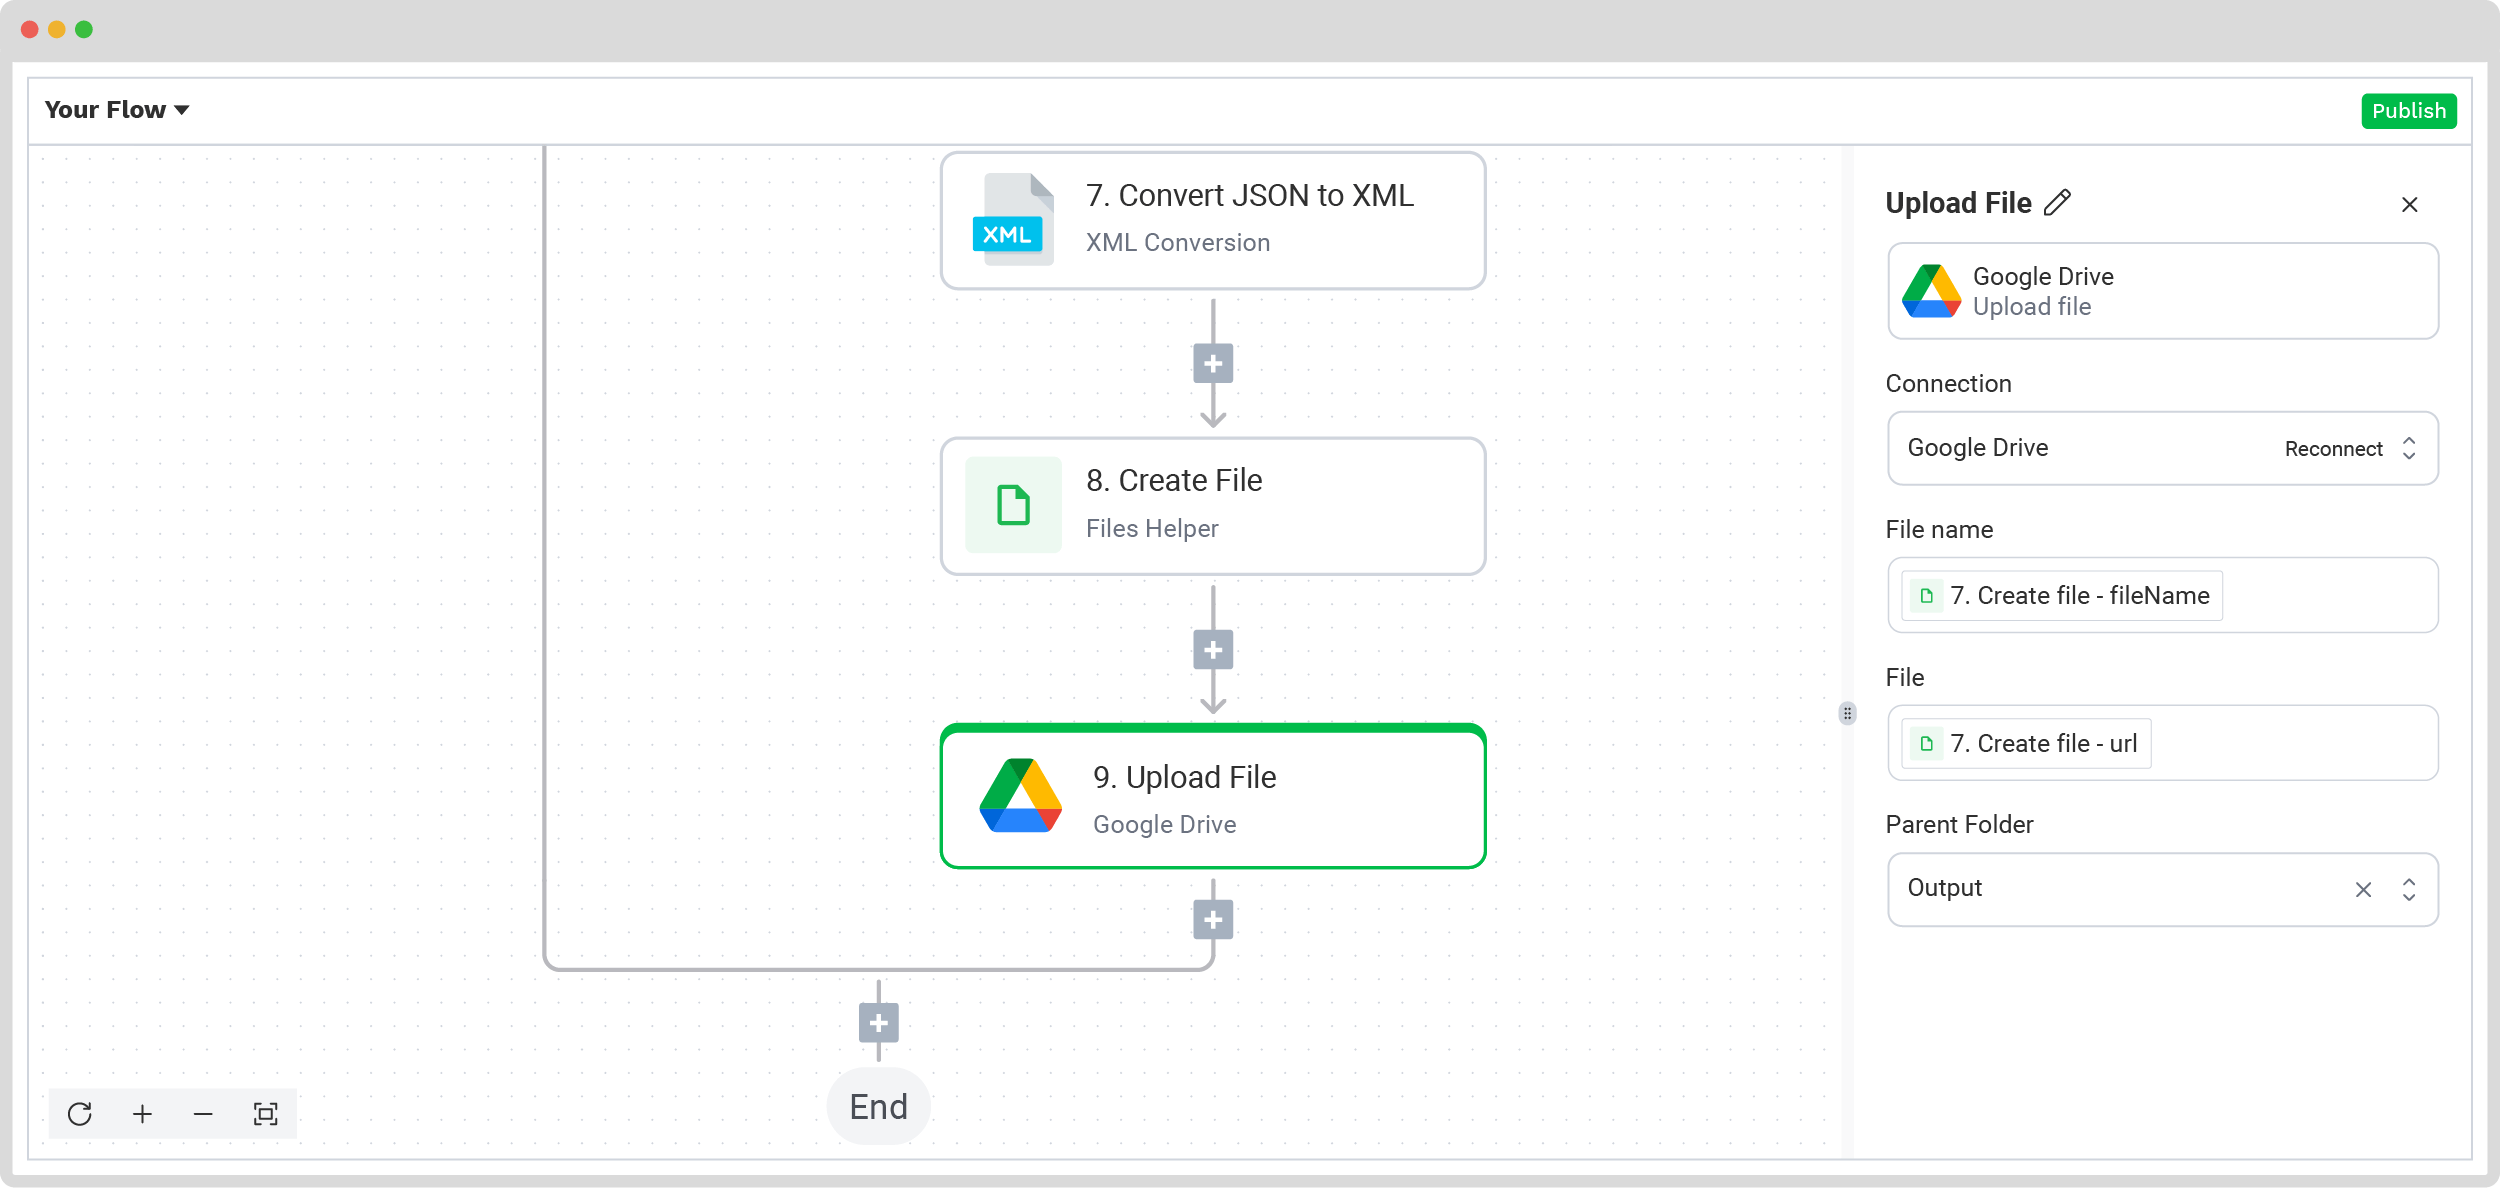
Step 10: Export to Desired Destination
Now it’s time to choose where the created file should be stored. Klippa allows you to choose from various output formats and destinations, but for this use case, we’ll showcase Google Drive as a possible export destination.
Look for Google Drive -> Upload file and connect it to the DocHorizon platform. Then, for the File name section, select from the menu Create file -> file -> fileName. For File, do the same steps but choose URL instead of fileName. Lastly, for Parent Folder, pick the folder where you want the new files to be uploaded.
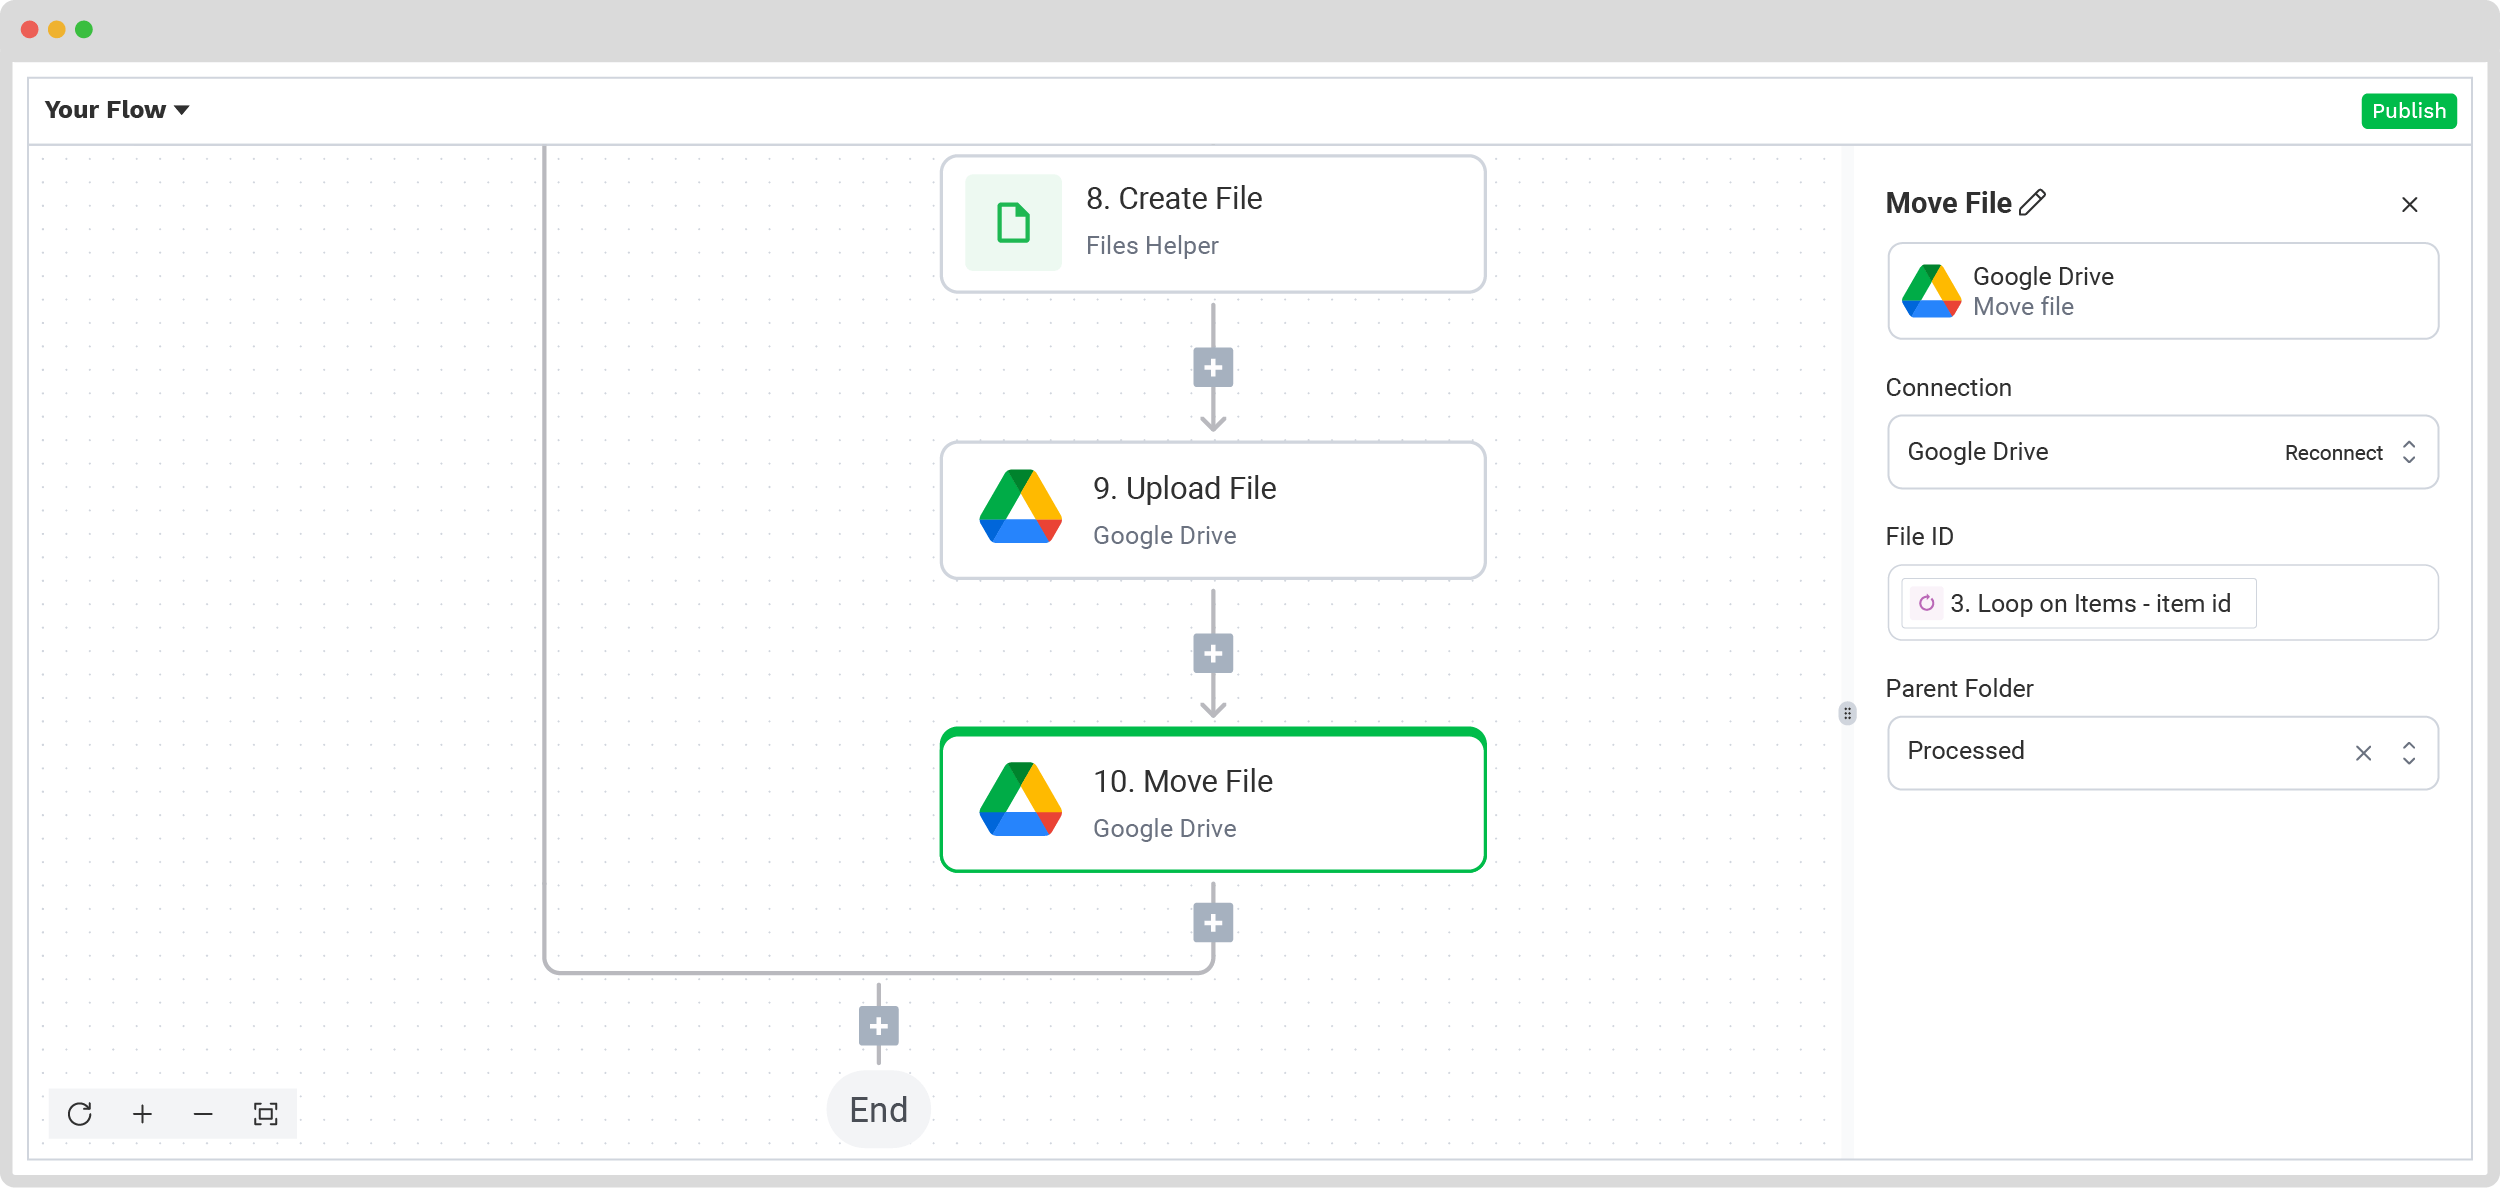
Step 11: Move the file
The final step of the process is telling the platform to move the files which were already been processed. For this, click the + button and look for Google Drive -> Move file. As usual, connect it with the platform and configure it like this:
- For File ID: Loop on items -> item -> id.
- For Parent folder: The folder where you want the already-processed files to be moved to.
And remember: if you’re processing a high volume of documents, you don’t have to set up the flow yourself! Feel free to reach out to us because we’d love to help you out!
And it’s done! With only a few quick clicks, your PDF files are now effortlessly converted in bulk into a ready-to-use Excel spreadsheet. Without any manual work or any processing limits. So, knowing all this, which method are you going to choose?
How to Get Started with Klippa’s Bulk PDF to Excel Conversion
Klippa DocHorizon is a powerful Intelligent Document Processing (IDP) platform that lets you fully automate the conversion of PDF files into Excel files in bulk, or any other format critical to your daily business operations.
By combining different Klippa DocHorizon modules and integrating them seamlessly with your favorite applications, you can build a workflow that perfectly fits your needs.
Here’s what you can do with Klippa DocHorizon:
- Data extraction: Instantly extract data from any type of PDF invoice, with high accuracy and speed.
- Document conversion: Effortlessly convert PDF invoices into business-ready formats like JSON, XLSX, CSV, TXT, XML, and more.
- Data anonymization: Stay compliant by automatically anonymizing privacy-sensitive information, such as personal details and contact data.
- Document verification: Detect and prevent fraud with automatic document authentication and fraud detection mechanisms.
- Human-in-the-Loop: Maximize data quality with our human-in-the-loop option, letting you verify output internally or rely on Klippa’s expert data annotation team for near-perfect results.
- GDPR and ISO compliance: Keep your data secure with document workflows fully compliant with HIPAA, GDPR, and ISO standards.
Are you convinced and ready to streamline your PDF-to-Excel workflows? Contact our experts today or schedule a free demo below!
FAQ
For businesses that regularly handle large volumes of documents, converting PDF files to Excel in bulk offers several strategic advantages, such as time savings, data accessibility, improved accuracy, scalability, cost reduction, and data compliance.
Bulk conversion is perfect for processing invoices, financial reports, contracts, surveys, and HR documents. It helps businesses organize data faster, improve accuracy, and simplify compliance or audit preparation.
Yes, Klippa DocHorizon supports both native (digital) and scanned PDFs. Its advanced Optical Character Recognition (OCR) technology ensures accurate data extraction from various PDF types.
Klippa employs AI-driven data extraction complemented by a Human-in-the-Loop feature, allowing for manual verification to achieve near-perfect accuracy.